Documentation Index
Fetch the complete documentation index at: https://docs.encord.com/llms.txt
Use this file to discover all available pages before exploring further.
Data Management and Curation
STEP 1: Register Cloud Data with Encord
Create a Cloud Integration
Select your cloud provider.Create a Folder
You must create a folder in Index to store your files.- Navigate to Files under the Index heading in the Encord platform.
- Click the + New folder button to create a new folder. Select the type of folder you want to create.

- Give the folder a meaningful name and description.
- Click Create to create the folder. The folder is listed in Files.
Create JSON or CSV for Registration
To register files from cloud storage with Encord, you must create a JSON or CSV file specifying the files you want to register. All types of data (videos, images, image groups, image sequences, and DICOM) from a private cloud are added to a Dataset in the same way, by using a JSON or CSV file. The file includes links to all images, image groups, videos and DICOM files in your cloud storage.- Up to 1 million URLs
- A maximum of 500,000 items (e.g. images, image groups, videos, DICOMs)
- URLs can be up to 16 KB in size
JSON Format
JSON Format
Create JSON file for Registration
For detailed information about the JSON file format used for import go here.The information provided about each of the following data types is designed to get you up and running as quickly as possible without going too deeply into the why or how. Look at the template for each data type, then the examples, and adjust the examples to suit your needs.skip_duplicate_urls is set to true, all object URLs that exactly match existing images/videos in the dataset are skipped.JSON for AWS
JSON for AWS
AWS JSON
Audio files
Audio files
Audio Files
The following is an example JSON file for uploading two audio files to Encord.- Template: Imports audio files with an Encord title.
- Audio Metadata: Imports one audio file with the
audiometadataflag. When theaudiometadataflag is present in the JSON file, we directly use the supplied metadata without performing any additional validation, and do not store the file on our servers. To guarantee accurate labels, it is crucial that the metadata you provide is accurate.
Text Files
Text Files
Single images
Single images
Single Images
For detailed information about the JSON file format used for import go here.The JSON structure for single images parallels that of videos.Template: Provides the proper JSON format to import images into Encord.Examples:- Data Imports the images only.
Image groups
Image groups
Image groups
For detailed information about the JSON file format used for import go here.- Image groups are collections of images that are processed as one annotation task.
- Images within image groups remain unaltered, meaning that images of different sizes and resolutions can form an image group without the loss of data.
- Image groups do NOT require ‘write’ permissions to your cloud storage.
- If
skip_duplicate_urlsis set totrue, all URLs exactly matching existing image groups in the dataset are skipped.
objectUrl_{position_number}).- Data: Imports the image groups only.
Image sequences
Image sequences
Image sequences
For detailed information about the JSON file format used for import go here.- Image sequences are collections of images that are processed as one annotation task and represented as a video.
- Images within image sequences may be altered as images of varying sizes and resolutions are made to match that of the first image in the sequence.
- Creating Image sequences from cloud storage requires ‘write’ permissions, as new files have to be created in order to be read as a video.
- Each object in the
image_groupsarray with thecreateVideoflag set totruerepresents a single image sequence. - If
skip_duplicate_urlsis set totrue, all URLs exactly matching existing image sequences in the dataset are skipped.
objectUrl_{position_number}).- Data: Imports the images groups only.
DICOM
DICOM
DICOM
For detailed information about the JSON file format used for import go here.- Each
dicom_serieselement can contain one or more DICOM series. - Each series requires a title and at least one object URL, as shown in the example below.
- If
skip_duplicate_urlsis set totrue, all object URLs exactly matching existing DICOM files in the dataset will be skipped.
.dcm file and does not have to be specific during the upload to Encord. - The first series contains only a single object URL, as it is composed of a single file.
- The second series contains 3 object URLs, as it is composed of three separate files.
- The third series contains 2 object URLs, as it is composed of two separate files.
DicomSeries file is created. This file represents the series file-set. Only DicomSeries are displayed in the Encord application. Multiple file types
Multiple file types
JSON for GCP
JSON for GCP
GCP JSON
Audio files
Audio files
Audio Files
The following is an example JSON file for uploading two audio files to Encord.- Example 1 imports audio files with an Encord title.
- Example 2 imports one audio file with the
audiometadataflag. When theaudiometadataflag is present in the JSON file, we directly use the supplied metadata without performing any additional validation, and do not store the file on our servers. To guarantee accurate labels, it is crucial that the metadata you provide is accurate.
Text Files
Text Files
Single images
Single images
Single Images
For detailed information about the JSON file format used for import go here.The JSON structure for single images parallels that of videos.Template: Provides the proper JSON format to import images into Encord.Examples:- Data Imports the images only.
- Image Metadata: Imports images with image metadata. This improves the import speed for your images.
Image groups
Image groups
Image groups
For detailed information about the JSON file format used for import go here.- Image groups are collections of images that are processed as one annotation task.
- Images within image groups remain unaltered, meaning that images of different sizes and resolutions can form an image group without the loss of data.
- Image groups do NOT require ‘write’ permissions to your cloud storage.
- If
skip_duplicate_urlsis set totrue, all URLs exactly matching existing image groups in the dataset are skipped.
objectUrl_{position_number}).- Data: Imports the image groups only.
Image sequences
Image sequences
Image sequences
For detailed information about the JSON file format used for import go here.- Image sequences are collections of images that are processed as one annotation task and represented as a video.
- Images within image sequences may be altered as images of varying sizes and resolutions are made to match that of the first image in the sequence.
- Creating Image sequences from cloud storage requires ‘write’ permissions, as new files have to be created in order to be read as a video.
- Each object in the
image_groupsarray with thecreateVideoflag set totruerepresents a single image sequence. - If
skip_duplicate_urlsis set totrue, all URLs exactly matching existing image sequences in the dataset are skipped.
objectUrl_{position_number}).- Data: Imports the images groups only.
DICOM
DICOM
DICOM
For detailed information about the JSON file format used for import go here.- Each
dicom_serieselement can contain one or more DICOM series. - Each series requires a title and at least one object URL, as shown in the example below.
- If
skip_duplicate_urlsis set totrue, all object URLs exactly matching existing DICOM files in the dataset will be skipped.
.dcm file and does not have to be specific during the upload to Encord. - The first series contains only a single object URL, as it is composed of a single file.
- The second series contains 3 object URLs, as it is composed of three separate files.
- The third series contains 2 object URLs, as it is composed of two separate files.
DicomSeries file is created. This file represents the series file-set. Only DicomSeries are displayed in the Encord application. Multiple file types
Multiple file types
JSON for Azure
JSON for Azure
Azure JSON
Audio files
Audio files
Audio Files
The following is an example JSON file for uploading two audio files to Encord.- Template: Imports audio files with an Encord title.
- Audio Metadata: Imports one audio file with the
audiometadataflag. When theaudiometadataflag is present in the JSON file, we directly use the supplied metadata without performing any additional validation, and do not store the file on our servers. To guarantee accurate labels, it is crucial that the metadata you provide is accurate.
Text Files
Text Files
Single images
Single images
Single Images
For detailed information about the JSON file format used for import go here.The JSON structure for single images parallels that of videos.Template: Provides the proper JSON format to import images into Encord.Examples:- Data Imports the images only.
- Image Metadata: Imports images with image metadata. This improves the import speed for your images.
Image groups
Image groups
Image groups
For detailed information about the JSON file format used for import go here.- Image groups are collections of images that are processed as one annotation task.
- Images within image groups remain unaltered, meaning that images of different sizes and resolutions can form an image group without the loss of data.
- Image groups do NOT require ‘write’ permissions to your cloud storage.
- If
skip_duplicate_urlsis set totrue, all URLs exactly matching existing image groups in the dataset are skipped.
objectUrl_{position_number}).- Data: Imports the image groups only.
Image sequences
Image sequences
Image sequences
For detailed information about the JSON file format used for import go here.- Image sequences are collections of images that are processed as one annotation task and represented as a video.
- Images within image sequences may be altered as images of varying sizes and resolutions are made to match that of the first image in the sequence.
- Creating Image sequences from cloud storage requires ‘write’ permissions, as new files have to be created in order to be read as a video.
- Each object in the
image_groupsarray with thecreateVideoflag set totruerepresents a single image sequence. - If
skip_duplicate_urlsis set totrue, all URLs exactly matching existing image sequences in the dataset are skipped.
objectUrl_{position_number}).- Data: Imports the images groups only.
DICOM
DICOM
DICOM
For detailed information about the JSON file format used for import go here.- Each
dicom_serieselement can contain one or more DICOM series. - Each series requires a title and at least one object URL, as shown in the example below.
- If
skip_duplicate_urlsis set totrue, all object URLs exactly matching existing DICOM files in the dataset will be skipped.
.dcm file and does not have to be specific during the upload to Encord. - The first series contains only a single object URL, as it is composed of a single file.
- The second series contains 3 object URLs, as it is composed of three separate files.
- The third series contains 2 object URLs, as it is composed of two separate files.
DicomSeries file is created. This file represents the series file-set. Only DicomSeries are displayed in the Encord application. Multiple file types
Multiple file types
JSON for OTC
JSON for OTC
OTC JSON
Audio files
Audio files
Audio Files
The following is an example JSON file for uploading two audio files to Encord.- Template: Imports audio files with an Encord title.
- Audio Metadata: Imports one audio file with the
audiometadataflag. When theaudiometadataflag is present in the JSON file, we directly use the supplied metadata without performing any additional validation, and do not store the file on our servers. To guarantee accurate labels, it is crucial that the metadata you provide is accurate.
Text Files
Text Files
Single images
Single images
Single Images
For detailed information about the JSON file format used for import go here.The JSON structure for single images parallels that of videos.Template: Provides the proper JSON format to import images into Encord.Examples:- Data Imports the images only.
- Image Metadata: Imports images with image metadata. This improves the import speed for your images.
Image groups
Image groups
Image groups
For detailed information about the JSON file format used for import go here.- Image groups are collections of images that are processed as one annotation task.
- Images within image groups remain unaltered, meaning that images of different sizes and resolutions can form an image group without the loss of data.
- Image groups do NOT require ‘write’ permissions to your cloud storage.
- If
skip_duplicate_urlsis set totrue, all URLs exactly matching existing image groups in the dataset are skipped.
objectUrl_{position_number}).- Data: Imports the image groups only.
Image sequences
Image sequences
Image sequences
For detailed information about the JSON file format used for import go here.- Image sequences are collections of images that are processed as one annotation task and represented as a video.
- Images within image sequences may be altered as images of varying sizes and resolutions are made to match that of the first image in the sequence.
- Creating Image sequences from cloud storage requires ‘write’ permissions, as new files have to be created in order to be read as a video.
- Each object in the
image_groupsarray with thecreateVideoflag set totruerepresents a single image sequence. - If
skip_duplicate_urlsis set totrue, all URLs exactly matching existing image sequences in the dataset are skipped.
objectUrl_{position_number}).- Data: Imports the images groups only.
DICOM
DICOM
DICOM
For detailed information about the JSON file format used for import go here.- Each
dicom_serieselement can contain one or more DICOM series. - Each series requires a title and at least one object URL, as shown in the example below.
- If
skip_duplicate_urlsis set totrue, all object URLs exactly matching existing DICOM files in the dataset will be skipped.
.dcm file and does not have to be specific during the upload to Encord. - The first series contains only a single object URL, as it is composed of a single file.
- The second series contains 3 object URLs, as it is composed of three separate files.
- The third series contains 2 object URLs, as it is composed of two separate files.
DicomSeries file is created. This file represents the series file-set. Only DicomSeries are displayed in the Encord application. Multiple file types
Multiple file types
JSON for AWS Multi-Region Access Point
JSON for AWS Multi-Region Access Point
Use a Multi-Region Access Point
When using a Multi-Region Access Point for your AWS S3 buckets the JSON file has to be slightly different from the examples provided. Instead of an object’s URL, objects are specified using the ARN of the Multi-Region Access Point followed by the object name. The example below shows how video files from a Multi-Region Access Point would be specified.CSV Format
CSV Format
Create CSV File for Registration
In the CSV file format, the column headers specify which type of data is being uploaded. You can add and single file format at a time, or combine multiple data types in a single CSV file.Details for each data format are given in the sections below.Videos
Videos
Videos
A CSV file containing videos should contain two columns with the following mandatory column headings:‘ObjectURL’ and ‘Video title’. All headings are case-insensitive.
-
The ‘ObjectURL’ column containing the
objectUrl. This field is mandatory for each file, as it specifies the full URL of the video resource. -
The ‘Video title’ column containing the
video_title. If left blank, the original file name is used.
| ObjectUrl | Video title |
|---|---|
| path/to/storage-location/frame1.mp4 | Video 1 |
| path/to/storage-location/frame2.mp4 | Video 2 |
| path/to/storage-location/frame3.mp4 | |
| path/to/storage-location/frame4.mp4 | Video 3 |
Single images
Single images
‘ObjectURL’ and ‘Image title’. All headings are case-insensitive.
-
The ‘ObjectURL’ column containing the
objectUrl. This field is mandatory for each file, as it specifies the full URL of the image resource. -
The ‘Image title’ column containing the
image_title. If left blank, the original file name is used.
| ObjectUrl | Image title |
|---|---|
| path/to/storage-location/frame1.jpg | Image 1 |
| path/to/storage-location/frame2.jpg | Image 2 |
| path/to/storage-location/frame3.jpg | |
| path/to/storage-location/frame4.jpg | Image 3 |
Image groups
Image groups
Image groups
A CSV file containing image groups should contain three columns with the following mandatory headings:‘ObjectURL’, ‘Image group title’, and ‘Create video’. All three headings are case-insensitive.
-
The ‘ObjectURL’ column containing the
objectUrl. This field is mandatory for each file, as it specifies the full URL of the resource. -
The ‘Image group title’ column containing the
image_group_title. This field is mandatory, as it determines which image group a file will be assigned to.
| ObjectUrl | Image group title | Create video |
|---|---|---|
| path/to/storage-location/frame1.jpg | Group 1 | false |
| path/to/storage-location/frame2.jpg | Group 1 | false |
| path/to/storage-location/frame3.jpg | Group 2 | false |
| path/to/storage-location/frame4.jpg | Group 2 | false |
Image sequences
Image sequences
Image sequences
A CSV file containing image sequences should contain three columns with the following mandatory headings: ‘ObjectURL’, ‘Image group title’, and ‘Create video’. All three headings are case-insensitive.-
The ‘ObjectURL’ column containing the
objectUrl. This field is mandatory for each file, as it specifies the full URL of the resource. -
The ‘Image group title’ column containing the
image_group_title. This field is mandatory, as it determines which image sequence a file will be assigned to. The dimensions of the image sequence are determined by the first file in the sequence. - The ‘Create video’ column. This can be left blank, as the default value is ‘true’.
| ObjectUrl | Image group title | Create video |
|---|---|---|
| path/to/storage-location/frame1.jpg | Sequence 1 | true |
| path/to/storage-location/frame2.jpg | Sequence 1 | true |
| path/to/storage-location/frame3.jpg | Sequence 2 | true |
| path/to/storage-location/frame4.jpg | Sequence 2 | true |
DICOM
DICOM
-
The ‘ObjectURL’ column containing the
objectUrl. This field is mandatory for each file, as it specifies the full URL of the resource. -
The ‘Series title’ column containing the
dicom_title. When two files are given the same title they are grouped into the same DICOM series. If left blank, the original file name is used.
| ObjectUrl | Series title |
|---|---|
| path/to/storage-location/frame1.dcm | dicom series 1 |
| path/to/storage-location/frame2.dcm | dicom series 1 |
| path/to/storage-location/frame3.dcm | dicom series 2 |
| path/to/storage-location/frame4.dcm | dicom series 2 |
| path/to/storage-location/frame5.dcm | dicom series 3 |
Multiple file types
Multiple file types
Multiple file types
You can upload multiple file types with a single CSV file by using a new header each time there is a change of file type. Three headings will be required if image sequences are included.The example below shows a CSV file for the following:- Two image sequences composed of 2 files each.
- One image group composed of 2 files.
- One single image.
- One video.
| ObjectUrl | Image group title | Create video |
|---|---|---|
| path/to/storage-location/frame1.jpg | Sequence 1 | true |
| path/to/storage-location/frame2.jpg | Sequence 1 | true |
| path/to/storage-location/frame3.jpg | Sequence 2 | true |
| path/to/storage-location/frame4.jpg | Sequence 2 | true |
| path/to/storage-location/frame5.jpg | Group 1 | false |
| path/to/storage-location/frame6.jpg | Group 1 | false |
| ObjectUrl | Image title | Create video |
| path/to/storage-location/frame1.jpg | Image 1 | false |
| ObjectUrl | Image title | Create video |
| full/storage/path/video.mp4 | Video 1 | false |
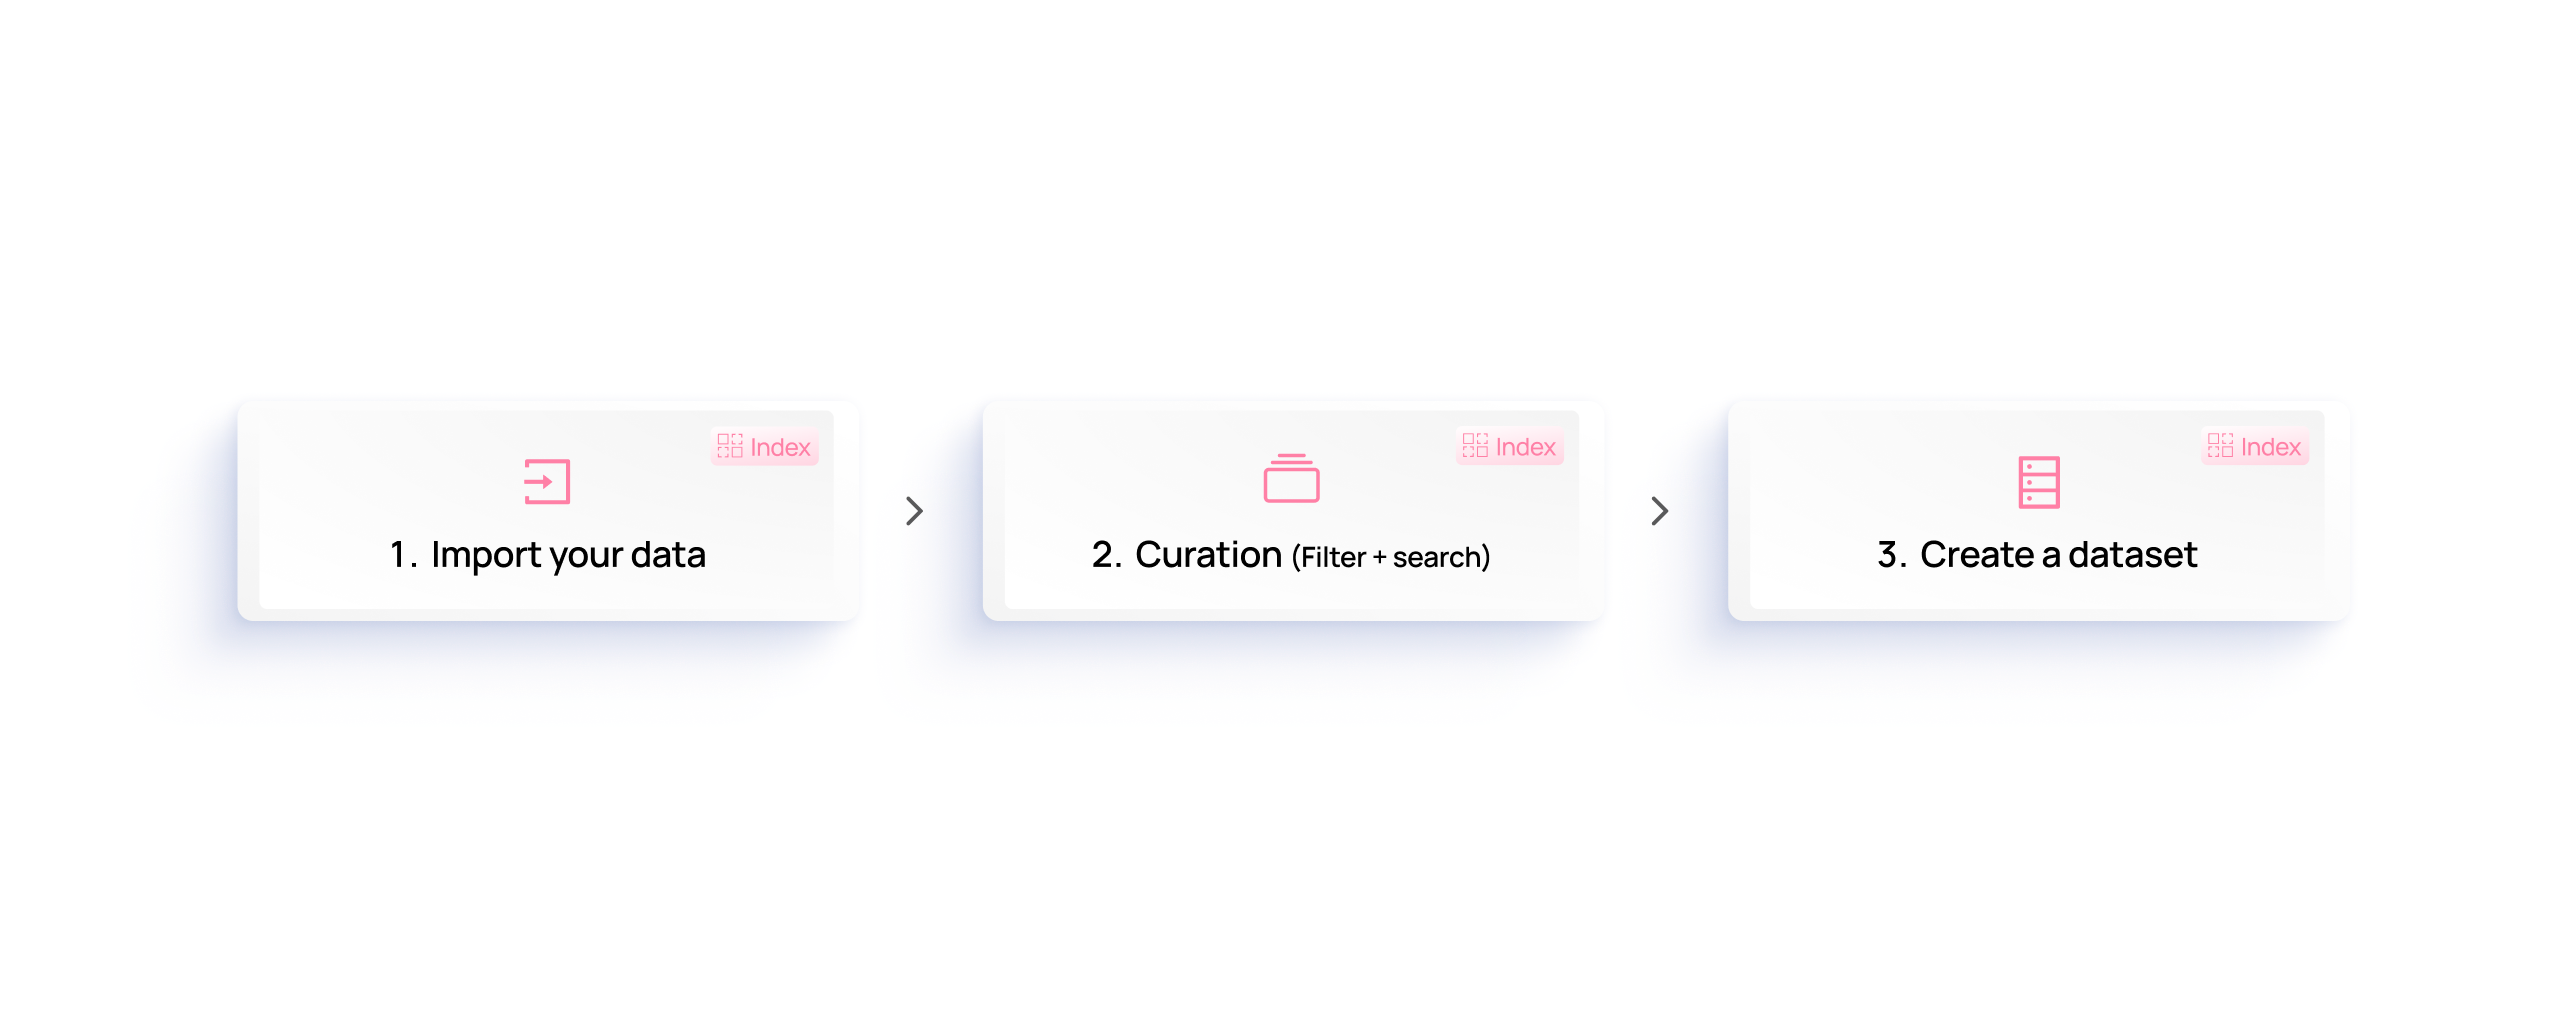
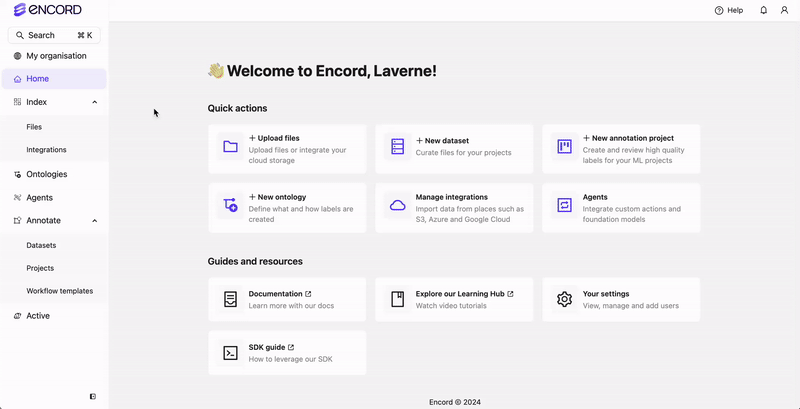
Import or Register your Data

Import Local Data
Import Local Data
Import Local Data
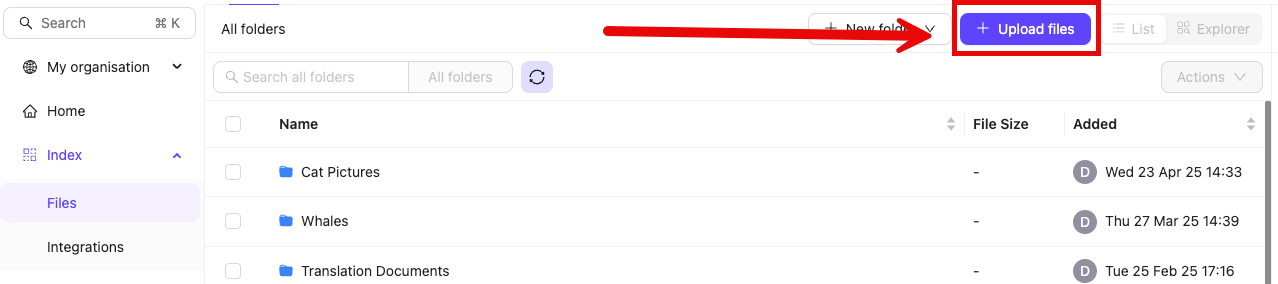
- Navigate to Files section of Index in the Encord platform.
- Click into a Folder.
- Click + Upload files. A dialog appears.
-
Click one of the following:
- Upload: Upload images, videos, and audio files.

- Batch images as: Upload image batches as image groups or image sequences.

- DICOM/NifTi: Upload DICOM or NifTi series.
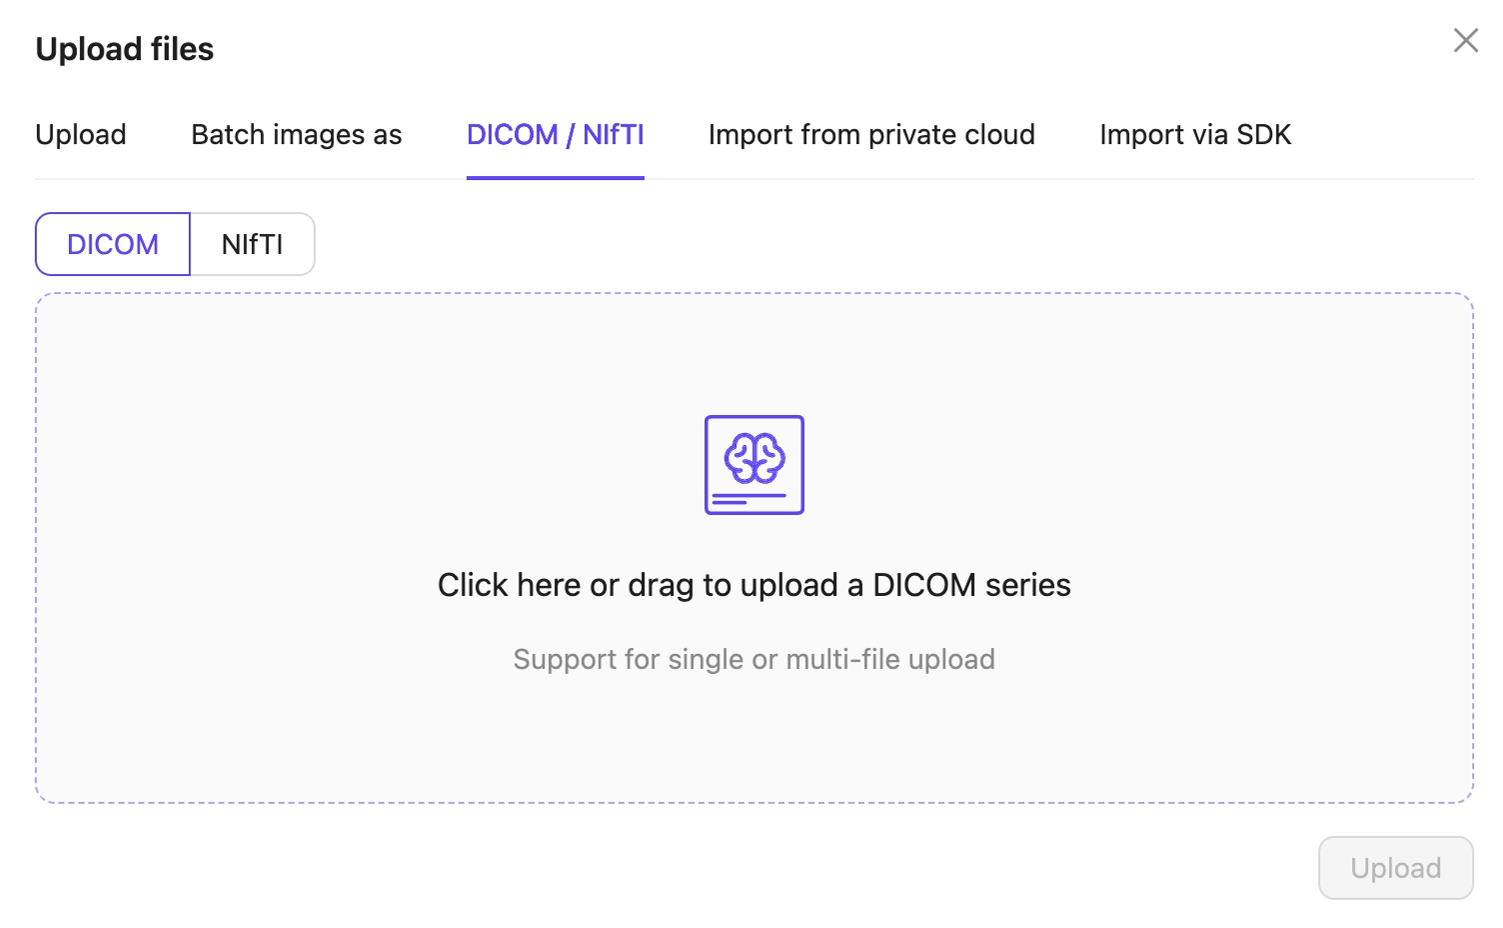
- Upload: Upload images, videos, and audio files.
- Click Upload after selecting your images or series. Your files upload into the Folder in Encord.
STEP 2: Curate your Data
Curation of your data consists of sorting, filtering, using analytics, and embedding plots to create one or more Collections. Collections can then be made into a Dataset for use with your Annotate and Active Projects.Filter and Sort Data
File Quality Metrics
File Quality Metrics
| Criteria | Description |
|---|---|
| File Size | Filters files (video) based on their size in bytes. |
| Random Value | Filters files (video) based on a random value assigned as the file is added to Index. |
Video Quality Metrics
Video Quality Metrics
| Criteria | Description |
|---|---|
| Area | Filters videos based on the area of the frame. |
| Aspect Ratio | Filters videos based on the aspect ratio of the video. |
| Clip Duration | Filters videos based on the duration of the video by hundredths of seconds. |
| Frame per Second | Filters videos based on the frames per second of the video. |
| Height | Filters videos based on the height of the video frame. |
| No. of Video Frames | Filters videos based on the number of frames in the video. |
| Random Value | Filters videos based on a random value assigned as the file is added to Index. |
| Width | Filters videos based on the width of the video. |
Frame Quality Metrics
Frame Quality Metrics
| Criteria | Description |
|---|---|
| Area | Filters images/video frames based on the area of the frame. |
| Aspect Ratio | Filters images/video frames based on the aspect ratio of the video. |
| Frame Number | Filters images/video frames based on the height of the video frame. |
| Height | Filters images/video frames based on the height of the video frame. |
| Random Value | Filters images/video frames based on a random value assigned as the file is added to Index. |
| Width | Filters images/video frames based on the width of the video. |
Audio Quality Metrics
Audio Quality Metrics
| Criteria | Description |
|---|---|
| Bit Depth | Filters audio files based on the size of each sample (int) in bits. |
| Duration | Filters audio files based on the duration of the audio file by hundredths of seconds. |
| Number of Channels | Filters audio files based on number of audio channels in the audio file. |
| Random Value | Filters audio files based on a random value assigned as the file is added to Index. |
| Samples per Second | Filters audio files based on the number of samples per second. |
Custom Metadata, Custom Embeddings, Key Frames
Custom Metadata, Custom Embeddings, Key Frames
| Criteria | Description |
|---|---|
| Custom Metadata | Filters files by any custom metadata available on your data. |
| Custom Embeddings | Filters files by any custom embeddings available on your data. |
| Key Frames | VIDEO ONLY Filters files by any key frames specified on frames in your video data. Specifying key frames on videos significantly speeds up importing videos in to Index. Index imports videos at 1 FPS by default. |
Other Filtering Criteria
Other Filtering Criteria
| Criteria | Description |
|---|---|
| Collection | Filters files by the Collection the files belong to. |
| Data Title | Filters files their file name. |
| Data Type | Filters files their file type: Video, Audio, Image, Image Group, Image Sequence, DICOM Series |
| File ID | Filters files their unique file ID. |
| Folder | Filters files by the Folders that contain the files. |
| Integration | Filters files by the Integrations that contain the files. |
| Mime | Filters files the file’s Mime type. |
| Storage Location | Filters files by the storage location that contains the files. |
| Uploaded At | Filters files the time and date of their upload. |
Use Custom Analytic Dashboards
Custom Embeddings and Similarity Search
 Similarity Search
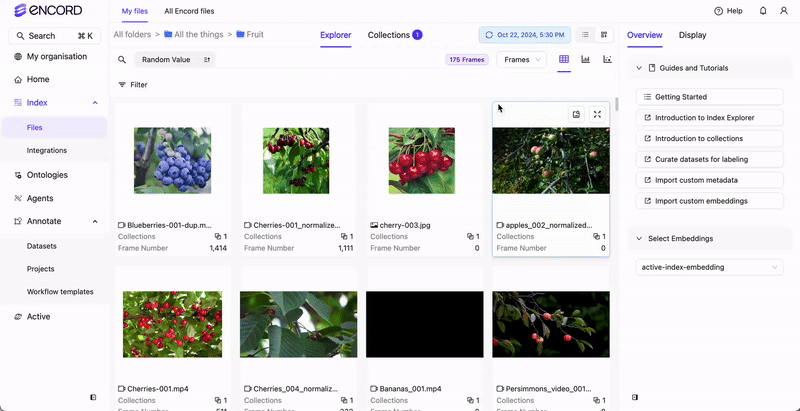
Create a Collection
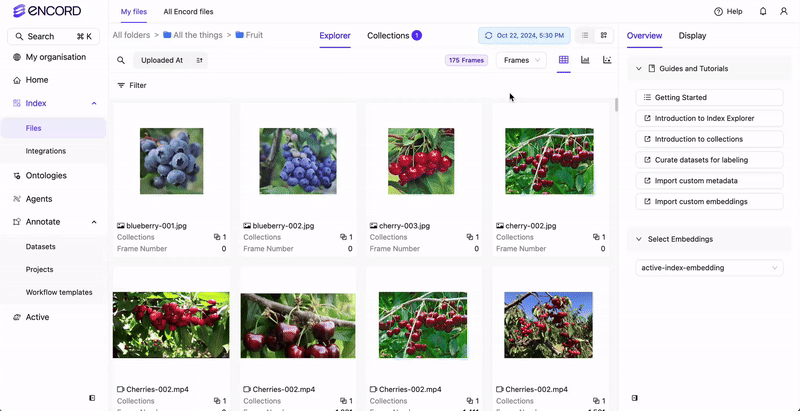
- Log in to the Encord platform. The landing page for the Encord platform appears.
- Go to Index > Files. The All folders page appears with a list of all folders in Encord.
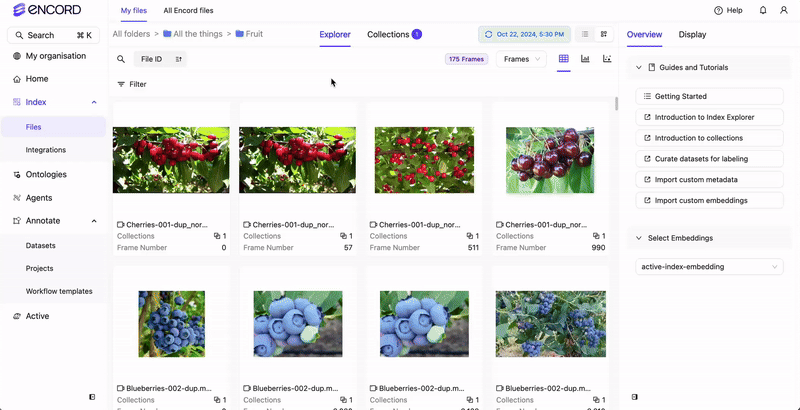
- Click in to a Folder. The landing page for the Folder appears and the Explorer button is enabled.
-
Click the Explorer button.
The Index Explorer page appears.
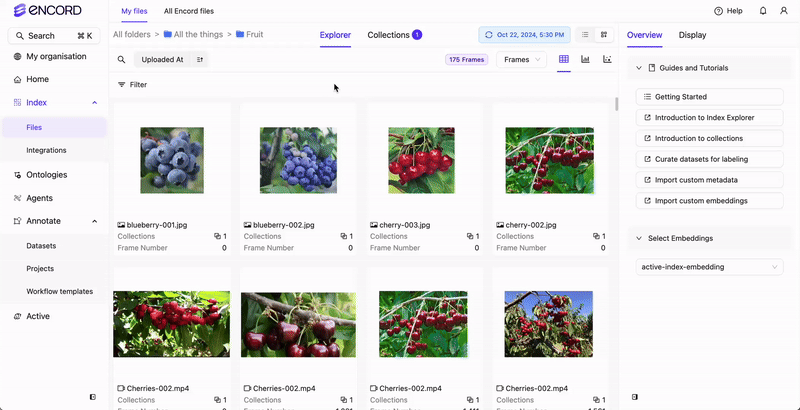
-
Search, sort, and filter your data until you have the subset of the data you need.
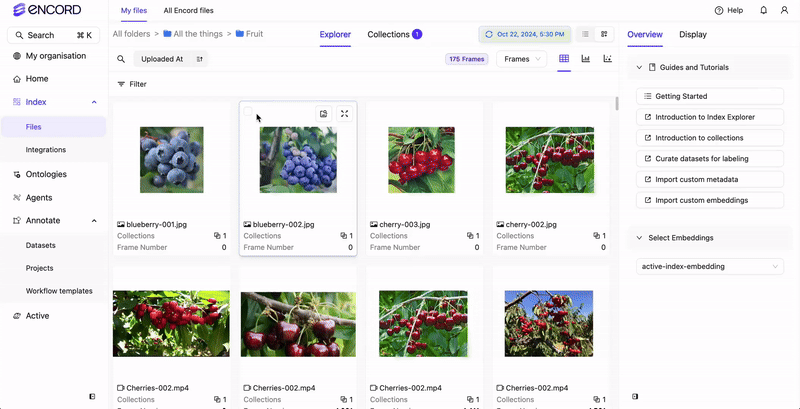
-
Select one or more of the images/frames/audio files in the Explorer workspace.
A ribbon appears at the top of the Explorer workspace.
Selecting a video frame selects the entire video. Specific frames from a video cannot be selected.

-
Click Select all to select all the files in the subset.
Use Command + A as a short cut to select all files.
- Click Add to a Collection.
- Click New Collection.
-
Specify a meaningful title and description for the Collection.
The title specified here is applied as a tag/label to every selected image.
- Click Collections to verify the Collection appears in the Collections list.