

Label Audio Files
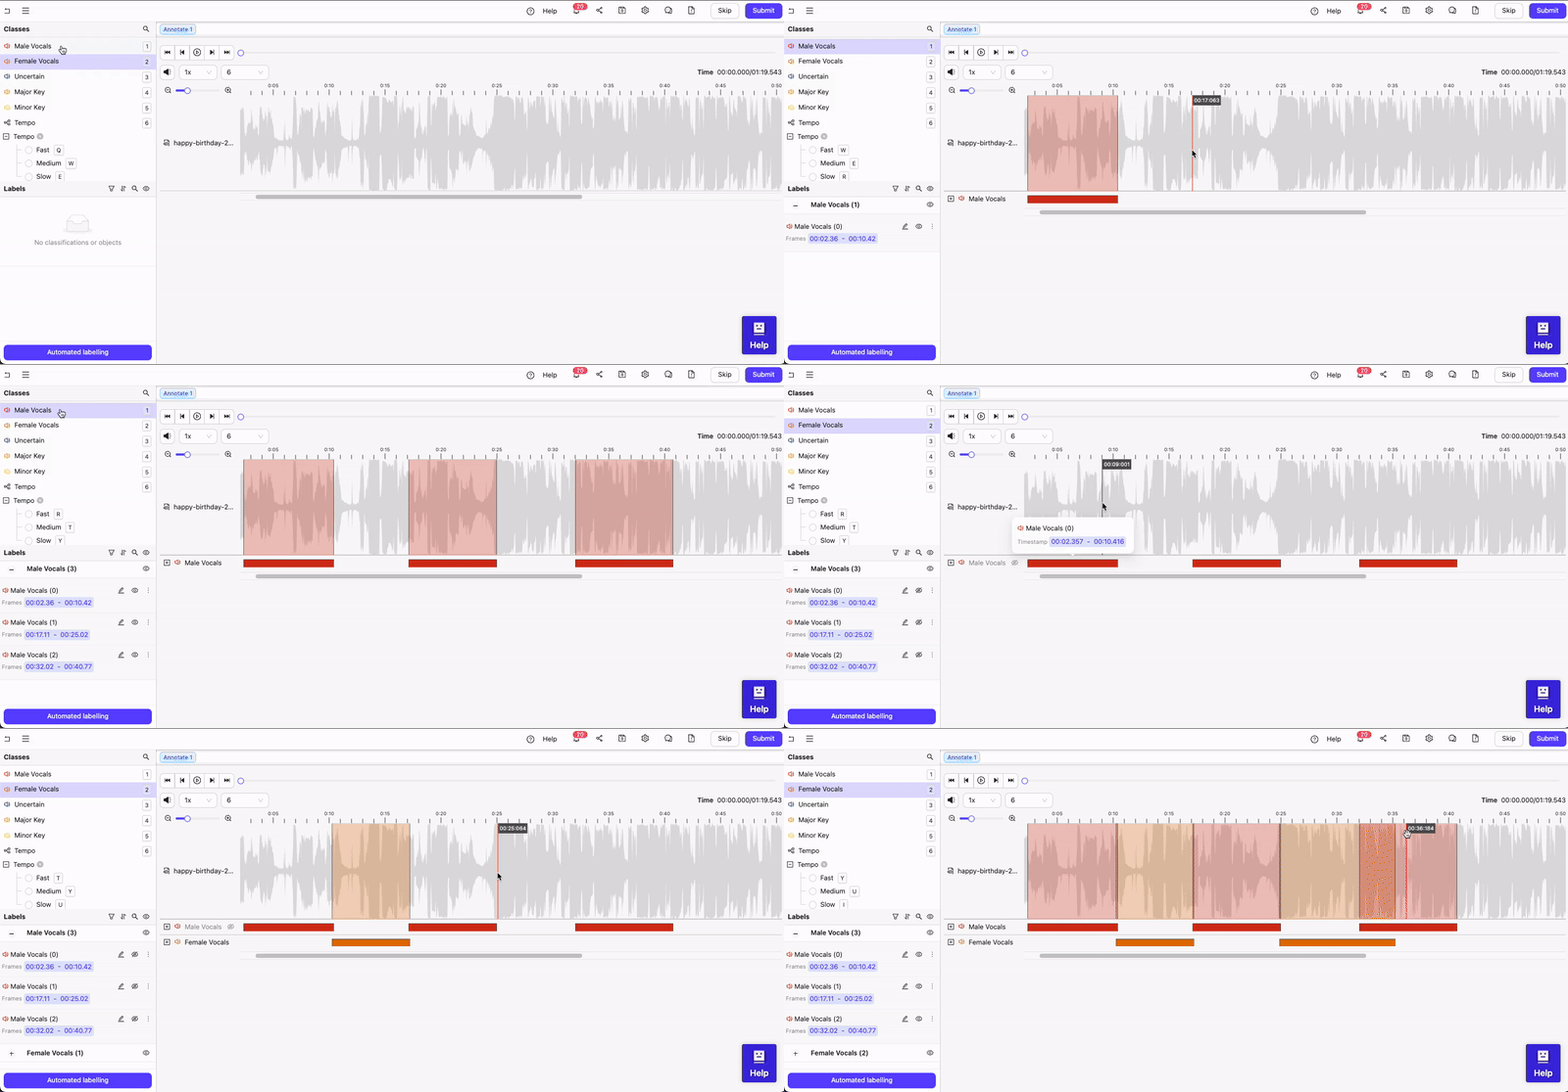
Navigate to the Queue tab of your Project and select the data unit you want to label. To label an audio region:- Select a Audio Region class from the left side menu.
- Click and drag your cursor along the waveform to apply the label between the desired start and end points. Repeat this as many times as necessary while the class is selected.
- If required, apply any attributes to the region.
- Repeat these steps for as many regions as necessary.
- Select the Classification from the left side menu.
- For radio buttons and checklists, select the value(s) you want to classification to have. For text classifications, enter the desired text.
Fill Range to the Playhead
You can quickly snap the boundary of a selected audio classification or audio region range to the current playhead (the visual marker on the timeline or waveform) position using the Fill to playhead action. This is useful when you want to extend a range to an exact point without manually dragging the timeline handle. The action automatically determines which edge to move:- If the playhead is past the end of the range, the end boundary extends to the playhead.
- If the playhead is before the start of the range, the start boundary extends to the playhead.
- If the playhead is inside the range, the action does nothing — it only ever extends a range outward, never trims it.
Fill to playhead is only available for editable ranges. The action and hotkey have no effect on read-only or locked ranges.
Editing Exact Classification Frame Ranges
When you select a classification in the left sidebar while the Label Editor is in edit mode, the frame range bounds display as editable Range start and Range end input fields instead of static text chips. This lets you type an exact frame number or timestamp to adjust a classification’s range boundary directly, without needing to drag the timeline.Editable range inputs are only available when the Label Editor is in edit mode, the classification is selected, and the label is not read-only. When these conditions are not met, the range bounds display as static text chips as before.
Propagating Dynamic Attributes Across Disjointed Object Ranges
When an object appears only on disjointed (non-contiguous) frame ranges — for example, every few frames — setting a dynamic attribute normally writes only to the end of the sub-range containing the playhead. The Propagate across gaps setting changes this behavior so that the attribute value automatically covers all later sub-ranges of the same object. To enable this setting, open Timeline settings and locate the Dynamic attributes section, then turn on Propagate across gaps. The setting is off by default. When Propagate across gaps is on:- Setting a dynamic attribute at the playhead propagates the value forward through all later sub-ranges of the object, stopping only at the next deliberately-set keyframe for that attribute.
- Editing or clearing a propagated value at any frame applies the change forward through all later sub-ranges from that point, while any deliberately-set later keyframe remains unchanged.
- For checklist attributes, each option propagates independently. Only a keyframe for the same checklist option stops propagation of that option — keyframes for other options do not affect it.
When Limit to a single frame is also enabled, it takes precedence and Propagate across gaps has no effect.
Copy-Paste Labels
You can copy and paste Audio Region labels.- Select the range(s) from the timeline.
- Press Ctrl + C (Windows) or Cmd + C (Mac) to copy.
- Click the part of the timeline you want to paste to.
- Press Ctrl + V (Windows) or Cmd + V (Mac) to paste.
Bulk Class Changes for Audio Regions
You can change the class of multiple audio regions at once using the timeline selection feature.This feature is only available for Audio Region objects in the timeline view.
-
In the audio timeline, select multiple regions by clicking and dragging across the desired regions while holding
Ctrl(Windows) orCmd(Mac). - Right-click on any of the selected regions to open the context menu.
- Select Change class from the menu.
- In the Change class modal, choose the target class you want to apply to all selected regions.
- Click the target class to confirm the change.
Audio Transcription
Navigate to the Queue tab of your Project and select the data unit you want to label.The process outlined here assumes the Admin has configured an Ontology that includes Speaker and Transcription in the same Audio region.
- Select an Audio Region class from the left side menu.
-
Perform one of the following:
- Use Timeline (Recommended): Click and drag your cursor along the Timeline under the audio file to apply the label between the desired start and end points.
When using the Timeline, click and drag your cursor at the root for the text region to create new instances of text regions. For example for multiple Speakers.- Use Waveform: Click and drag your cursor along the waveform to apply the label between the desired start and end points.
- Fill in the content for the Speaker and for Transcription to the labeled audio region as text.
- Repeat these steps for as many regions as necessary.
Transcription Pane
The Audio Transcription Pane is available when your Ontology includes at least one Transcription attribute. To access it, click the icon at the top of the Label Editor. The Transcription Pane opens on the right side, displaying all transcriptions in chronological order.
Long Audio Files
When audio files in your cloud storage are longer than an hour, the Label Editor may take extra time to load their waveforms. To significantly reduce load times, you can generate a JSON file containing the waveform data and store it alongside your audio file.- Install audiowaveform.
- Use the following command to generate a JSON file of your waveform:
The name of the JSON file must exactly match the name of your audio file. Only the file extensions differ.
- Upload the JSON file to the location of your audio file.
The JSON file MUST reside in the same cloud storage location as your audio file.For example:
- Audio File Path in Bucket : “/my-bucket/all-audio/my-favorite-song.mp3”
- Audio Waveform File Path in Bucket: “/my-bucket/all-audio/my-favorite-song.json”