

To ensure seamless data loading in Encord, allowlist https://app.encord.com/ or https://app.us.encord.com/ in any 3rd party VPNs, firewalls, or URL isolators. This helps to prevent potential issues with opening your data in Encord.
Review Mode
Introductory Video
The following video goes through the basics of reviewing visual data in the Label Editor.Review Mode Components
As a reviewer, your Label Editor workspace contains the following components:- A. Filter and search reviews
- B. Labels to review
- C. Quick toolbar
- D. Single Label Review
- E. Actions
- F. Reject and Approve buttons
- G. Editor header
- H. Issues
- I. Skip Task and Edit labels buttons
- F. Reject and Approve buttons
Videos, Image Sequences, Scenes, and Audio display a timeline in the Label Editor.
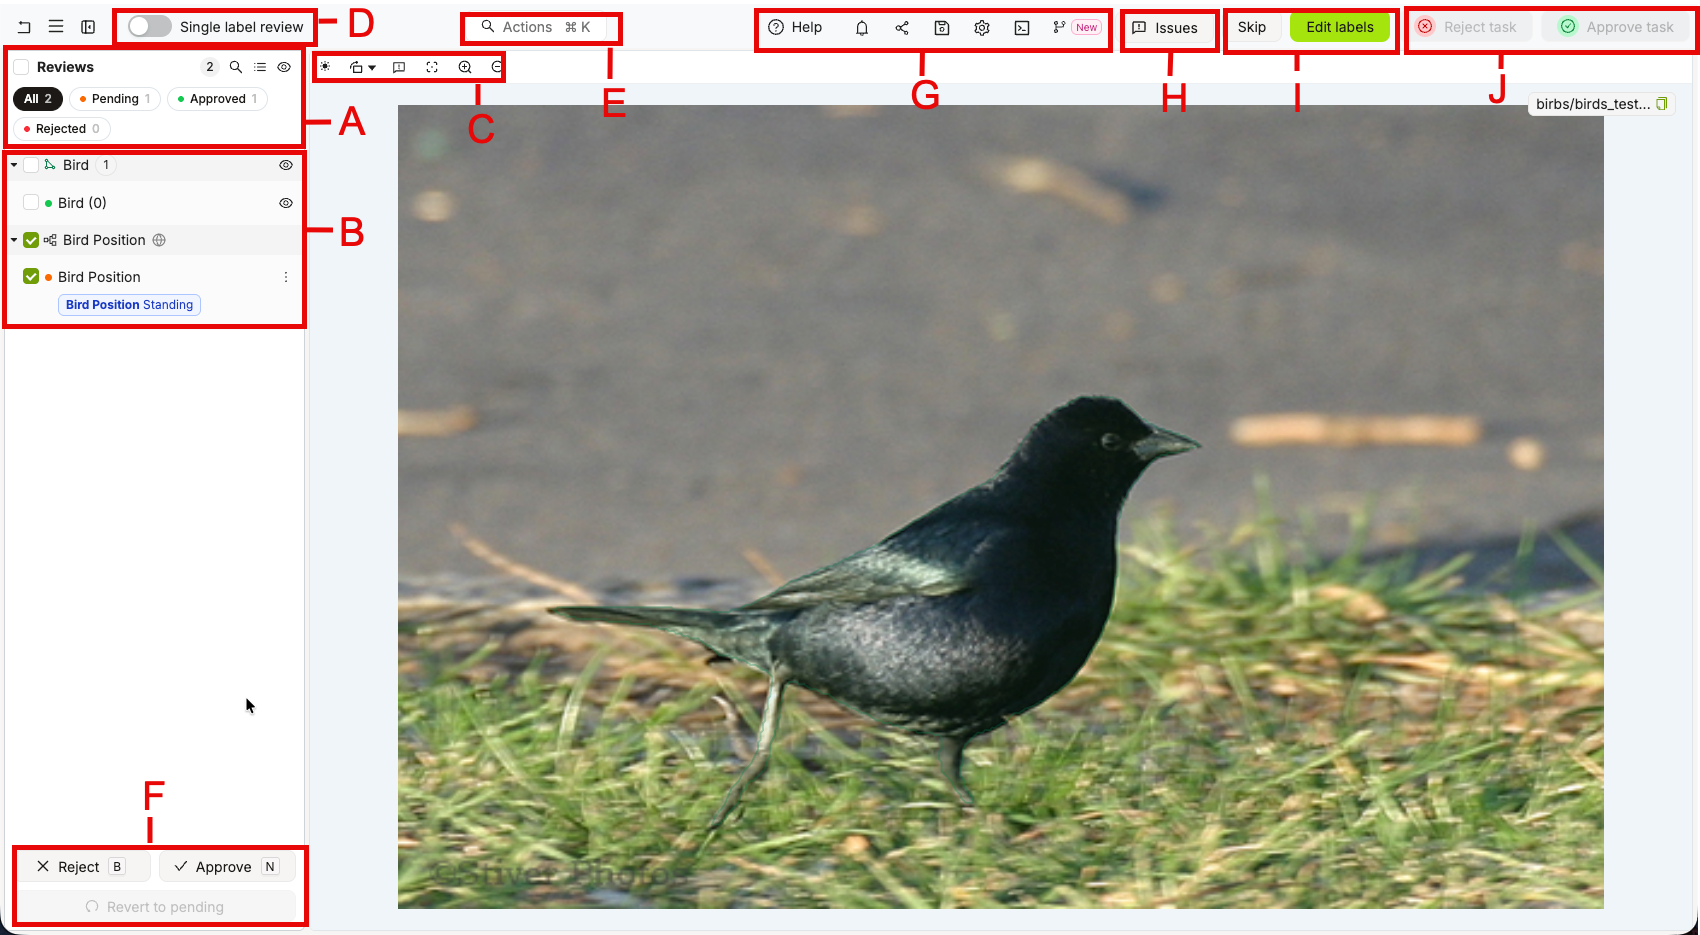
Use the show-hide labels buttons, workspace settings, and the drag and select in the workspace to speed up your approved label selection and review process.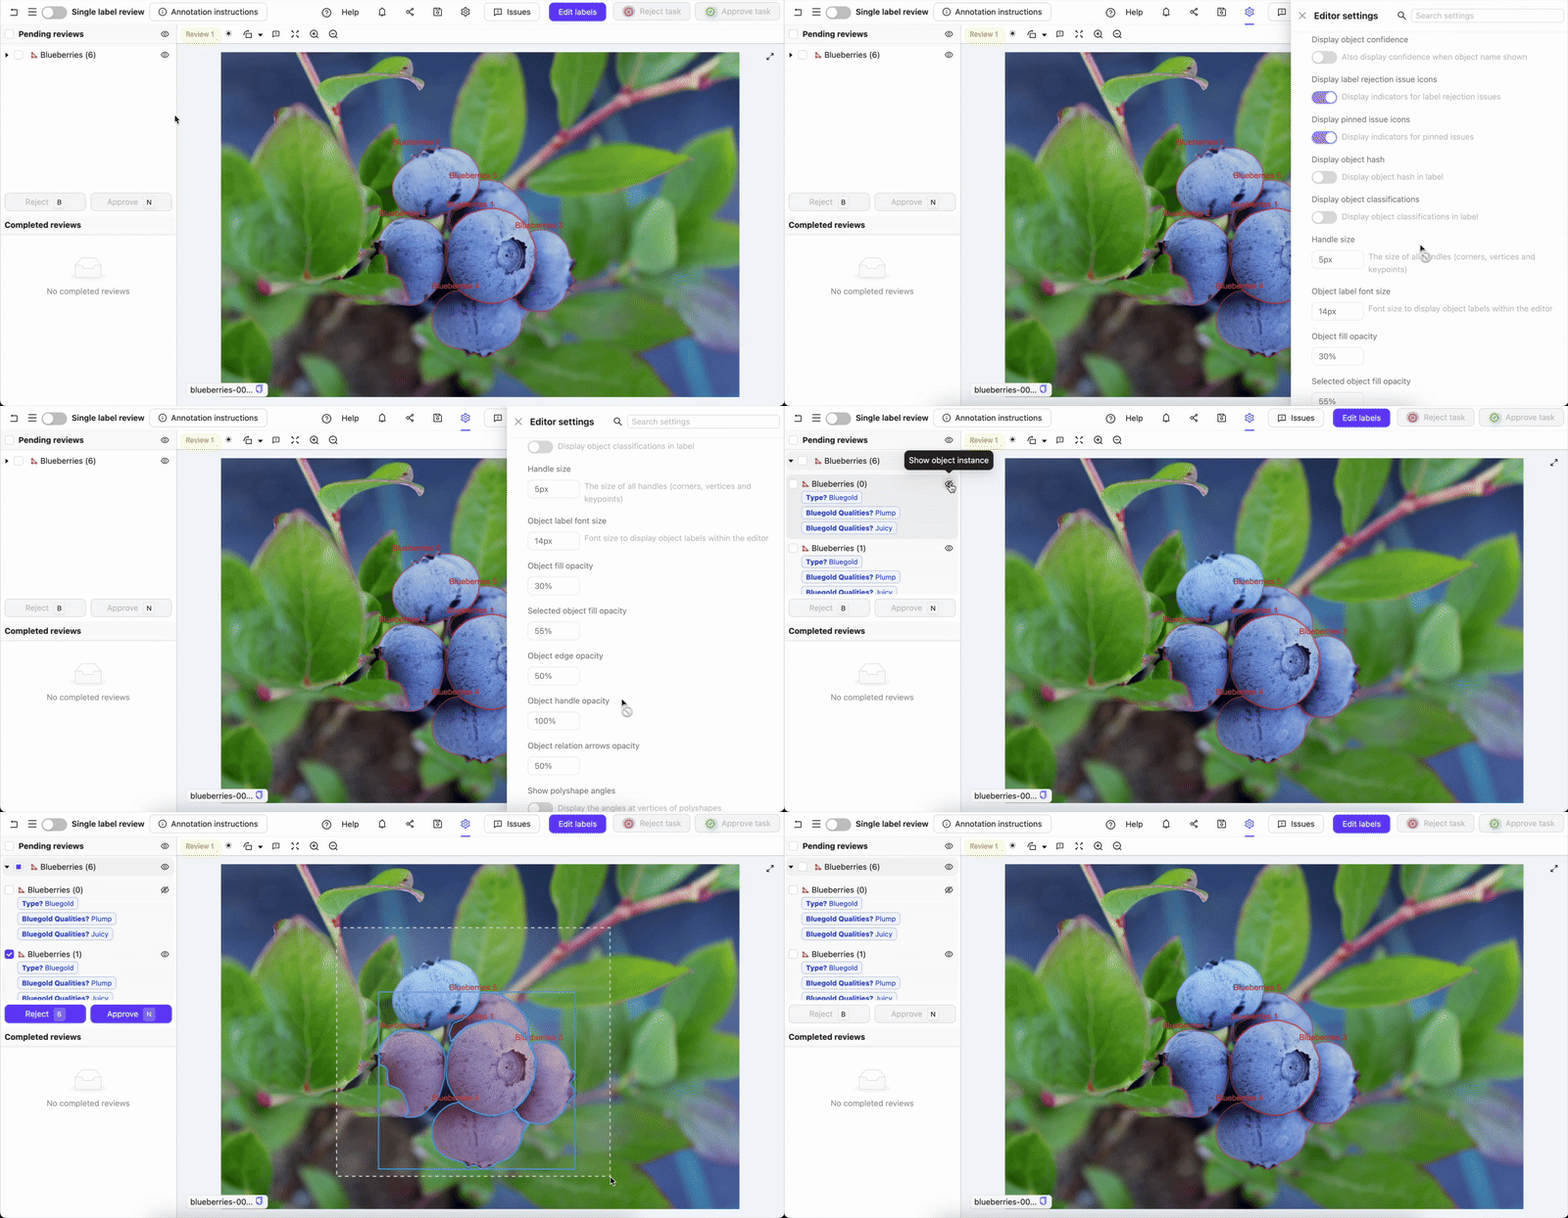
Single Label Review
The normal review mode displays all labels simultaneously, allowing you to quickly approve or reject many labels in bulk actions. Alternately, enter the Single label review mode by toggling the switch at the top left. The single label review mode automatically highlights the selected instance, and hides all other objects. This allows you to carefully review one instance at a time including their attributes, and quickly iterate through the different instances using the Up and Down keys on your keyboard or by clicking the appropriate buttons in the UI.
The Single label review feature can also be considered “turbo review mode,” analogous to the “turbo attribute mode” in annotation mode, because it allows the reviewer to quickly step through and review instance attributes. “Turbo attribute mode” in the editor settings can be disabled while in review mode.
- Open the editor settings.
- In the General settings section, adjust the Default zoom level for single label view & turbo mode value. The setting applies to the next selected label and to auto-zoom in turbo mode.
- Initially, the default is set to 60%
- 20% corresponds to no zoom. It’s the magnification at which the image or frame is displayed in the Label Editor.
- To zoom in, increase the percentage value.
- To zoom out, decrease the percentage value. The minimum value is 1%.
Skip a Review Task
In the standard and configurable Label Editors, click Skip when you cannot complete a review task. You can enter an optional reason, then click Skip task. Skipping saves your label changes and unassigns you from the task. If another review task is available, it loads in the editor; otherwise, you return to the task queue. The skip and any reason you provide are added to the task as a comment.Edit Labels During Review
It is sometimes faster, more convenient, and less error-prone to have reviewers make edits to annotations, instead of outright rejecting them. Rejection requires the return of the entire set of labels to the annotator. Edit review allows reviewers to make changes to labels, remove labels, and add new labels. Approved or rejected labels cannot be edited. Only Pending labels can be edited by reviewers. New labels made by editors are automatically approved, and cannot be changed once they have been saved. Once all labels have been approved the task moves to the Complete stage. To edit labels in review mode:- Click the Edit labels button.

- Add or remove labels, or edit existing labels as necessary using the same interface annotators use to create labels.
- Click the Save and return to review button to save your edits and return to review mode.
The Save and return to review button replaces the Save and Cancel buttons used in earlier versions of this feature.

Review Pane Filters
The review pane groups labels by Ontology class and opens with the Pending filter selected. Use Pending, Approved, Rejected, or All to filter labels by review status. Pending labels have an orange dot, approved labels have a green checkmark, and rejected labels have a red X. The same indicators appear on individual label rows. You can click a label to highlight it. Select labels and then approve or reject them individually or in bulk using the Reject and Approve buttons or the matching hotkeys, b for reject and n for approve.Approve and Reject All In Frame Buttons
The Approve all in frame and Reject all in frame buttons take the named action without having to select a particular instance or set of instances. This speeds up workflows, particularly in images, where you can judge whether all instances are correct or not by looking at an individual frame.Reject and Approve Buttons
To reject/approve multiple object instances across frames, select the instances, and then click the Reject or Approve button, as appropriate. Alternately, you may press b for reject and n for approve.Review Status Color Mode
When Label color mode (review) is set to By review status in the editor settings, labels are recolored to reflect their current review state:- Pending — orange
- Approved — green
- Rejected — red
By review status color mode and Reviewed label opacity now apply to all 3D label types in point-cloud review tasks, including cuboids, spheres, polylines, and keypoints/points. This brings 3D review workflows to visual parity with 2D review.The opacity fade applies only to filled shapes (cuboids and spheres). Polylines and keypoints/points are recolored by review status but do not fade. For full details on 3D-specific behavior, see the point cloud editor documentation.This color mode is active in both standard workflow review mode and consensus review mode. It has no effect outside a review stage.
Change Review Judgement
Video Tutorial - Strict review & change review judgment
Video Tutorial - Strict review & change review judgment

- Revert labels to pending :
- Revert an approved task to pending by clicking the green tick icon next to the instance.
- Revert a rejected task to pending by clicking the red cross icon next to the instance.
- Once the reviewer completes their review, they need to click the Approve task or Reject task to finalize the review.
Controls Common To Both Modes
Editor Timeline
The Editor timeline visualizes when objects and instances appear throughout videos, scenes, and audio files. The cursor tracks playback in real time, always reflecting the current frame. The timeline is shown by default and can be resized or hidden by dragging it up or down.Editor Header

| Icon | Name | Description |
|---|---|---|
 | Help | Links to the: quick start guide, documentation, learning hub, and Encord support team. |
 | Notifications | Shows the current status and history of actions taken in the application. This includes uploading datasets, training models, and exporting labels. |
 | Share | Copies the URL of the asset currently being labeled or reviewed. |
 | Save labels | Manually saves labels on the Encord server. |
 | Label Editor settings | Settings controlling your labeling and reviewing experience. |
 | Open metadata | Display any metadata for the current asset. |
 | Overlay label branches | Choose which label branches to display for the current asset. |
Quick Toolbar

- Display settings: adjust brightness, contrast, and gamma, or select Show grid to overlay a grid on images, image groups, and videos. In Grid settings, set the grid size in pixels, color, and opacity. Your display settings persist across sessions.
- Rotate the asset
- Pin a new Issue
- Center the asset
- Zoom in and out, view the rounded zoom percentage, and click the percentage to reset the zoom to 100% or the nearest permitted zoom limit
Actions
The actions bar allows your to search for and access any actions and features within the Label Editor, for both the Annotate and Review modes.Issues and Comments
Issues can be added to annotation and review tasks to communicate with other users. All issues contain comment threads relating to the entire task or specific sections of the task. A small notification badge on the Issues icon displays the number of unresolved issues in a task. Types of Issues:- Label rejection: Created when a reviewer rejects labels. The reviewer is prompted to provide a reason for the rejection in the form of a comment. If all instances in a frame or image are rejected, a separate rejection issue is created for each label. Labels with rejection issues display a red Issues icon next to the instance name, which turns green once the issue is resolved.
- File: Apply to the entire file and can be created at any stage within the Label Editor.
- Pinned: Apply to a specific part of the file or frame and can be created at any stage within the Label Editor. Red Pin icons indicate unresolved issues and remain red until they are marked as resolved.
- Frame: Apply to a specific frame and can be created at any stage within the Label Editor. Frame issues can only be created when multiple frames are present; such as in a video, image sequence, or DICOM volume.
- Frame range: Apply to a range of frames and can be created at any stage within the Label Editor. Frame range issues can only be created when multiple frames are present; such as in a video, image sequence, or DICOM volume. Frame range issues can only be created during label validation.
- Task requirement: Are created for each object or classification marked Required in the Ontology. The issue is resolved when the required object or classification is applied. Task requirement issues are the only issues visible in a Consensus annotate stage.
Issues cannot be created in a Consensus annotate stage.
- Open the Issues pane by clicking the Issues icon.
- Click the New issue icon (or keyboard shortcut Ctrl+N).
- Click the Apply to dropdown to select the type of issue you want to create.
- Select any Issue Tags you want to apply to the issue.
- Add a comment to the issue.
- If you selected ‘Pin on canvas’ in Step 3, click the desired location on the canvas.
- Click Create issue.
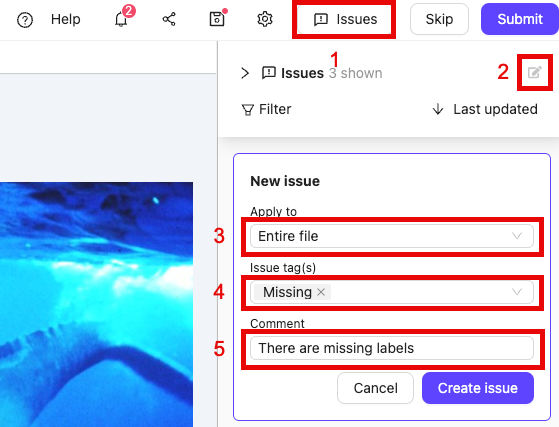
- Open the Issues pane by clicking the Issues icon.
- Click the tick to mark a thread as resolved.
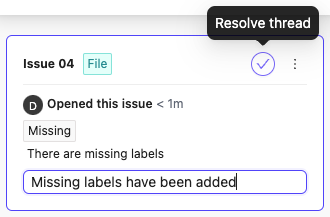
- Open the Issues pane by clicking the Issues icon.
- Click the Ellipsis icon to show more options.
- Click Delete thread.
Users can only delete issues that they created. Label rejections cannot be deleted, only resolved.
- Open the Issues pane by clicking the Issues icon.
- Click Reopen on an issue that was previously resolved.
- Ask questions: Annotators and reviewers can ask questions about the task. Admins can use this feedback to improve guidance.
- Explain task rejection: Reviewers can provide reasons for rejection, helping annotators avoid repeating mistakes.
- Track unresolved issues: Keep a record of open discussions that need follow-up before finalizing annotations.
Editor Lock
The ‘Editor lock’ is a safety feature we implemented to prevent several people making changes to the same file - annotators labeling, or reviewers reviewing the same data unit. A warning is triggered in two cases:- When you have the same task open in two different tabs or browser windows:

- When a different user is editing the same task:
