- SAM 3: Automatically detect and track one or more objects.
- SAM 2: Automatically detect objects and track one or more objects.
- Interpolation: Tracking objects between a range of frames.
- Agents: Automatically detect and track objects.
SAM 3
SAM 3 allows you to label and track one or more objects in a data unit. You can also use prompts to SAM 3 to help with labeling.Label one object
Labeling one object is the same for images and videos.
- Go to Annotate > Projects.
- Click a Project from the Project list.
- OPTIONAL: Filter the data units as required from the Queue.
- Click Start task, Initiate, or use the keyboard shortcut Command + Enter in the Queue. The Label Editor appears.
- Click the Toggle auto-annotation button for the object class from the Classes list. A dialog appears for SAM 3.
- Select Single object, if it is not selected.
- Click on an object in your image or video.
- Click Save.
- Continue labeling as required.
- Click Submit to submit the task.
Track one object
You can track objects in videos or image sequences.Track while creating new labels
Track while creating new labels
- Go to Annotate > Projects.
- Click a Project from the Project list.
- OPTIONAL: Filter the data units as required from the Queue.
- Click Start task, Initiate, or use the keyboard shortcut Command + Enter in the Queue. The Label Editor appears.
- Click the Toggle auto-annotation button for the object class from the Classes list. A dialog appears for SAM 3.
- Select Single object, if it is not selected.
- Click on an object in your image or video.
- Specify the number of frames to track the object across.
- Click Track backwards or Track forwards.
- Click Save.
- Continue labeling as required.
- Click Submit when you are done labeling the task.
Track on existing labels
Track on existing labels
This task assumes you are already in the Label Editor.Method 1
- Hover over a label in the Label Editor workspace.
- Right click. A menu appears.
-
Click one of the following:
- Track forwards or use the keyboard shortcut SHIFT + T.
- Track backwards or use the keyboard shortcut SHIFT + OPTION/ALT + T.
- Click Save.
- Continue labeling/tracking objects as required.
- Click Submit to submit the task.
- Hover over a label in the Labels list. A small groups of icons appear.
- Click the kebab icon. A menu appears.
-
Click one of the following:
- Track forwards from this frame or use the keyboard shortcut SHIFT + T.
- Track backwards from this frame or use the keyboard shortcut SHIFT + OPTION/ALT + T.
- Click Save.
- Continue labeling/tracking objects as required.
- Click Submit to submit the task.
Label multiple objects
You can track objects in videos, image groups, or image sequences.
- Go to Annotate > Projects.
- Click a Project from the Project list.
- OPTIONAL: Filter the data units as required from the Queue.
- Click Start task, Initiate, or use the keyboard shortcut Command + Enter in the Queue. The Label Editor appears.
- Click the Detect all button for the object class from the Classes list.
You can also use the keyboard shortcut for the class, then click SHIFT + A, and then click Detect all > Detect all objects.
- Click Save.
- Continue labeling as required.
- Click Submit when you are done labeling the task.
Use SAM 3 prompt
- Go to Annotate > Projects.
- Click a Project from the Project list.
- OPTIONAL: Filter the data units as required from the Queue.
- Click Start task, Initiate, or use the keyboard shortcut Command + Enter in the Queue. The Label Editor appears.
- Click the Toggle auto-annotation button for the object class from the Classes list. A dialog appears for SAM 3.
- Select Detect all.
- Provide a prompt to start labeling.
- Click on an object in your image or video.
- Specify the number of frames to track the object across.
- Click Track backwards or Track forwards.
- Click Save.
- Continue labeling as required.
- Click Submit when you are done labeling the task.
Track multiple objects
You can track objects in videos or image sequences. You can track multiple objects, of multiple classes, at the same time.Track multiple objects while creating new labels
Track multiple objects while creating new labels
In this example, we’ll label multiple objects at once by class and then track all of them.
- Go to Annotate > Projects.
- Click a Project from the Project list.
- OPTIONAL: Filter the data units as required from the Queue.
- Click Start task, Initiate, or use the keyboard shortcut Command + Enter in the Queue. The Label Editor appears.
- Click the Toggle auto-annotation button for the object class from the Classes list. A dialog appears for SAM 3.
- Select Detect all.
-
Select the labels you want to track objects on by doing one of the following:
- Hold down SHIFT and select the labels to track from the Label Editor workspace or from the Labels list
- Left click and drag the area, in the Label Editor workspace, with the labels you want to track.
- Right click. A menu appears.
-
Click one of the following:
- Track forwards or use the keyboard shortcut SHIFT + T.
- Track backwards or use the keyboard shortcut SHIFT + OPTION/ALT + T.
- Click Save.
- Continue labeling and tracking as required.
- Click Submit when you are done labeling the task.
Track multiple objects on existing labels
Track multiple objects on existing labels
This task assumes you are already in the Label Editor.Method 1
-
Select the labels you want to track objects on:
- Hold down SHIFT and select the labels to track in the Label Editor workspace.
- Left click and drag the area, in the Label Editor workspace, with the labels you want to track.
- Right click. A menu appears.
-
Click one of the following:
- Track forwards or use the keyboard shortcut SHIFT + T.
- Track backwards or use the keyboard shortcut SHIFT + OPTION/ALT + T.
- Click Save.
- Continue labeling/tracking objects as required.
- Click Submit to submit the task.
- Hold down SHIFT and select labels in the Labels list.
- Move your cursor to the Label Editor workspace.
- Right click. A menu appears.
-
Click one of the following:
- Track forwards or use the keyboard shortcut SHIFT + T.
- Track backwards or use the keyboard shortcut SHIFT + OPTION/ALT + T.
- Click Save.
- Continue labeling/tracking objects as required.
- Click Submit to submit the task.
SAM 2
Label one object
Labeling one object is the same for images and videos.- Go to Annotate > Projects.
- Click a Project from the Project list.
- OPTIONAL: Filter the data units as required from the Queue.
- Click Start task, Initiate, or use the keyboard shortcut Command + Enter in the Queue. The Label Editor appears.
- Click the Toggle auto-annotation button for the object class from the Classes list. A dialog appears for SAM 2.
- Click on an object in your image or video.
- Click Save.
- Continue labeling as required.
- Click Submit to submit the task.
Track one object
You can track objects in videos or image sequences.Track while creating new labels
Track while creating new labels
- Go to Annotate > Projects.
- Click a Project from the Project list.
- OPTIONAL: Filter the data units as required from the Queue.
- Click Start task, Initiate, or use the keyboard shortcut Command + Enter in the Queue. The Label Editor appears.
- Click the Toggle auto-annotation button for the object class from the Classes list. A dialog appears.
- Click on an object in your image or video.
- Specify the number of frames to track the object across.
- Click Track backwards or Track forwards.
- Click Save.
- Continue labeling as required.
- Click Submit when you are done labeling the task.
Track on existing labels
Track on existing labels
This task assumes you are already in the Label Editor.Method 1
- Hover over a label in the Label Editor workspace.
- Right click. A menu appears.
-
Click one of the following:
- Track forwards or use the keyboard shortcut SHIFT + T.
- Track backwards or use the keyboard shortcut SHIFT + OPTION/ALT + T.
- Click Save.
- Continue labeling/tracking objects as required.
- Click Submit to submit the task.
- Hover over a label in the Labels list. A small groups of icons appear.
- Click the kebab icon. A menu appears.
-
Click one of the following:
- Track forwards from this frame or use the keyboard shortcut SHIFT + T.
- Track backwards from this frame or use the keyboard shortcut SHIFT + OPTION/ALT + T.
- Click Save.
- Continue labeling/tracking objects as required.
- Click Submit to submit the task.
Track multiple objects
You can track objects in videos or image sequences. You can track multiple objects, of multiple classes, at the same time.Track multiple objects while creating new labels
Track multiple objects while creating new labels
In this example, we’ll label multiple objects, and then track all of them.
- Go to Annotate > Projects.
- Click a Project from the Project list.
- OPTIONAL: Filter the data units as required from the Queue.
- Click Start task, Initiate, or use the keyboard shortcut Command + Enter in the Queue. The Label Editor appears.
- Click the Toggle auto-annotation button for the object class from the Classes list. A dialog appears.
- Create and edit some object labels.
-
Select the labels you want to track objects on by doing one of the following:
- Hold down SHIFT and select the labels to track from the Label Editor workspace or from the Labels list
- Left click and drag the area, in the Label Editor workspace, with the labels you want to track.
- Right click. A menu appears.
-
Click one of the following:
- Track forwards or use the keyboard shortcut SHIFT + T.
- Track backwards or use the keyboard shortcut SHIFT + OPTION/ALT + T.
- Click Save.
- Continue labeling and tracking as required.
- Click Submit when you are done labeling the task.
Track multiple objects on existing labels
Track multiple objects on existing labels
This task assumes you are already in the Label Editor.Method 1
- Select the labels you want to track objects on:
- Hold down SHIFT and select the labels to track in the Label Editor workspace.
- Left click and drag the area, in the Label Editor workspace, with the labels you want to track.
- Right click. A menu appears.
-
Click one of the following:
- Track forwards or use the keyboard shortcut SHIFT + T.
- Track backwards or use the keyboard shortcut SHIFT + OPTION/ALT + T.
- Click Save.
- Continue labeling/tracking objects as required.
- Click Submit to submit the task.
- Hold down SHIFT and select labels in the Labels list.
- Move your cursor to the Label Editor workspace.
- Right click. A menu appears.
-
Click one of the following:
- Track forwards or use the keyboard shortcut SHIFT + T.
- Track backwards or use the keyboard shortcut SHIFT + OPTION/ALT + T.
- Click Save.
- Continue labeling/tracking objects as required.
- Click Submit to submit the task.
Interpolation
Use interpolation to automatically create labels by estimating the location that labels should be created, between a start frame and an end frame.- Go to Annotate > Projects.
- Click a Project from the Project list.
- OPTIONAL: Filter the data units as required from the Queue.
- Click Start task, Initiate, or use the keyboard shortcut Command + Enter in the Queue. The Label Editor appears.
- Create a label, for an object, on a start frame.
- Move forward in the data unit to the location of the end frame.
- Click Instantiate object in frame for the object from the Labels list.
-
Do one of the following to interpolate/track between the start and end frames:
- Right click the label and click Interpolate from the menu.
- Click the kebab icon for the label in the Labels list and click Interpolate.
- Use the shortcut SHIFT + I.
- Continue creating and editing labels.
- Click Submit.
Re-Interpolate
Interpolation results can be improved by manually correcting some interpolated labels, and re-running the interpolation. Enable the Interpolation auto adjustments toggle in the Drawing settings section of the label editor settings. This ensures that only labels with a confidence score (α) less than 100% are overwritten in successive interpolations, while manual labels (α = 100%) are kept and serve as key frames.
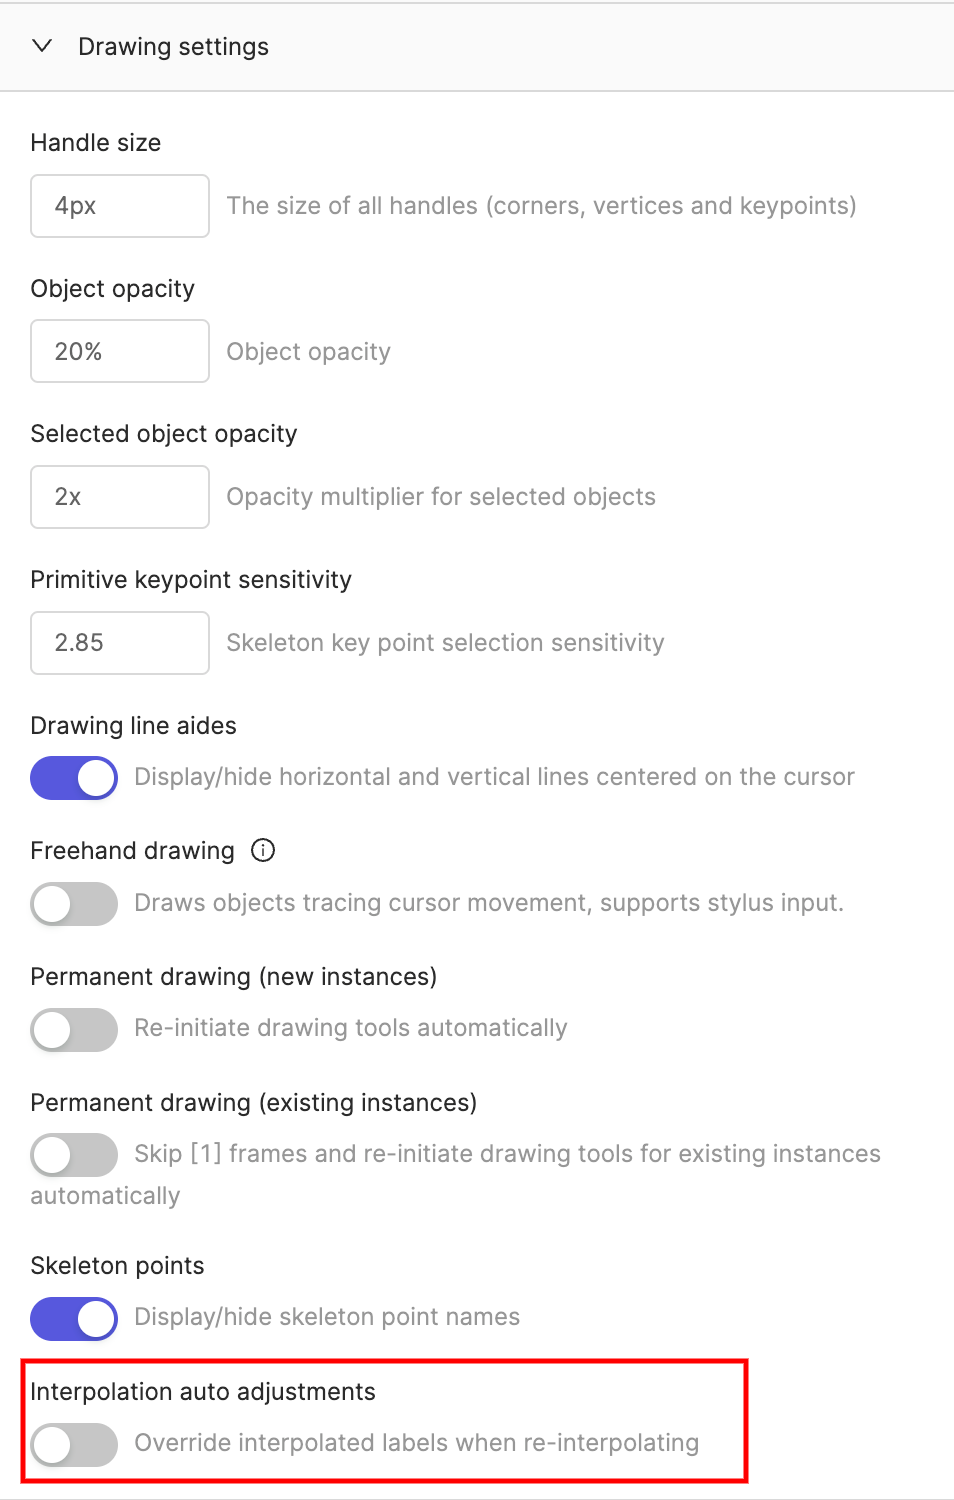
All labels created using interpolation are always assigned α = 99%.
Agents
Your Workspace/Project Admin communicates that they configured an Editor Agent to perform annotation on tasks in the Queue. You trigger the Editor Agent from inside the Label Editor.- Go to Annotate > Projects.
- Click a Project from the Project list.
- OPTIONAL: Filter the data units as required from the Queue.
- Click Start task, Initiate, or use the keyboard shortcut Command + Enter in the Queue. The Label Editor appears.
- Move the cursor to the Label Editor workspace.
- Right click. A menu appears.
- Hover over Trigger agent. A menu appears.
- Click the Agent you want to trigger.
- Edit the labels as required.
- Click Submit.