- Set up your cloud storage so Encord can access your data
- Create a cloud storage integration on Encord to link to your cloud storage
- Create a JSON or CSV file to import your data
- Create a Dataset
- Perform the registration using the JSON or CSV file
Step 1: Setup OTC Integration
Before you can do anything with the Encord platform and cloud storage, you need to configure your cloud storage to work with Encord. Once the integration between Encord and your cloud storage is complete, you can then use your data in Encord. In order to integrate with Open Telecom Cloud, you need to:- Create the account which accesses data in the Object Storage Service.
- Give the account read access to the desired buckets by:
- Creating a Custom Bucket Policy.
- (Optional) If you have Cross-origin resource sharing (CORS) configured on your buckets, make sure that
*.encord.comis given read access.
- Create the integration by giving Encord access to that account’s credentials.
Step 2: Create Encord Integration
On the Encord platform enter theAccess key ID and Secret access key, which should be located in the access key file, generated with the creation of the user. (if the access key has been misplaced, a new one can be created from the IAM User menu).
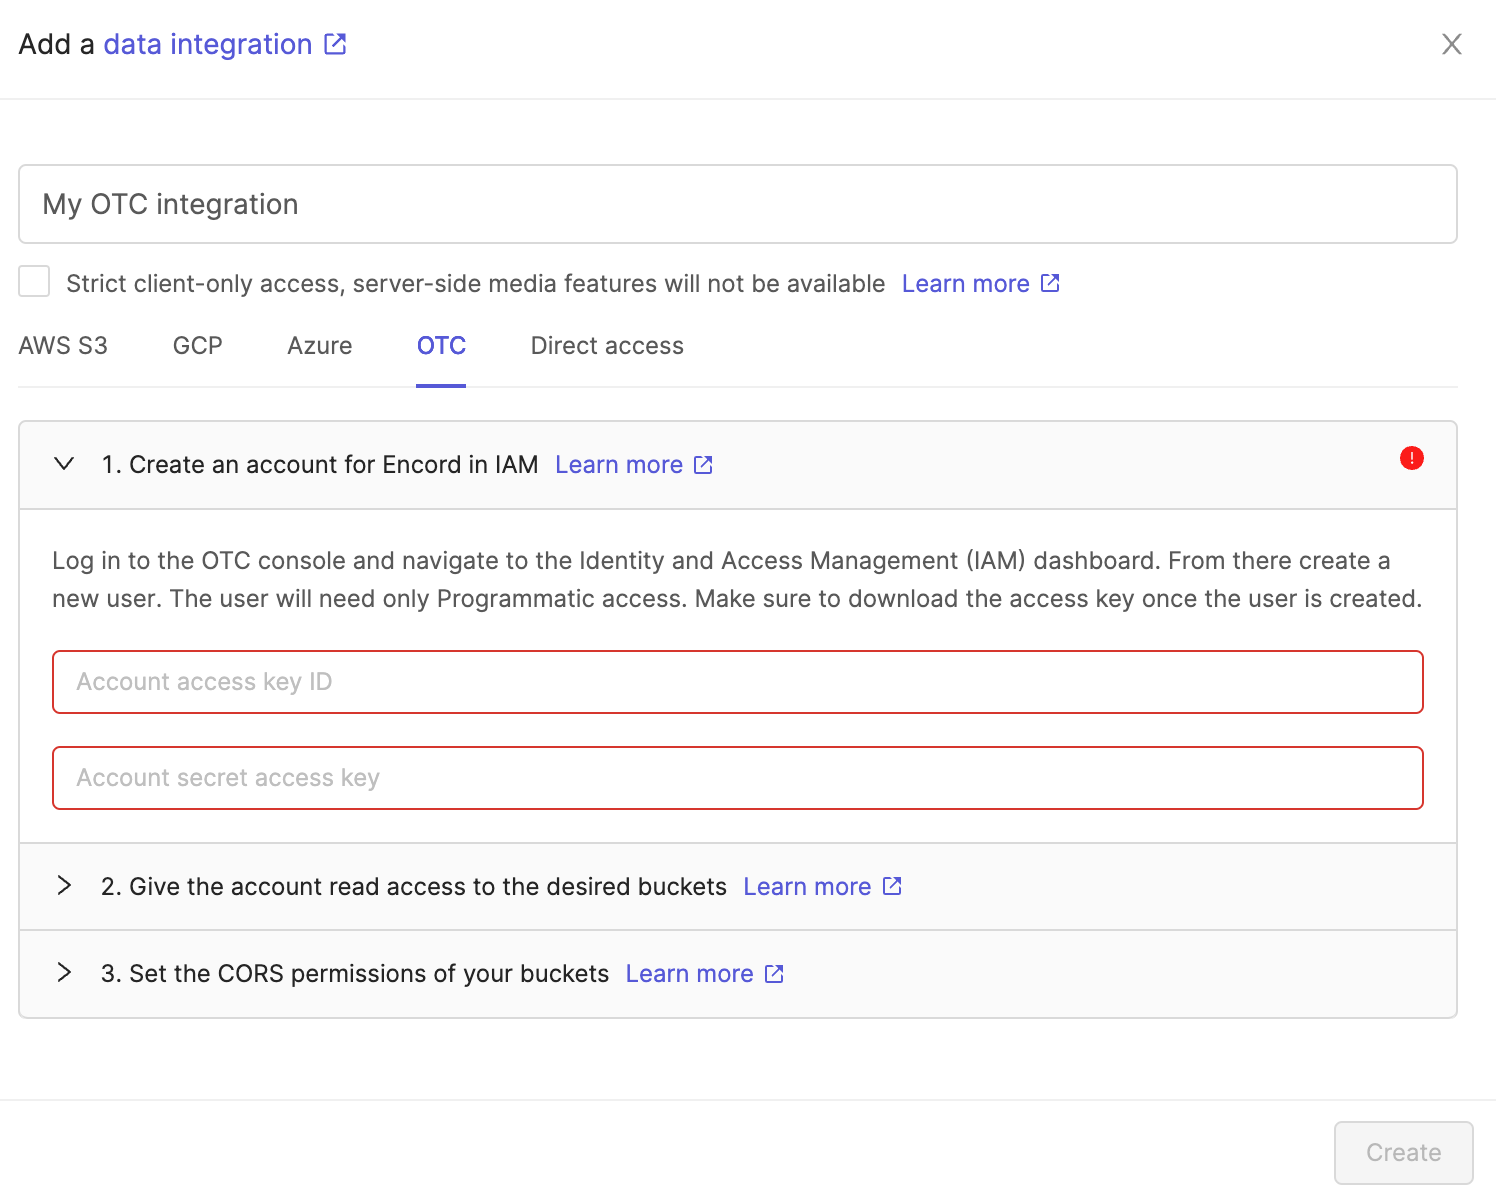 Optionally check the box to enable Strict client-only access, server-side media features will not be available if you would like Encord to sign URLs, but refrain from downloading any media files onto Encord servers. Read more about this feature here.

Step 3: Create JSON or CSV for Registration
All types of data (videos, images, image groups, image sequences, and DICOM) from a private cloud are added to a Dataset in the same way, by using a JSON or CSV file. The file includes links to all images, image groups, videos and DICOM files in your cloud storage.For a list of supported file formats for each data type, go here
Encord supports file names up to 300 characters in length for any file or video for upload.
Encord enforces the following upload limits for each JSON file used for file registration:
- Up to 1 million URLs
- A maximum of 500,000 items (e.g. images, image groups, videos, DICOMs)
- URLs can be up to 16 KB in size
Create JSON file for Registration
For detailed information about the JSON file format used for import go here. The information provided about each of the following data types is designed to get you up and running as quickly as possible without going too deeply into the why or how. Look at the template for each data type, then the examples, and adjust the examples to suit your needs.If
skip_duplicate_urls is set to true, all object URLs that exactly match existing images/videos in the dataset are skipped.Audio files
Audio files
Audio Files
The following is an example JSON file for uploading two audio files to Encord.- Template: Imports audio files with an Encord title.
- Audio Metadata: Imports one audio file with the
audiometadataflag. When theaudiometadataflag is present in the JSON file, we directly use the supplied metadata without performing any additional validation, and do not store the file on our servers. To guarantee accurate labels, it is crucial that the metadata you provide is accurate.
Text Files
Text Files
Single images
Single images
Single Images
For detailed information about the JSON file format used for import go here.The JSON structure for single images parallels that of videos.Template: Provides the proper JSON format to import images into Encord.Examples:- Data Imports the images only.
- Image Metadata: Imports images with image metadata. This improves the import speed for your images.
Image groups
Image groups
Image groups
For detailed information about the JSON file format used for import go here.- Image groups are collections of images that are processed as one annotation task.
- Images within image groups remain unaltered, meaning that images of different sizes and resolutions can form an image group without the loss of data.
- Image groups do NOT require ‘write’ permissions to your cloud storage.
- If
skip_duplicate_urlsis set totrue, all URLs exactly matching existing image groups in the dataset are skipped.
The position of each image within the sequence needs to be specified in the key (
objectUrl_{position_number}).- Data: Imports the image groups only.
Image sequences
Image sequences
Image sequences
For detailed information about the JSON file format used for import go here.- Image sequences are collections of images that are processed as one annotation task and represented as a video.
- Images within image sequences may be altered as images of varying sizes and resolutions are made to match that of the first image in the sequence.
- Creating Image sequences from cloud storage requires ‘write’ permissions, as new files have to be created in order to be read as a video.
- Each object in the
image_groupsarray with thecreateVideoflag set totruerepresents a single image sequence. - If
skip_duplicate_urlsis set totrue, all URLs exactly matching existing image sequences in the dataset are skipped.
The position of each image within the sequence needs to be specified in the key (
objectUrl_{position_number}).Encord supports up to 32,767 entries (21:50 minutes) for a single image sequence. We recommend up to 10,000 to 15,000 entries for a single image sequence for best performance. If you need a longer sequence, we recommend using video instead of an image sequence.
- Data: Imports the images groups only.
DICOM
DICOM
DICOM
For detailed information about the JSON file format used for import go here.- Each
dicom_serieselement can contain one or more DICOM series. - Each series requires a title and at least one object URL, as shown in the example below.
- If
skip_duplicate_urlsis set totrue, all object URLs exactly matching existing DICOM files in the dataset will be skipped.
Custom metadata is distinct from patient metadata, which is included in the
.dcm file and does not have to be specific during the upload to Encord. - The first series contains only a single object URL, as it is composed of a single file.
- The second series contains 3 object URLs, as it is composed of three separate files.
- The third series contains 2 object URLs, as it is composed of two separate files.
For each DICOM upload, an additional
DicomSeries file is created. This file represents the series file-set. Only DicomSeries are displayed in the Encord application.JSON for DICOM
Multiple file types
Multiple file types
You can upload multiple file types using a single JSON file. The example below shows 1 image, 2 videos, 2 image sequences, and 1 image group.
Multiple file types
Create CSV File for Registration
In the CSV file format, the column headers specify which type of data is being uploaded. You can add and single file format at a time, or combine multiple data types in a single CSV file. Details for each data format are given in the sections below.Encord supports up to 10,000 entries for upload in the CSV file.
Videos
Videos
Videos
A CSV file containing videos should contain two columns with the following mandatory column headings:‘ObjectURL’ and ‘Video title’. All headings are case-insensitive.
-
The ‘ObjectURL’ column containing the
objectUrl. This field is mandatory for each file, as it specifies the full URL of the video resource. -
The ‘Video title’ column containing the
video_title. If left blank, the original file name is used.
| ObjectUrl | Video title |
|---|---|
| path/to/storage-location/frame1.mp4 | Video 1 |
| path/to/storage-location/frame2.mp4 | Video 2 |
| path/to/storage-location/frame3.mp4 | |
| path/to/storage-location/frame4.mp4 | Video 3 |
Single images
Single images
A CSV file containing single images should contain two columns with the following mandatory headings:
‘ObjectURL’ and ‘Image title’. All headings are case-insensitive.
‘ObjectURL’ and ‘Image title’. All headings are case-insensitive.
-
The ‘ObjectURL’ column containing the
objectUrl. This field is mandatory for each file, as it specifies the full URL of the image resource. -
The ‘Image title’ column containing the
image_title. If left blank, the original file name is used.
| ObjectUrl | Image title |
|---|---|
| path/to/storage-location/frame1.jpg | Image 1 |
| path/to/storage-location/frame2.jpg | Image 2 |
| path/to/storage-location/frame3.jpg | |
| path/to/storage-location/frame4.jpg | Image 3 |
Image groups
Image groups
Image groups
A CSV file containing image groups should contain three columns with the following mandatory headings:‘ObjectURL’, ‘Image group title’, and ‘Create video’. All three headings are case-insensitive.
-
The ‘ObjectURL’ column containing the
objectUrl. This field is mandatory for each file, as it specifies the full URL of the resource. -
The ‘Image group title’ column containing the
image_group_title. This field is mandatory, as it determines which image group a file will be assigned to.
| ObjectUrl | Image group title | Create video |
|---|---|---|
| path/to/storage-location/frame1.jpg | Group 1 | false |
| path/to/storage-location/frame2.jpg | Group 1 | false |
| path/to/storage-location/frame3.jpg | Group 2 | false |
| path/to/storage-location/frame4.jpg | Group 2 | false |
Image groups do not require ‘write’ permissions.
Image sequences
Image sequences
Image sequences
A CSV file containing image sequences should contain three columns with the following mandatory headings: ‘ObjectURL’, ‘Image group title’, and ‘Create video’. All three headings are case-insensitive.-
The ‘ObjectURL’ column containing the
objectUrl. This field is mandatory for each file, as it specifies the full URL of the resource. -
The ‘Image group title’ column containing the
image_group_title. This field is mandatory, as it determines which image sequence a file will be assigned to. The dimensions of the image sequence are determined by the first file in the sequence. - The ‘Create video’ column. This can be left blank, as the default value is ‘true’.
| ObjectUrl | Image group title | Create video |
|---|---|---|
| path/to/storage-location/frame1.jpg | Sequence 1 | true |
| path/to/storage-location/frame2.jpg | Sequence 1 | true |
| path/to/storage-location/frame3.jpg | Sequence 2 | true |
| path/to/storage-location/frame4.jpg | Sequence 2 | true |
Image sequences require ‘write’ permissions against your storage bucket to save the compressed video.
DICOM
DICOM
A CSV file containing DICOM files should contain two columns with the following mandatory headings: ‘ObjectURL’ and ‘Dicom title’. Both headings are case-insensitive.
-
The ‘ObjectURL’ column containing the
objectUrl. This field is mandatory for each file, as it specifies the full URL of the resource. -
The ‘Series title’ column containing the
dicom_title. When two files are given the same title they are grouped into the same DICOM series. If left blank, the original file name is used.
| ObjectUrl | Series title |
|---|---|
| path/to/storage-location/frame1.dcm | dicom series 1 |
| path/to/storage-location/frame2.dcm | dicom series 1 |
| path/to/storage-location/frame3.dcm | dicom series 2 |
| path/to/storage-location/frame4.dcm | dicom series 2 |
| path/to/storage-location/frame5.dcm | dicom series 3 |
Multiple file types
Multiple file types
Multiple file types
You can upload multiple file types with a single CSV file by using a new header each time there is a change of file type. Three headings will be required if image sequences are included.The example below shows a CSV file for the following:- Two image sequences composed of 2 files each.
- One image group composed of 2 files.
- One single image.
- One video.
| ObjectUrl | Image group title | Create video |
|---|---|---|
| path/to/storage-location/frame1.jpg | Sequence 1 | true |
| path/to/storage-location/frame2.jpg | Sequence 1 | true |
| path/to/storage-location/frame3.jpg | Sequence 2 | true |
| path/to/storage-location/frame4.jpg | Sequence 2 | true |
| path/to/storage-location/frame5.jpg | Group 1 | false |
| path/to/storage-location/frame6.jpg | Group 1 | false |
| ObjectUrl | Image title | Create video |
| path/to/storage-location/frame1.jpg | Image 1 | false |
| ObjectUrl | Image title | Create video |
| full/storage/path/video.mp4 | Video 1 | false |
Step 4: Register Data with Encord
To use your data in Encord, it must be uploaded to the Encord Files & Folders storage. Once uploaded, your data can be reused across multiple Projects and contain no labels or annotations themselves. Files & Folders stores your data, while Projects store your labels. The following script creates a folder in Files & Folders and uses your AWS integration to register data in that folder. The following script creates a new folder in Files & Folders and initiates uploads from AWS. It works for all file types. Ensure that you:- Replace
<private_key_path>with the path to your private key. - Replace
<integration_title>with the title of the integration you want to use. - Replace
<folder_name>with the folder name. The scripts assume that the specified folder name is unique. - Replace
path/to/json/file.jsonwith the path to a JSON file specifying which cloud storage files should be uploaded. - Replace
A folder to store my fileswith a meaningful description for your folder. - Replace
"my": "folder_metadata"with any metadata you want to add to the folder.
- “Upload is still in progress, try again later!”: The registration has not finished. Run this script again later to check if the data registration has finished.
- “Upload completed”: The registration completed. If any files failed to upload, the URLs are listed.
- “Upload failed”: The entire registration failed, and not just individual files. Ensure your JSON file is formatted correctly.
Step 5: Check Registration Status
If Step 5 returns"Upload is still in progress, try again later!", run the following code to query the Encord server again. Ensure that you replace <upload_job_id> with the output by the previous code. In the example above upload_job_id=c4026edb-4fw2-40a0-8f05-a1af7f465727.
The script has several possible outputs:
- “Upload is still in progress, try again later!”: The registration has not finished. Run this script again later to check if the data registration has finished.
- “Upload completed”: The registration completed. If any files failed to upload, the URLs are listed.
- “Upload failed”: The entire registration failed, and not just individual files. Ensure your JSON file is formatted correctly.
Step 6: Create a Dataset
Creating a Dataset and adding files to a Dataset are two distinct steps. Click here to learn how to add data to an existing Dataset.
Datasets cannot be deleted using the SDK or the API. Use the Encord platform to delete Datasets.
- Substitute
<private_key_path>with the file path for your private key. - Replace “Houses” with the name you want your Dataset to have.
Step 7: Add Your Data to a Dataset
Now that you registered your data and created a Dataset, it is time to add your files to the Dataset. The following scripts add all files in a specified folder to a Dataset.- Replace
<private_key_path>with the path to your private key. - Replace
<folder_name>with the name you want to give your Storage folder. - Replace
<dataset_hash>with the hash of the Dataset you want to add the data units to.
Files added to the folder at a later time will not be automatically added to the Dataset.
All files
Step 8: Verify your files are in the Dataset
After adding your files to the Dataset, verify that all the files you expect to be there made it into the Dataset. The following script prints the URLs of all the files in a Dataset. Ensure that you:- Replace
<private_key_path>with the path to your private key. - Replace
<dataset_hash>with the hash of your Dataset.
Sample Code