- Filtering and sorting in Index and Active.
- Creating custom Label Editor layouts based on metadata.
Prerequisites
Before you can filter your data or create a Collection based on your data’s custom metadata, the custom metadata must exist in your Annotate Project.This content applies to custom metadata (
clientMetadata), which is the metadata associated with individual data units. This is distinct from videoMetadata that is used to specify video parameters when using Strict client-only access. It is also distinct from patient metadata in DICOM files.clientMetadata) is accessed by specifying the dataset using the <dataset_hash>. All Projects that have the specified Dataset attached contain custom metadata.
READ THIS FIRST
While not required, we strongly recommend importing a metadata schema before importing custom metadata into Encord. The process we recommend:- Import a metadata schema. If a metadata schema already exists, you can import metadata. You can run a small piece of code to verify that a metadata schema exists
- Import your custom metadata.
Performing multiple schema imports overwrites the current schema with the new schema.
Import Custom Metadata
Importing custom metadata (clientMetadata) for any data type follows a similar format. But there are important differences for each data type.Videos
Videos
Videos
The following table provides some guidance for the examples provided after the table.| Title | Description |
|---|---|
| Template | Provides the proper JSON format to import videos into Encord. This template provides examples from the most basic to the most complex. |
| Data | Imports videos into Encord. Why would I do this?
|
| Key Frames | Imports videos with an Encord title and specifies key frames (frames of interest) for Active and Index. Why would I do this?
config is optional when specifying key frames for Active and Index:config is not specified, the sampling_rate is 1 frame per second, and the keyframe_mode is frame. |
| Custom Metadata | Imports videos with an Encord title, specifies key frames (frames of interest), and custom metadata for Active and Index.
Why would I do this?
config is optional when specifying key frames for Active and Index:config is not specified, the sampling_rate is 1 frame per second, and the keyframe_mode is frame. |
| Embeddings | Imports videos with an Encord title, specifies key frames (frames of interest), custom metadata, and custom embeddings for Active and Index. This example includes the following custom metadata types: boolean, varchar, datetime, uuid, number. Why would I do this?
config is optional when specifying custom embeddings for Active and Index:config is not specified, the sampling_rate is 1 frame per second, and the keyframe_mode is frame. |
| Video Metadata | Imports videos with the videoMetadata flag. When the videoMetadata flag is present in the JSON file, we directly use the supplied metadata without performing any additional validation, and do not store the file on our servers. To guarantee accurate labels, it is crucial that the metadata you provide is accurate. |
Audio files
Audio files
Audio Files
The following is an example JSON file for uploading two audio files to Encord.- Template: Imports audio files with an Encord title, and with custom metadata. Custom metadata only appears in the Encord UI in Active and Index as an option to filter your data.
- Audio Metadata: Imports one audio file with the
audiometadataflag. When theaudiometadataflag is present in the JSON file, we directly use the supplied metadata without performing any additional validation, and do not store the file on our servers. To guarantee accurate labels, it is crucial that the metadata you provide is accurate.
PDFs
PDFs
PDFs
The following is an example JSON file for uploading PDFs to Encord.- Template: Imports PDFs with an Encord title, and with custom metadata. Custom metadata only appears in the Encord UI in Active and Index as an option to filter your data.
- Data: Imports two PDFs with no title or custom metadata.
- Custom Metadata: Imports two pdfs with a title and custom metadata.
Text Files
Text Files
Text Files
The following is an example JSON file for uploading text files to Encord.- Template: Imports text files with an Encord title, and with custom metadata. Custom metadata only appears in the Encord UI in Active and Index as an option to filter your data.
- Data: Imports two text files with no title or custom metadata.
- Custom Metadata: Imports two text files with a title and custom metadata.
Single images
Single images
Single Images
For detailed information about the JSON file format used for import go here.The JSON structure for single images parallels that of videos.Template: Provides the proper JSON format to import images into Encord.Examples:- Data Imports the images only.
- Custom Metadata: Imports images with an Encord title for the images and with custom metadata for each image. Custom metadata only appears in Active and Index as an option to filter your data. This example includes the following custom metadata types: boolean, varchar, datetime, uuid, number.
- Embeddings: Imports images with an Encord title, custom metadata, and custom embeddings for each image. This example includes the following custom metadata types: boolean, varchar, datetime, uuid, number.
- Image Metadata: Imports images with image metadata. This improves the import speed for your images.
Image groups
Image groups
Image groups
For detailed information about the JSON file format used for import go here.- Image groups are collections of images that are processed as one annotation task.
- Images within image groups remain unaltered, meaning that images of different sizes and resolutions can form an image group without the loss of data.
- Image groups do NOT require ‘write’ permissions to your cloud storage.
- Custom metadata is defined per image group, not per image. See our documentation here to learn how to add
clientMetadatato images in an image group. - If
skip_duplicate_urlsis set toTrue, all URLs exactly matching existing image groups in the dataset are skipped.
The position of each image within the sequence needs to be specified in the key (
objectUrl_{position_number}).- Data: Imports the image groups only.
- Custom Metadata: Imports image groups with an Encord title for the image groups and with custom metadata for each image. Custom metadata only appears in Active and Index as an option to filter your data. This example includes the following custom metadata types: boolean, varchar, datetime, uuid, number.
Image sequences
Image sequences
Image sequences
For detailed information about the JSON file format used for import go here.- Image sequences are collections of images that are processed as one annotation task and represented as a video.
- Images within image sequences may be altered as images of varying sizes and resolutions are made to match that of the first image in the sequence.
- Creating Image sequences from cloud storage requires ‘write’ permissions, as new files have to be created in order to be read as a video.
- Each object in the
image_groupsarray with thecreateVideoflag set toTruerepresents a single image sequence. - Custom client metadata is defined per image sequence, not per image.
- If
skip_duplicate_urlsis set toTrue, all URLs exactly matching existing image sequences in the dataset are skipped.
The position of each image within the sequence needs to be specified in the key (
objectUrl_{position_number}).Encord supports up to 32,767 entries (21:50 minutes) for a single image sequence. We recommend up to 10,000 to 15,000 entries for a single image sequence for best performance. If you need a longer sequence, we recommend using video instead of an image sequence.
- Data: Imports the images groups only.
- Custom Metadata: Imports image groups and custom metadata. This example includes the following custom metadata types: boolean, varchar, datetime, uuid, number.
DICOM
DICOM
DICOM
For detailed information about the JSON file format used for import go here.- Each
dicom_serieselement can contain one or more DICOM series. - Each series requires a title and at least one object URL, as shown in the example below.
- If
skip_duplicate_urlsis set toTrue, all object URLs exactly matching existing DICOM files in the dataset will be skipped.
Custom metadata is distinct from patient metadata, which is included in the
.dcm file and does not have to be specific during the upload to Encord. - The first series contains only a single object URL, as it is composed of a single file.
- The second series contains 3 object URLs, as it is composed of three separate files.
- The third series contains 2 object URLs, as it is composed of two separate files.
For each DICOM upload, an additional
DicomSeries file is created. This file represents the series file-set. Only DicomSeries are displayed in the Encord application.Template
Multiple file types
Multiple file types
You can upload multiple file types using a single JSON file. The example below shows 1 image, 2 videos, 2 image sequences, and 1 image group.
Multiple file types
Import to Files already in Index
Importing with Custom Embeddings You can import custom embeddings with custom metadata. When importing custom embeddings with custom metadata keep the following in mind:config is optional when importing your custom embeddings:
config is not specified, the sampling_rate is 1 frame per second, and the keyframe_mode is frame.
Specifying a
sampling_rate of 0 only imports the first frame and all keyframes of your video into Index.Folders and Custom Metadata
List custom metadata (Folders)
Import Custom Metadata (Folders)
After importing or updating custom metadata, verify that your custom metadata (list the data units with custom metadata) applied correctly. Do not simply add a
print command after importing or updating your custom metadata.Import custom metadata to specific data units in a Folder
This code allows you to import custom metadata on specific data units in Index. This code OVERWRITES all existing custom metadata on a data unit.Import custom metadata to all data units in a Folder
This code allows you to update ALL custom metadata on ALL data units in a Folder in Index. This code OVERWRITES all existing custom metadata on a data unit.Update custom metadata
The Specific Data Units code enables you to update custom metadata for specific data units in Index. It does not overwrite all existing custom metadata on a data unit. Instead, it updates metadata that matches existing keys with new values and adds any new custom metadata keys to the data unit without affecting other existing metadata. The All data units in a Project code updates the custom metadata for all data units in the specified Project. Replace theclient_metadata with the metadata you want to update.
Bulk import custom metadata to all data units in a Folder
This code allows you to update custom metadata on all data units in a Folder in Index. This code OVERWRITES all existing custom metadata on a data unit. Usingbundle allows you to update up to 1000 label rows at a time.
Bulk custom metadata import on specific data units
This code allows you to update custom metadata on specific data units in a Folder in Index. This code DOES NOT OVERWRITE existing custom metadata on a data unit. It does overwrite custom metadata with existing values and adds new custom metadata to the data unit. Usingbundle allows you to update up to 1000 label rows at a time.
Add custom metadata to images in an image group
The following script addsclientMetadata to all images / frames in a specified Image Group.
Ensure that you:
- Replace
<private_key_path>with the file path to your private access key. - Replace
<image-group-id>with the File ID (UUID) of the target Image Group. - Customize the
_get_metadata_for_imagefunction with the clientMetadata you want to add. To add unique metadata for each image, make the function dynamic by passing additional variables.
Datasets and custom metadata
Before importing custom metadata to Encord, first import a metadata schema.We strongly recommend that you upload your custom metadata to Folders, instead of importing using Datasets. Importing custom metadata to data in Folders allows you to filter your data in Index by custom metadata.
List custom metadata (Datasets)
The following code lists the custom metadata of all data units in the specified Dataset. The code prints the custom metadata along with the data unit’s index within the dataset.Deprecated - Import custom metadata (Datasets)
Importing custom metadata (
clientMetadata) to data units in the Datasets is deprecated.
Import custom metadata to data units in Folders instead.Before importing custom metadata to Encord, first import a metadata schema.
We strongly recommend that you import your custom metadata to Folders, instead of importing to Datasets. Importing custom metadata to data in folders allows you to filter your data in Index by custom metadata.
Import custom metadata to a specific data unit in your Dataset
You can import custom metadata (clientMetadata) to specific data units in the Dataset.
- Replace
<private_key_path>with the path to your private key. - Replace
<dataset_hash>with the hash of your Dataset. - Replace
Image1.pngand the other file names in themetadatavariable with the names of the files in your Dataset to which you want to add metadata.
Multiple data units
Import custom metadata (clientMetadata) to all data units in a Dataset
The following code adds the same custom metadata (clientMetadata) to each data unit in the specified dataset. The code prints the custom metadata along with the data units index within the dataset, so that you can verify that the custom metadata was set correctly.
Deprecated - Reserved Keywords
Reserved keywords are strings that are set aside for exclusive use. The following keywords are reserved:keyframes
KEYFRAMES
keyframes is reserved for use with frames of interest in videos. Specifying keyframes on specific frames ensures that those frames import into Index and Active. That means frames specified using keyframes are available to filter your frames and for calculating embeddings on your data.
keyframes while importing your videos or after you import your videos.
Import keyframes to Specific Data Units (Folder):
This code allows you to import keyframes on specific videos in Index. This code DOES NOT OVERWRITE all existing custom metadata on a data unit. It does overwrite custom metadata with existing values and adds new custom metadata to the data unit.
Custom Metadata in Index
Once your custom metadata is imported to a Folder, you can create Collections based on your custom metadata and then create Datasets and Projects based on the Collections. To create a Dataset from an Index Collection:-
Log in to the Encord platform.
The landing page for the Encord platform appears. -
Navigate to Data > Explore.
The All folders pages appears with a list of all folders in Encord. -
Open a folder.
The landing page for the folder appears and the View in Explorer button is enabled. -
Click the View in Explorer button.
The Index Explorer page appears. - Search, sort, and filter your data until you have the subset of the data you need.
-
Select one or more of the images in the Explorer workspace.
A ribbon appears at the top of the Explorer workspace. - Click Select all to select all the images in the subset.
- Click Add to a Collection.
- Click New Collection.
-
Specify a meaningful title and description for the Collection.
The title specified here is applied as a tag/label to every selected image.
-
Click Collections.
The Collections page appears.
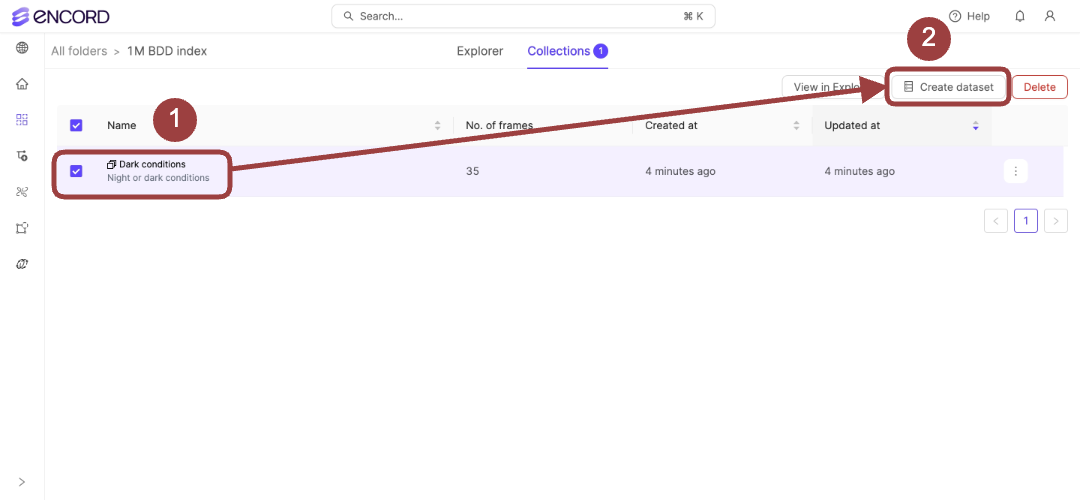
- Select the checkbox for the Collection to create a Dataset.
-
Click Create Dataset.
The Create Dataset dialog appears.

- Specify meaningful content for the following:
- Dataset Title
- Dataset Description
- Select Split image groups/sequences to extract images from the groups or sequences and add each image separately to the Dataset, if your Collection includes images from a group or sequence.
Custom Metadata in Active
Once your custom metadata is included in your Annotate Project (Folder or Dataset), you can create Collections based on your custom metadata and then send those Collections to Annotate.- [Import your Project that has custom metadata
-
Click the Project once import completes.
The Project opens with the Explorer page displaying. -
Filter the Project Data, Labels, or Predictions in the Explorer using a Custom Metadata filter.

- Continue searching, sorting, and filtering your data/labels/predictions until you have the subset of the data you need.
-
Select one or more of the images in the Explorer workspace.
A ribbon appears at the top of the Explorer workspace. - Click Select all to select all the images.
- Click Add to a Collection.
- Click New Collection.
-
Specify a meaningful title and description for the Collection.
The title specified here is applied as a tag/label to every selected image.