Overview
To upload predictions in Encord Active, you need to create a prediction branch. This guide explains everything you need to know for importing predictions.Predictions Workflow

- Import Predictions to Annotate Project: Everything starts in Annotate. Your labels and predictions must exist in your Annotate Project for the labels and predictions to appear in Active.
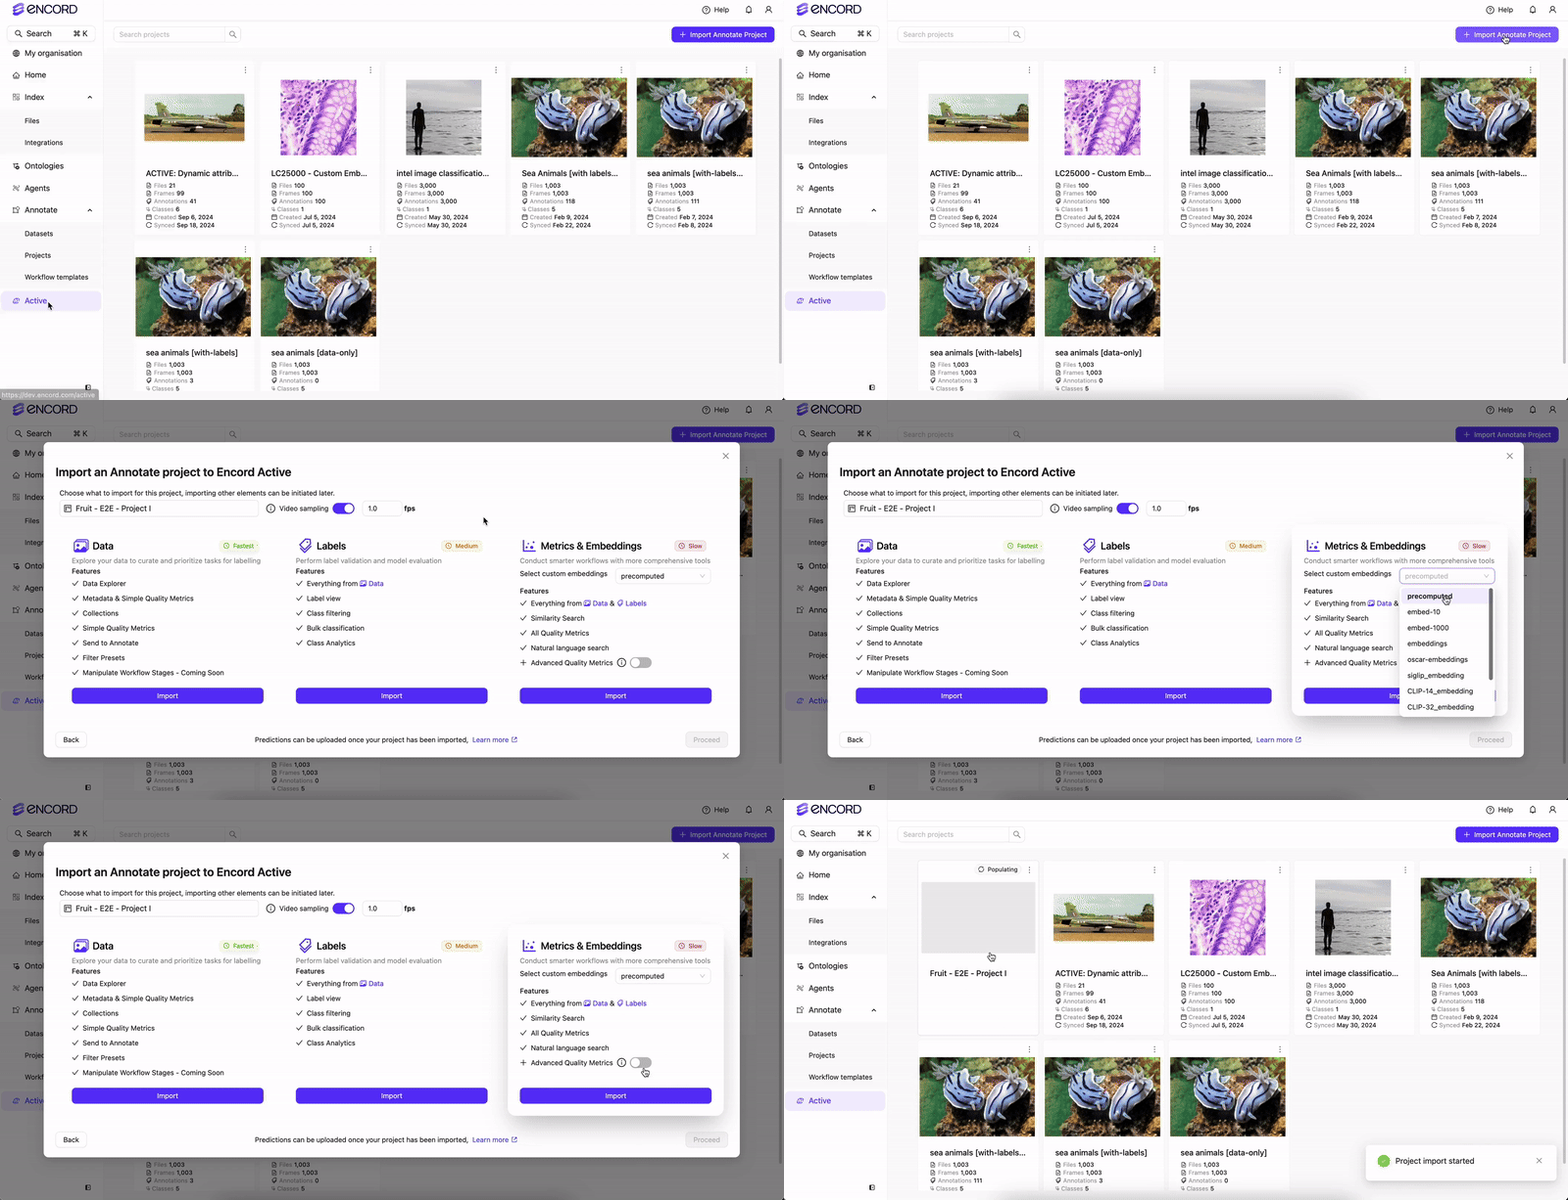
- Import/Sync Project in Active: After importing your predictions, you can then import the Project into Active. Or you can sync an existing Active Project after importing your predictions.
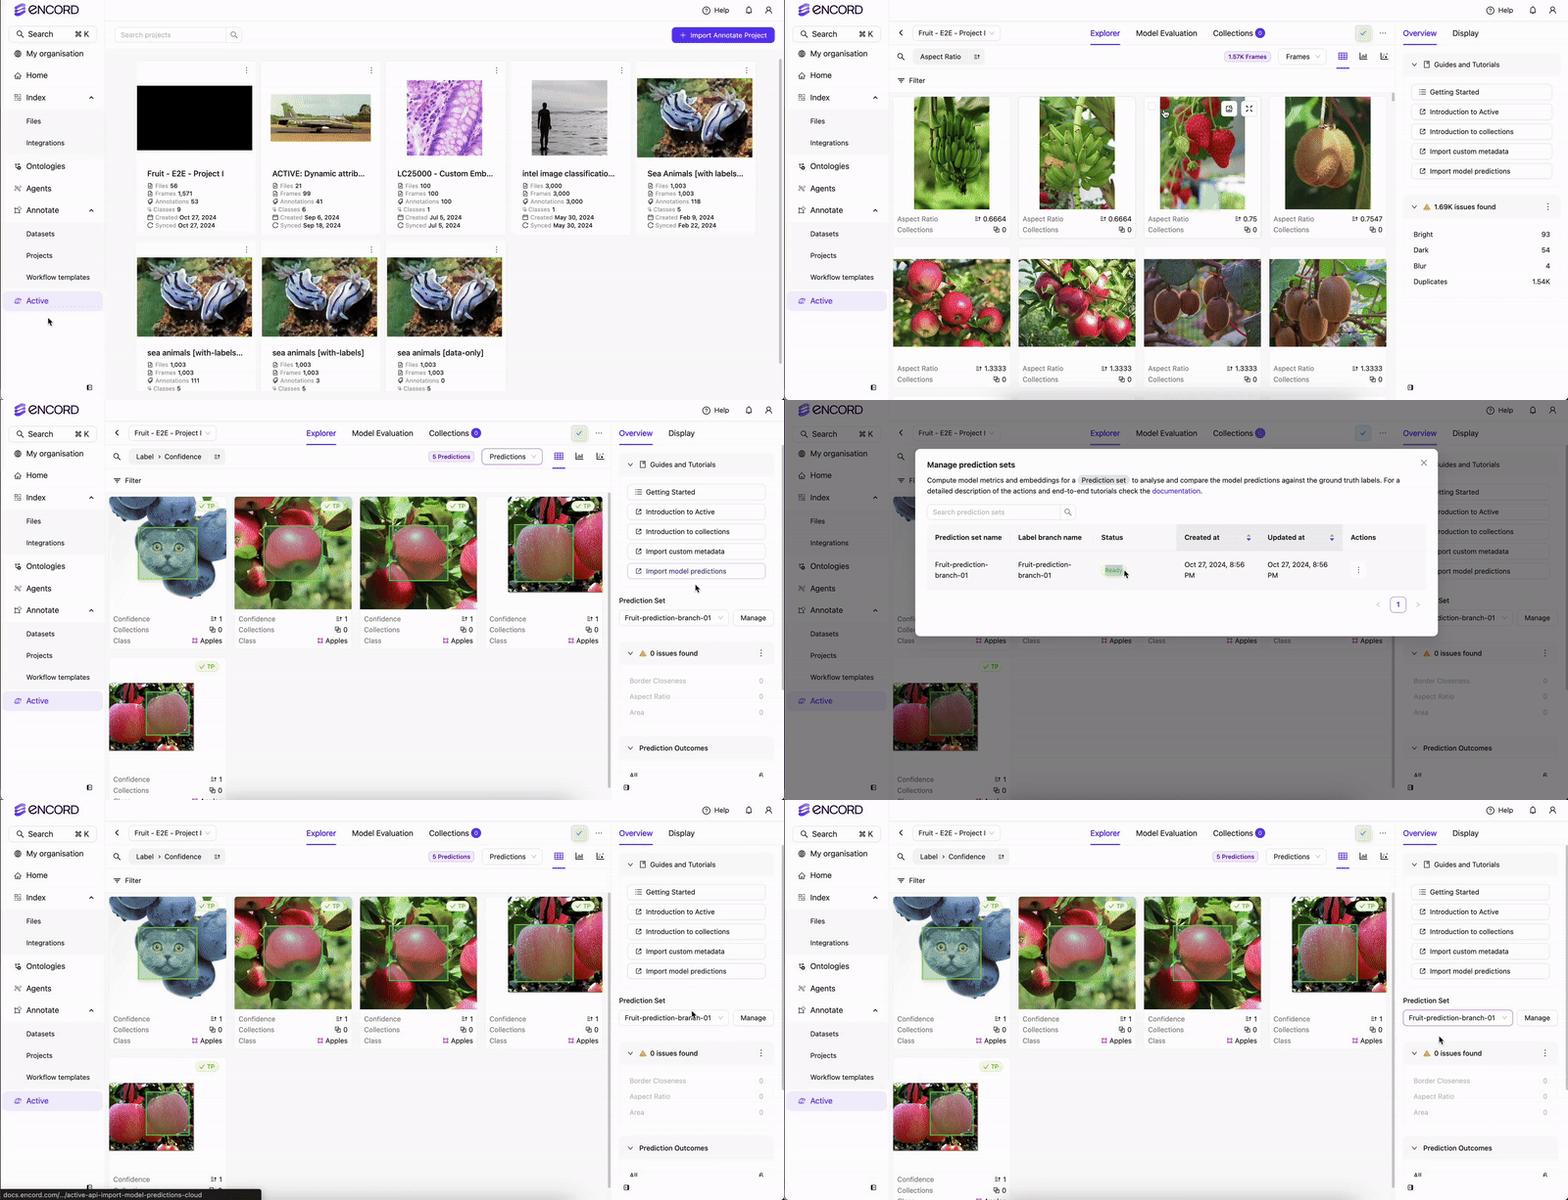
- Analyze the Predictions in Active: Once the Project import/sync completes, specify the prediction set for Active to analyze.
- Select the Predictions in Active: Once analysis completes, select the prediction set you want to view in Active.
Supported Prediction Formats
Encord Format (Recommended)- Supports multi-level nested classifications (radio, checklist, or free-form text) under objects or classifications.
- Handles all object types and classification.
- Only top-level objects and classifications are considered when calculating in model metrics.
- Metrics are not yet available for keypoints and polylines. If you are interested in these, please contact the Encord team.
Confidence Score
You can include confidence scores when uploading predictions. Encord automatically calculates model metrics based on your prediction set and assigned confidence scores.Prediction Branches
When importing prediction sets into Encord Active, they are added as branches to individual label rows on your data units (images, videos, audio). Each data unit has the following:- A MAIN branch for ground truth annotations or pre-labels.
- Optional Consensus branches and Prediction branches for different prediction sets.

STEP 1: Import Predictions
Import your predictions to a Project in Annotate. Encord currently supports importing predictions from the Encord format and from COCO.TLDR;
Import Encord-Format Predictions
Usebranch_name to create a prediction branch in label_rows_v2 for a data unit.
Bounding Box
Bounding Box
Example 1Imports a single bounding box (
Cherry) to a single image (cherry_001.png).Example 2:Imports three instances (tracking an object across three sequential frames: 103, 104, and 105) of a bounding box (Cherry) to a video (Cherries_video.mp4).Example 3Imports three bounding boxes (Cherry) to a single image (cherry_001.png).Example 4:Imports three instances (tracking 3 different objects across three frames: object 1 - frames 103, 104, 105, object 2 - frames 206, 207, 208, and object 3 - frames 313, 315, 317) of three bounding boxes (Cherry) to a video (Cherries_video.mp4).Rotatable Bounding Box
Rotatable Bounding Box
Example 1Imports a single rotatable bounding box (
Other type of fruit) to a single image (apple_001.png).Example 2Imports three instances (tracking an object across three sequential frames: 120, 121, and 122) of a bounding box (Other type of fruit) to a video (Cherries_video.mp4).Example 3Imports three rotatable bounding boxes (Other type of fruit) to a single image (apple_001.png).Example 4:Imports three instances (tracking 3 different objects across three frames: object 1 - frames 120, 121, 122, object 2 - frames 222, 224, 226, and object 3 - frames 321, 323, 325) of three rotatable bounding boxes (Other type of fruit) to a video (Cherries_video.mp4).Polygons
Polygons
Example 1Imports a single polygon (
Persimmon) to a single image (persimmon_001.jpg).Example 2Imports three instances (tracking an object across three sequential frames: 143, 144, and 145) of a polygon (Persimmon) to a video (Cherries_video.mp4).Example 3Imports three polygons (Persimmon) to a single image (persimmon_001.jpg).Example 4:Imports three instances (tracking 3 different objects across three frames: object 1 - frames 153, 154, 155, object 2 - frames 242, 244, 246, and object 3 - frames 343, 345, 347) of three polygons (Persimmon) to a video (Cherries_video.mp4).Polyline
Polyline
Example 1Imports a single polyline (
Branch) to a single image (persimmon_001.jpg).Example 2Imports three instances (tracking an object across three sequential frames: 146, 147, and 148) of a polygon (Branch) to a video (Cherries_video.mp4).Example 3Imports three polylines (Branch) to a single image (persimmon_001.jpg).Example 4:Imports three instances (tracking 3 different objects across three frames: object 1 - frames 246, 247, 248, object 2 - frames 346, 347, 348, and object 3 - frames 446, 447, 448) of three polylines (Branch) to a video (Cherries_video.mp4).Keypoint
Keypoint
Example 1Imports a single keypoint (
Pedicel) to a single image (blueberry_003.png).Example 2Imports three instances (tracking an object across three sequential frames: 143, 144, and 145) of a keypoint (Pedicel) to a video (Blueberries_video.mp4).Example 3Imports three keypoints (Pedicel) to a single image (blueberry_003.png).Example 4:Imports three instances (tracking 3 different objects across three frames: object 1 - frames 143, 144, 145, object 2 - frames 242, 244, 246, and object 3 - frames 343, 345, 347) of three keypoints (Pedicel) to a video (Blueberries_video.mp4).Bitmask
Bitmask
Example 1:Imports a single bitmask (
Blueberry) to a single image (blueberry_003.jpg). For simplicity, the bitmask covers the entire image (image dimensions: 1254x836).Example 2:Imports three instances (tracking an object across three sequential frames: 156, 157, and 159) of a bitmask (Blueberry) to a video (Blueberries_video.mp4). For simplicity, the bitmask covers the entire frame (video dimensions: 1920x1080).Example 3:Imports three bitmasks (Blueberry) to a single image (blueberry_003.jpg). For simplicity, the bitmasks cover the entire image (image dimensions: 1254x836).Example 4:Imports three instances (tracking 3 different objects across three frames: object 1 - frames 156, 157, 158, object 2 - frames 256, 258, 259, and object 3 - frames 355, 357, 359) of three bitmasks (Blueberry) to a video (Blueberries_video.mp4). For simplicity, the bitmasks cover the entire frame (video dimensions: 1920x1080).Object Primitives
Object Primitives
Before you can import Object Primitive labels into Encord, the Object Primitive Template MUST exist in Encord. Use the UI to create the Object Primitive Template so you can visually inspect the Object Primitive.
Strawberry Object Primitive name = Triangle) to a single image (strawberries_10.jpg).Example 2Imports three instances (tracking an object across three sequential frames: 163, 164, and 165) of a object primitive (Ontology object = Strawberry Object Primitive name = Triangle) to a video (Cherries_video.mp4).Example 3Imports three object primitives (Ontology object = Strawberry Object Primitive name = Triangle) to a single image (strawberries_10.jpg).Example 4Imports three instances (tracking 3 different objects across three frames: object 1 - frames 173, 174, 175, object 2 - frames 183, 184, 185, and object 3 - frames 193, 194, 195) of three object primitives (Ontology object = Strawberry Object Primitive name = Triangle) to a video (Cherries_video.mp4).Radio Button
Radio Button
Checklist
Checklist
Example 1:Imports a checklist classification (
Many types of fruit?) to a single image (apple_003.jpg). The selected items from the list are apple and kiwi.Example 2:Imports a checklist classification (Many types of fruit?) across a range of sequential frames: 193 to 197) to a video (Blueberries_video.mp4). The selected items from the list are apple and kiwi.Store Predictions Boilerplate
Import COCO Labels as Predictions
The following code imports COCO labels as predictions for Active. For more information on importing COCO labels into Encord, refer to our documentation. Replace the following:-
<private_key_path>with the file path to your SSH private key. -
<my-prediction-branch-name>with the name of your prediction branch. -
<project_hash>with the Project ID for your Project. -
COCOimportfile.jsonwith the full path of the COCO file containing the predictions you want to import.
COCO Label import as Predictions
Verify Prediction Import
After importing your predictions, verify that your predictions imported. The following code returns all labels and predictions on all branches.End-to-End Prediction Import Example
We provide an end-to-end example using a Jupyter Notebook here.STEP 2: Import/Sync Project to Active
Import or sync the Annotate Project in Active.
STEP 3: Analyze the Predictions
Active MUST analyze the predictions before you can view the predictions in Active. Specify whether you want to import Strict Match or Partial Match predictions.Strict Match Predictions
All attributes are matched. This mode makes the most comprehensive comparison. A prediction is considered as a true positive only if an exact match of all attributes matches with the ground truth.
Partial Match Predictions
Only attributes provided in the prediction are compared with the ground truth. Any missing attributes in the prediction, but present in the ground truth, have no impact on the outcome of the prediction.
Perform the Analysis
STEP 4: Select the Predictions
Once analysis completes, select the prediction set to view in Active.
Next Steps
Model and Prediction Validation
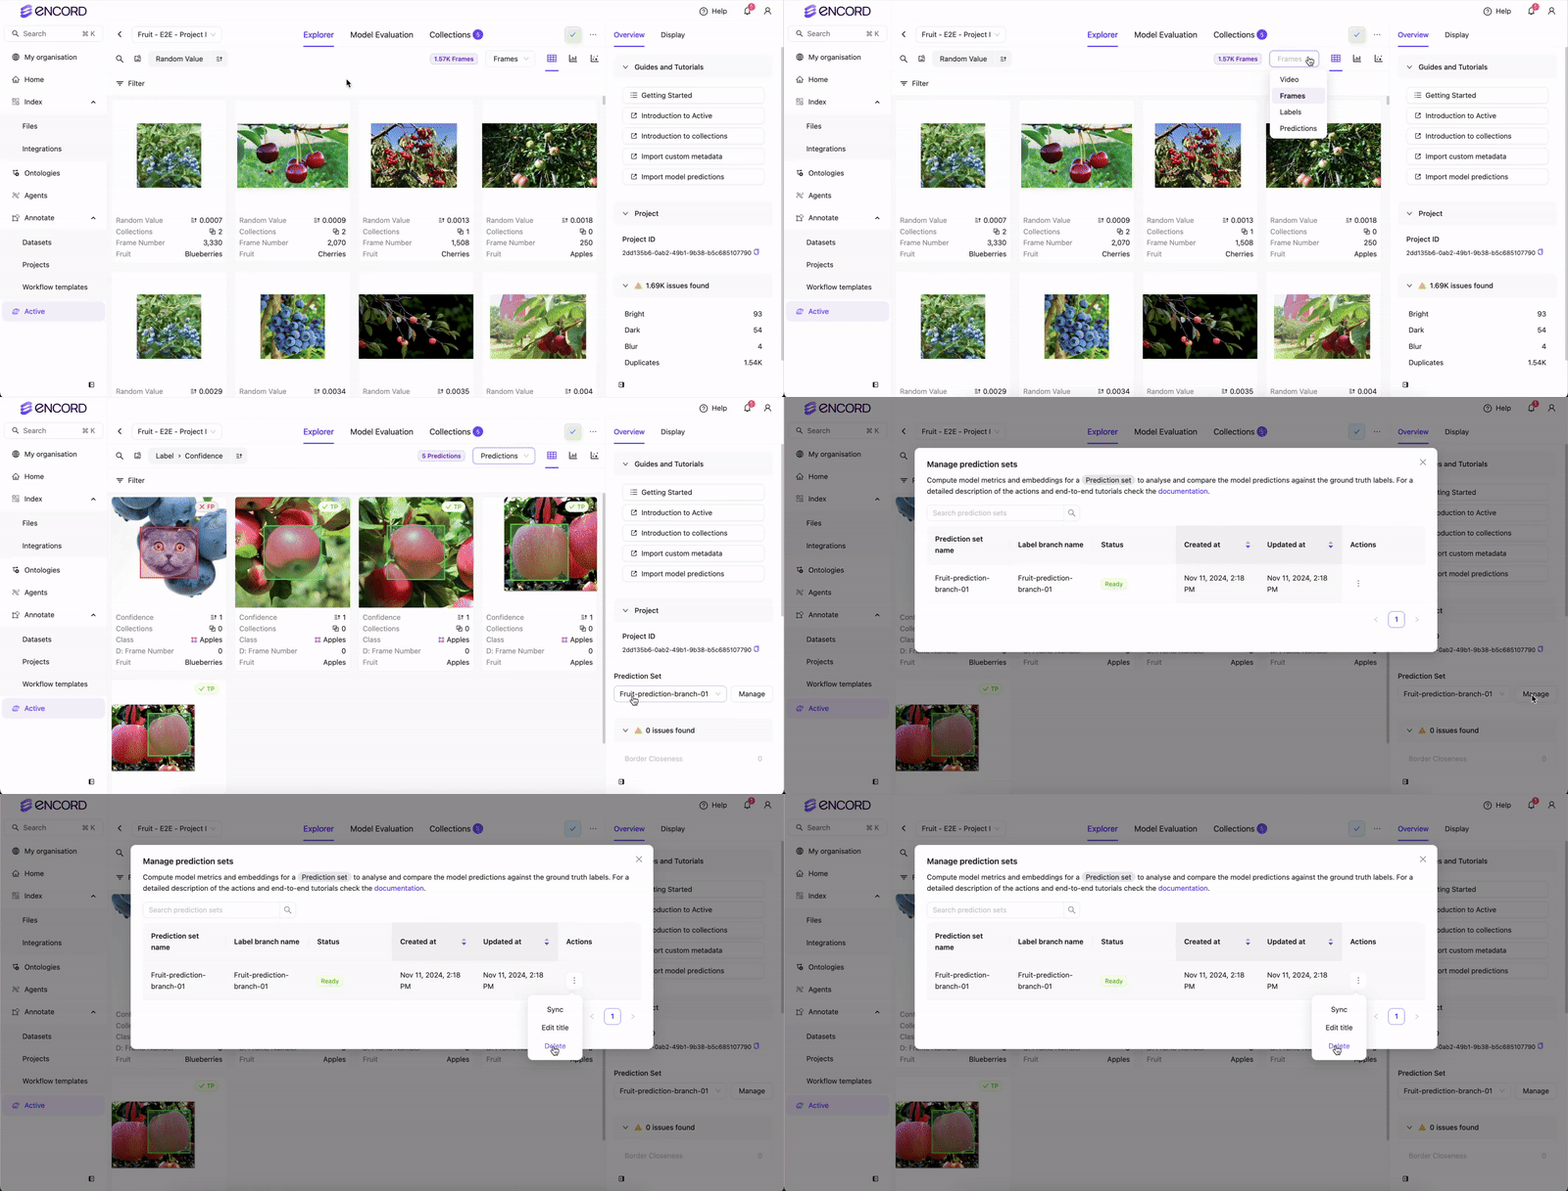
Delete Prediction Sets
You can delete prediction sets from Active from the Predictions page.


