Workflows are a powerful tool for designing and building Projects, allowing you to control how tasks move through different stages and how those stages interact.Documentation Index
Fetch the complete documentation index at: https://docs.encord.com/llms.txt
Use this file to discover all available pages before exploring further.
Creating Workflows
Workflows are created when creating new annotation Projects, and when creating Workflow templates.
- Manage Collaborators allows you to seamlessly add users to your Workflow as collaborators, which can be added to different stages of the workflow.
- Add stage allows you to add more stages to your Workflow.
Workflow Stages
This section contains details for all Workflow library components.Only ANNOTATE, CONSENSUS, and AGENT nodes can be the first node after the START node in a workflow.
Start
Start

Annotate
Annotate
Annotate

Only collaborators with the Annotator or the Annotator & Reviewer roles are available for selection. All Admins and Team Managers are part of all annotation stages and therefore cannot be added, or removed.
Routers
Routers
Routers
A Router splits the path that annotate and review tasks take through the workflow. Two different types of router are available:Percentage router

Routing percentages can be changed after Project creation. Changing routing percentages resets the percentage router, and may alter the pathway taken by a given task.
Collaborator router

- Click Add pathway to choose a subset of collaborators that form the pathway. - only collaborators present in the previous stage can be selected. There is no limit on the amount of pathways you can create.
- Click Add to finish a pathway.
Collaborators can only be added to the Router after an input is connected.
Review
Review
Review

To attach the Rejected node of the review stage to another review stage, contact support@encord.com

Only collaborators with the Reviewer and Annotator & Reviewer roles are available for selection. All Admins and Team Managers are part of all review stages and cannot be removed.

Strict review
Strict review is enabled by default, but can be disabled under Advanced settings.
Video Tutorial - Strict review & change review judgment
Video Tutorial - Strict review & change review judgment

User assignment restriction
The User assignment restriction feature prevents team members working on tasks in the current stage that they have done in previous stages. This can prevent individuals with the Annotator & Reviewer role from being assigned their own annotations to review.This feature does not apply to users with the Admin or Team Manager roles, since they are added to each stage by default and cannot be removed.
Agent
Agent
Agent

Complete
Complete
Complete

Managing collaborators
User permissions
| Permission | Admin | Team Manager | Reviewer | Annotator | Annotator & Reviewer |
|---|---|---|---|---|---|
| Attach / Detach datasets | ✅ | ❌ | ❌ | ❌ | ❌ |
| Attach / Switch ontology | ✅ | ❌ | ❌ | ❌ | ❌ |
| Delete | ✅ | ❌ | ❌ | ❌ | ❌ |
| Invite team members | ✅ | ✅ | ❌ | ❌ | ❌ |
| Manage team permissions | ✅ | ✅ | ❌ | ❌ | ❌ |
| Manage admins | ✅ | ❌ | ❌ | ❌ | ❌ |
| Annotate & review tasks | ✅ | ✅ | Review only | Annotate only | ✅ |
| Confirm annotations | ✅ | ✅ | ❌ | ❌ | ❌ |
| Control assignments and status | ✅ | ✅ | ❌ | ❌ | ❌ |
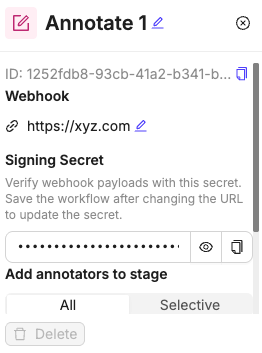
Workflow stage level collaborators
Collaborators can be added to a workflow stage by clicking + on a card that has been added to the workflow canvas.
- Annotator
- Annotator & Reviewer
- Team Manager
- Admin
Templates
Workflow templates allow you to save and reuse your most common workflows. You can then use these templates to create new annotation Projects, ensuring consistency and efficiency.Create Templates
New Workflow templates can be created each time a new Workflow is created.- Navigate to the Projects section of the Encord platform.
- Navigate to the Templates tab.
- Click Create template.

- Create your Workflow. Ensure your Workflow has a title.
- Click the Create workflow template button. The template is saved in the custom templates section.

Edit Templates
You can edit Workflow templates after they have been created.- Navigate to the Projects section of the Encord platform.
- Navigate to the Templates tab.
- Select the template you want to Edit.
- Click the Edit button in the top-right.
- Edit the template.
- Click Save changes.
You can not edit the start node.
Template Collaborators
Template collaborators are annotators and reviewers that can be assigned to Workflow stages.Invite Collaborators
Invite Collaborators
- Click the Collaborators button.

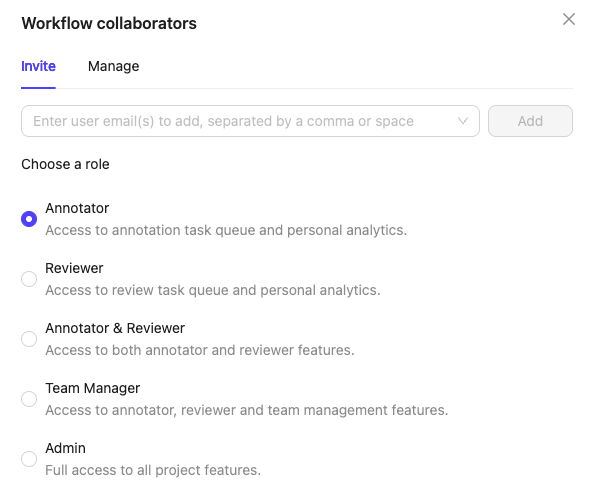
- Select a role. You can assign the following roles to collaborators:
- Annotator: Labels tasks in the Project.
- Reviewer: Reviews and validates labeled tasks.
- Annotator & Reviewer: Performs both annotation and review tasks.
- Team Manager: Assigns tasks to users and manages Project collaborators.
- Admin: Grants full administrative control over the Project. This action is irreversible.
- Type the email address of the user you want to add and select the user from the list.
- Click the Add button to add the user with the specified role.
Manage Users
Manage Users
- Click the Collaborators button.
- Click the Manage tab.
- Change collaborator role: Click the dropdown and select a new role.
- Remove collaborator: Click the red Remove icon in the remove column.

Manage Template Access
Template Access determines which users can edit, share, and delete the template.Invite Users
Invite Users
- Click the Manage template access button.

- Search for the collaborator or the group you want to add. Multiple collaborators and groups can be added at once.
Only group members are added when a group is assigned to a Project. Group managers are not included.
-
Select a role. You can assign the following roles to collaborators:
- User: Can view the template.
- Admin: Grants full administrative control over the template. This action is irreversible.
- Click Add.
Edit User Role
Edit User Role
Only template admins can modify collaborator roles. Admin roles cannot be changed, not even by other admins.
- Click the Manage template access button.
- Click the user role in the Role column
- Select a new role from the dropdown.

Remove User
Remove User
- Click the Manage template access button.
- Click the red Remove icon in the remove column.
Delete Templates
To delete a template, click the red Delete icon next to the template.
Editing Workflows
Only ANNOTATE, CONSENSUS, and AGENT nodes can be the first node after the START node in a workflow.
| Workflow Editing | Description |
|---|---|
| Add new stages |
|
| Delete stages |
Any stage containing tasks cannot be deleted. Move tasks to a different stage before deleting a stage. |
| Modify workflow connections |
|
| Workflow management |
|
Edit Consensus Workflows
Limitations
Editing Workflows has the following limitations:- Cannot change an Annotate stage to a Review stage. You must delete the stage and add a different stage.
- Cannot change fundamental stage configurations for Consensus stages.
- Cannot modify completed tasks. Historical task data remains unchanged
- Cannot delete labels/annotations. Existing annotation data is protected by blocking deleting stages that have tasks.