Documentation Index
Fetch the complete documentation index at: https://docs.encord.com/llms.txt
Use this file to discover all available pages before exploring further.
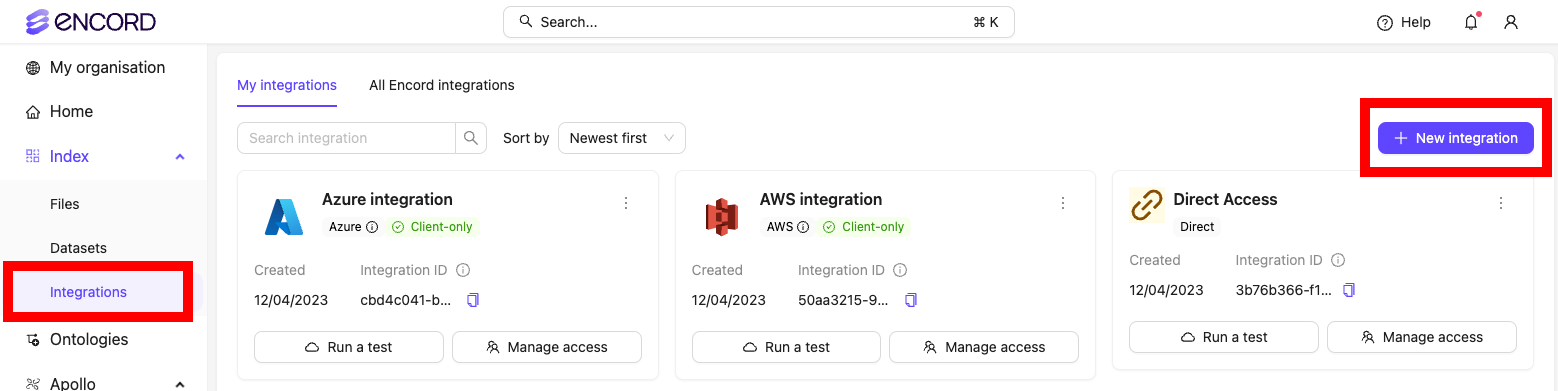
Only users that are part of a Workspace can create data integrations.
Security
- Encord generates signed URLs dynamically and does not store them. All signed URLs have an expiry time which can be configured by the person who is creating the integration. Encord uses HTTPS/ TLS 1.2 and above to ensure data transport is encrypted.
- Encord uses RBAC which allows only users who have required permissions to access the data. We also have CORS config to provide browser level protection by restricting the domains that can access the signed URLs.
- Encord is SOC 2 compliant.
- For enhanced security, create a Direct Access integration with Strict client-only access. This combination ensures the highest level of data protection: Strict client-only access prevents Encord from accessing your data, while Direct Access keeps Encord from signing the URLs, maintaining your data’s confidentiality.
User Roles and Permissions
Integrations have the following user based access controls.| Permission | Admin | User |
|---|---|---|
| View integration | ✅ | ✅ |
| Register data using the integration | ✅ | ❌ |
| Delete integration | ✅ | ❌ |
| Add users | ✅ | ❌ |
User Management
The user who creates the cloud integration becomes its administrator and gains immediate access to use it. Only integration admins can add users to an integration.
Add Users

- Click the Add or remove users button on the integration. A dialog appears.
- Ensure the Invite tab is selected.
- Ensure the Individual tab is selected
- Type the email addresses of the users you want to share the integration with and press Enter on your keyboard to confirm.
- Select the integration user role you want to assign to the users.
- Click Add.

- Click the Add or remove users button on the integration. A dialog appears.
- Ensure the Invite tab is selected.
- Click the Groups tab.
- Select a user group you want to add to the integration
- Select the integration user role you want to assign to all users in the group.
- Click Add.

Remove Users
Individuals with the Admin user role can only be removed from the integration from a Workspace Admin.
- Click the Add or remove users button on the integration. A dialog appears.
- Select the Manage tab.
- Ensure the Individuals tab is selected.
- Click the delete icon next to the user you want to remove from the integration.

- Click the Add or remove users button on the integration. A dialog appears.
- Select the Manage tab.
- Select the Groups tab.
- Click the delete icon next to the user group you want to remove from the integration.

Strict Client-only Access
Strict client-only access allows Encord to sign URLs without temporarily processing information on our servers. Strict client-only access is available for all types of private cloud integrations, including Direct access. There are two main consequences of making an integration client-only access:- Specific server-side features (data conversion and cloud-synced folders) DO NOT work. This includes features such as:
- Cloud-synced Folders
- Image groups & image sequences.
- Re-encoding videos.
- Object tracking.
- Segment-anything model (SAM).
- Metadata must be specified for all data in the JSON file when adding data to a dataset. The video metadata section shows how to specify the metadata.
Enabling Strict Client-Only Access
Strict client-only access is enabled by checking the Strict client-only access, server-side media features will not be available checkbox in the Advanced settings section when creating an integration.

Video Metadata
The JSON format allows you to specifyvideoMetadata for video files. videoMetadata is essential information used by the Label Editor and is crucial for aligning annotations to the correct frame.
When the
videometadata flag is included in the JSON file, we directly use the supplied metadata without performing any additional validation, and do not store the file on our servers. To guarantee accurate labels, it is crucial that the metadata you provide is accurate.videoMetadata must be specified when a Strict client-only access integration is used. In all other cases videoMetadata is optional.Encord assumes the videoMetadata is correct and our servers do not download or pre-process your data. This is particularly useful for customers with strict data compliance concerns.videoMetadata is distinct from clientMetadata. videoMetadata is required for videos when using Strict client-only access, while clientMetadata is optional and can be included for all types of data.ffmpeg -i 'video_title.mp4'to retrieve fps, duration, width, and height:

ls -l 'video_title.mp4'to retrieve the file size:

Example JSON including video metadata
Example JSON including video metadata
- fps: Frames per second.
- duration: Duration of the video (in seconds).
- width / height: Dimensions of the video (in pixels).
- file_size: The size of the file (in bytes).
- mime_type: Specifies the file type extension according to the MIME standard.
Image Metadata
The JSON format allows you to specifyimageMetadata for image files. imageMetadata contains essential information used by the Label Editor and is crucial for aligning annotations to the correct image properties.
When the
imageMetadata flag is present in the JSON file, we directly use the supplied metadata without performing any additional validation and do not store the file on our servers. To guarantee accurate labels, it is crucial that the metadata you provide is accurate.imageMetadata must be specified when a Strict client-only access integration is used. In all other cases, imageMetadata is optional.- width / height: Dimensions of the video (in pixels).
- file_size: The size of the file (in bytes).
- mime_type: Specifies the file type extension according to the MIME standard.
Audio Metadata
The JSON format allows you to specifyaudioMetadata for audio files. audioMetadata contains essential information used by the Label Editor and is crucial for aligning annotations to the correct audio properties.
When the
audioMetadata flag is present in the JSON file, we directly use the supplied metadata without performing any additional validation and do not store the file on our servers. To guarantee accurate labels, it is crucial that the metadata you provide is accurate.audioMetadata must be specified when a Strict client-only access integration is used. In all other cases, audioMetadata is optional.- duration: Length of the audio file (in seconds).
- file_size: The size of the file (in bytes).
- mime_type: Specifies the file type extension according to the MIME standard.
- sample_rate: The number of samples per second in the audio file (in Hz).
- bit_depth: The number of bits per sample, representing audio resolution.
- codec: The format used to encode the audio (e.g., “mp3”).
- num_channels: The number of audio channels (e.g., 1 for mono, 2 for stereo).
DICOM and NIfTI
Encord does not currently support Strict Client-only Access for NIfTI files.
dicom_metadata in a JSON file.
Custom Signed URL Expiration Time
A custom signed URL expiration time allows you to set the duration that an integration’s pre-signed URL remains valid.Custom signed URL expiration times are only available for AWS, GCP, and OTC integrations.
Setting Custom Signed URL Expiration Times
To set up a custom signed URL expiration time for a new integration:- Click the Custom signed URL integration time checkbox in the Advanced settings when setting up your GCP, AWS, or OTC integration.
- Set the duration for which pre-signed URLs should remain valid. We recommend configuring the URL expiration time to exceed the time required to annotate and review files from the integration in the Label Editor.

Edit Custom Signed URL Expiration Times
Custom signed URL expiration times are only available for AWS, GCP, and OTC integrations. For Azure integrations,expired SAS tokens must be updated regularly.
- Click the three dots icon on your integration.
- Select Update Signed Url Expiration.

- Set the duration for which pre-signed URLs should remain valid. We recommend configuring the URL expiration time to exceed the time required to annotate and review files from the integration in the Label Editor.
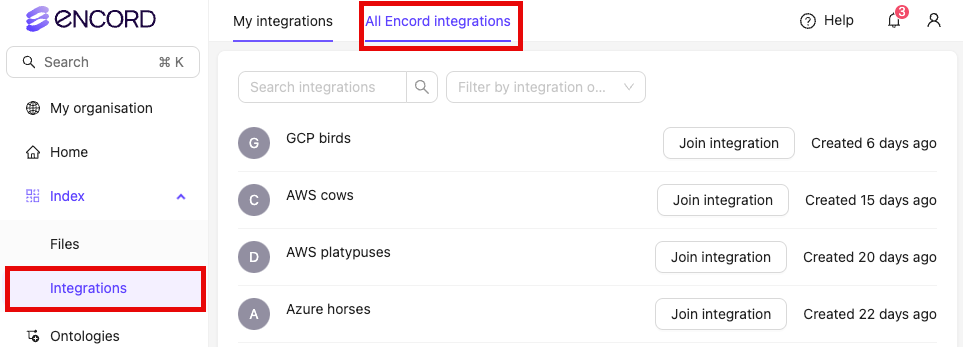
View and Join Integrations in Your Workspace
Workspace Admins can search for and join any data integration that exists within the Workspace. To search and join integrations:- Navigate to the Integrations of the Encord platform.
- Click All Encord integrations.
- Click Join integration to join the integration.
Fix Buffering Issues
A number of factors determine how fast remote content renders and displays in a web browser:- Geographical distance from host bucket.
- Local internet speed.
- Use of a Virtual Private Network (VPN).
- The bitrate of the video file being requested.
You can see the speed that a video downloads at the bottom of the ‘editor pane’ in the Label Editor on Encord’s platform. The speed also displays the download speed required to display a video without buffering.
Geographical distance from host
The physical distance between you and the server hosting your data affects how quickly content is accessed. For example, hosting an Amazon S3 bucket in the EU (London) eu-west-2 region may cause latency for users in India or Brazil due to the long travel distance for the data. To fix the issue, make sure that users always connect to their closest server. This reduces the time it takes for data to travel from one place to another. Setting this up, differs between cloud storage providers.

Amazon S3
Amazon S3
Caching Header
Caching MUST be enabled on the parent folder containing the objects you want to label. This is done by setting a cache-control header. If you do not set a cache-control header on all objects, this can lead to data loading slowly on our platform.Multi-Region Access Points
AWS allows you to set up Multi-Region Access Points that provides a single global end point to access a replicated dataset spanning multiple S3 buckets. This means that users all around the world are always connected to their closest server when accessing content from an S3 bucket.To make this work in Encord:- Set up Multi-Region Access Point on Amazon S3. Their step-by-step guide can be found here.
- Integrate your Multi-Region Access Point with Encord. The process is documented here.
- Add data using the Multi-Region Access Point integration. When specifying which files to register in your JSON file, make sure to use the ARN of the Multi-Region Access Point followed by the object name, instead of the object URL, as documented here.
Local Internet Speed
Test your internet connection to make sure it is fast enough to download your video from cloud storage without buffering. Consistently low internet speeds might mean your provider isn’t providing you with high enough internet speeds to load large quantities of data from your cloud storage. You can see the speed that a video downloads at the bottom of the ‘editor pane’ in the Label Editor on Encord’s platform. The speed also displays the download speed required to display a video without buffering.VPNs
VPNs can slow down your connection by requiring the data travel through the VPN’s server before arriving to you.High Bitrates in Videos
Videos vary widely in frame rate, compression, definition, and size. The most important factor in determining how quickly a remote video loads is its bitrate. A higher bitrate requires more data to load per second of video.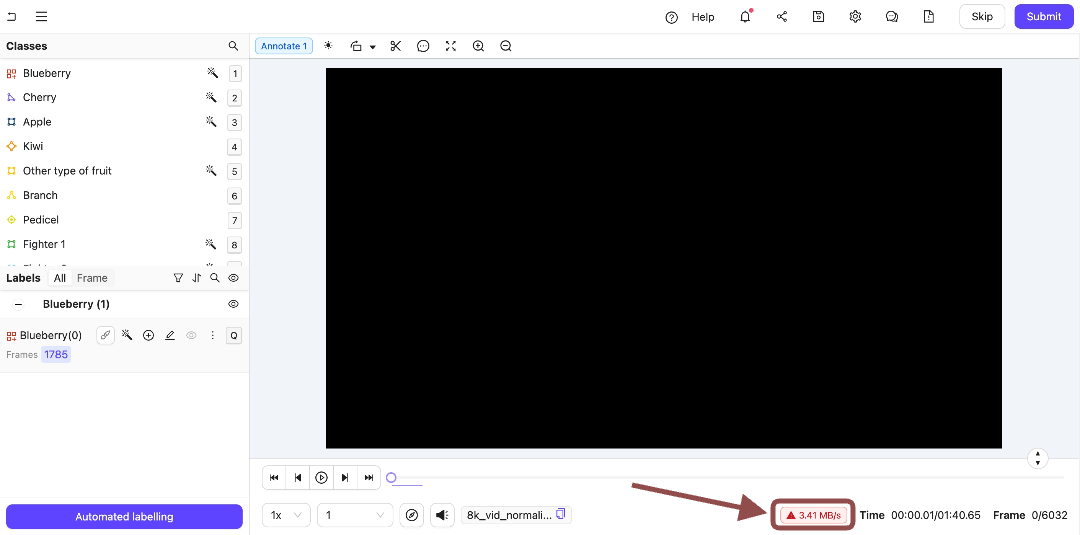 Lowering a video’s bitrate reduces the time it takes to load from your cloud storage. This can be achieved using tools such as FFmpeg. See our documentation on resizing videos for more information.
Updating Terraform Configuration
This section only applies when using a Terraform cloud integration.