

Default Embeddings
Embeddings are calculated using our purpose-built models, which perform well across a broad range of tasks. For highly specialized domains, custom embeddings may be more appropriate. Our built-in embeddings power the following features:- Natural language search
- Image similarity search
- Embeddings view
Natural language search is also supported with custom embeddings in both Data > Explore and Project > Explore. Enabling natural language search for custom embeddings requires additional setup. Contact your Encord representative for help.
Custom Embeddings Support
Encord enables the use of custom embeddings for images, image sequences, image groups, and individual video frames. Custom embeddings allow you to incorporate your own feature representations into Encord’s platform, enhancing capabilities like similarity search, visualizations, and data filtering. This flexibility supports more advanced workflows and deeper insights tailored to your specific use cases.Use Custom Embeddings
To bring your custom embeddings into Encord, you first need to create a key in your metadata schema. After the key is in your schema, you can import your custom embeddings. Custom embeddings can be used for data curation and label validation. To use custom embeddings- Create a new
embeddingtype in your Schema. - Upload your embeddings.
- Select your custom embeddings from the Embeddings view.
Before you can use embedding plots with your custom embeddings, you need to configure your root Folder in Files.
1. Create New Embedding Type
A key is required in your custom metadata schema for your embeddings. You can use any string as the key for your embeddings. We strongly recommend that you use a string that is meaningful. If you do not include a key in your metadata schema, your imported embeddings are treated as strings. Useadd_embedding to add an embedding to your metadata schema.
We currently support embeddings of:
- 1 to 4,096 dimensions for data curation.
- 1 to 2,000 dimensions for label validation.
2. Upload Embeddings
With the key in the custom metadata schema ready, we can now import our embeddings. Custom embedding sizes are flexible and can be set anywhere between 1 and 4096. You can import embeddings after you have added your data or during your data registration.Your key frames (frames specified with or without embeddings) always appear in Encord, regardless of what sampling rate you specify.
config is not specified, the sampling_rate is 1 frame per second, and the keyframe_mode is frame.
Specifying a
sampling_rate of 0 only imports the first frame and all keyframes of your video.Import while registering videos
Import while registering videos
Import while importing videos
This JSON file imports embeddings while registering your data with Encord from a cloud integration.config is optional when importing your custom embeddings:config is not specified, the sampling_rate is 1 frame per second, and the keyframe_mode is frame.Specifying a
sampling_rate of 0 only imports the first frame and all keyframes of your video.Update specific videos
Update specific videos
Update specific videos
Import while registering data units
Import while registering data units
Import while importing data units
This JSON file imports embeddings while registering your data with Encord from a cloud integration.Update specific data units
Update specific data units
Import specific data units
The custom embeddings format for images, text files, PDFs, and audio files follows the same format as importing custom metadata.3. Select your Custom Embeddings
You DO NOT need to re-index your data in Encord for your embeddings to appear. For more information on re-indexing refer to our documentation.
- Filtering using custom embeddings
- Similarity searches using your custom embeddings
- Embedding view and 2D plots with selection based workflows
Before you can use embedding plots with your custom embeddings, you need to configure your root Folder in Files.
Upgrade your Top-Level Folder
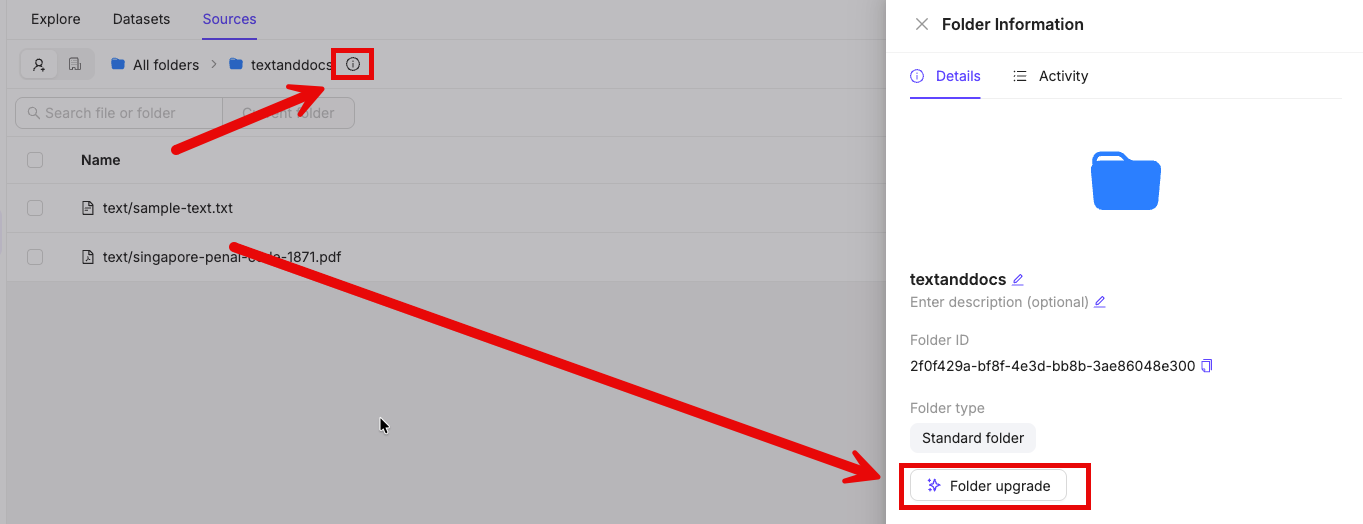
Before you can perform filtering, use similarity searches, or use embedding plots with your custom embeddings, you need to configure your top-level Folder in Data > Files & Folders.- Navigate to Data > Files & Folders.
- Click into the folder.
- Click the info icon next to the folder name.
- Click Folder upgrade.
- Expand the Custom Embeddings drop down.
- Select a custom embedding from the list.
-
Click Add.
The custom embedding appears under Custom Embeddings.
You can add multiple embeddings. Only one embedding can be active in Encord at a time.
- Expand your selected custom embedding.
-
Select any of the following:
- Similarity search
- Compute UMAP Embedding Reduction
- Compute Advanced Quality Metrics
- Click Save and process changes. A dialog appears informing you that the folder upgrade was successful. You are now ready to use your custom embeddings.
Filtering with Custom Embeddings
You must upgrade your top-level folder to filter using custom embeddings.
-
Click the Filter dropdown or press F.
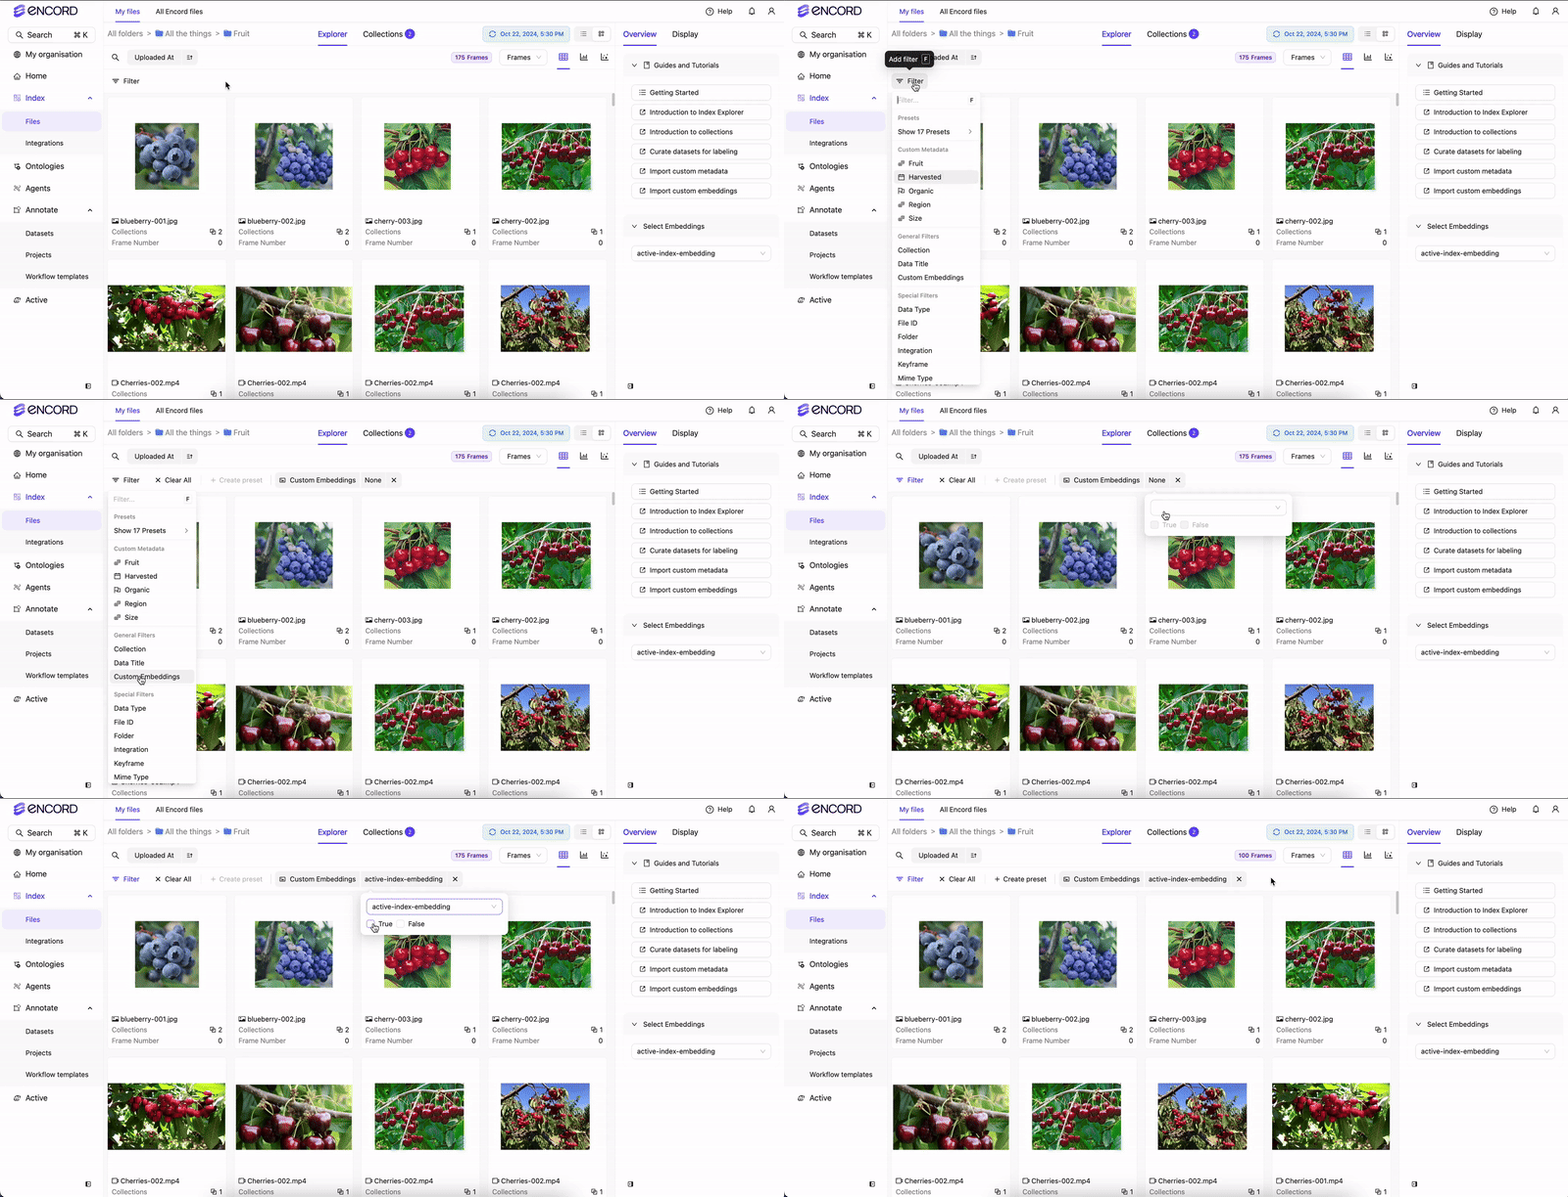
- Click Custom Embeddings from the menu.
- Select your custom embedding to filter your data.
- Select True to display images, frames, or videos with the custom embeddings. In the top-level Data > Explore view, the toolbar displays an Embedding selector when multiple embeddings are available. Selecting a custom embedding applies the corresponding Custom Embeddings filter. Applying a single Custom Embeddings filter set to True also updates the toolbar selection, and removing the filter resets the selector to All embeddings. Encord remembers your toolbar selection for each organization and restores it when that embedding remains available.
Similarity Searches with Custom Embeddings
You must upgrade your top-level folder before you can use similarity search.
- Click the Embeddings icon in the Explorer. The Embeddings screen appears.
-
Select the embedding you want to use from the Select custom embeddings menu.

- Click the Grid icon.
-
Hover over an image or frame with the custom embedding.

- Click the Similarity Search icon. Images and Frames sort according to similarity.
Adjust Similarity Search Distance
- Click the Embeddings icon in the Explorer. The Embeddings screen appears.
-
Select the embedding you want to use from the Select custom embeddings menu.
- Click the Grid icon.
-
Hover over an image or frame with the custom embedding.
-
Click the Similarity Search icon.
Images and Frames sort according to similarity AND a Distance filter appears.

- Adjust the Distance filter slider to change the similarity search results.
Embedding View
You must upgrade your top-level folder before you can view embedding plots.
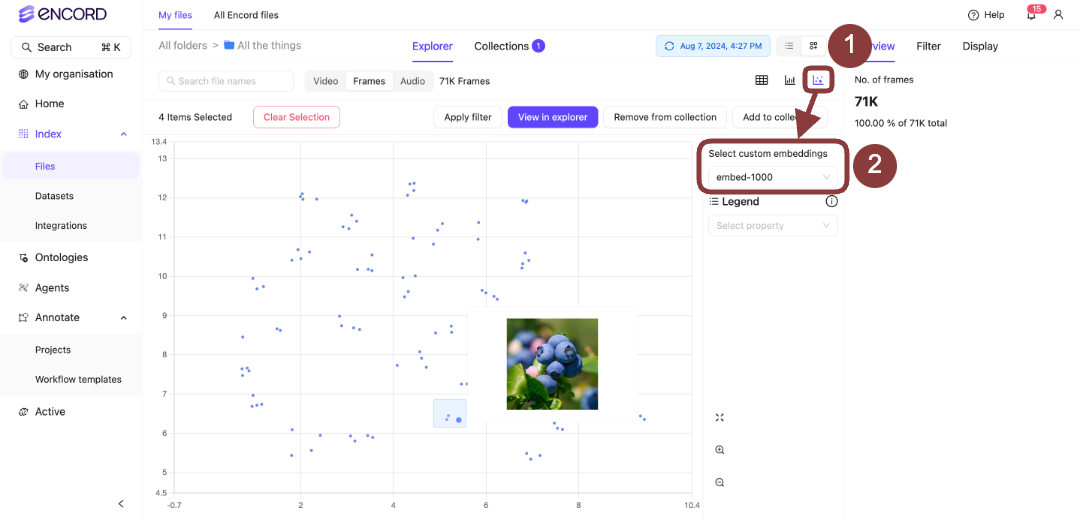 Notice how images are clustered around certain regions. By defining a rectangular area on the plot, users can quickly isolate and analyze data points within that defined region. This approach facilitates the exploration of commonalities among these samples.
Hover over clusters or individual data points on the plot to visually check frames.
Upon selecting a region, the content within the Explorer page adjusts accordingly. Various actions can be executed with the chosen group:
Notice how images are clustered around certain regions. By defining a rectangular area on the plot, users can quickly isolate and analyze data points within that defined region. This approach facilitates the exploration of commonalities among these samples.
Hover over clusters or individual data points on the plot to visually check frames.
Upon selecting a region, the content within the Explorer page adjusts accordingly. Various actions can be executed with the chosen group:
- Use Collections to tag and group images.
- Establish subsets similar to these and then conduct comparisons.