STEP 1: Create Metadata Schema
The schema organizes your custom metadata. Encord supports:- Scalars: Methods for filtering and specifying data for custom Label Editor layouts.
- Enums: Methods with options for filtering.
- Embeddings: Method for embedding plot visualization, similarity search, and natural language search.
Custom metadata
Custom metadata can store any information which is not the data itself in a key-value format. Custom metadata is often used to describe information useful in curation and management at scale. Encord also uses metadata to create annotation specific layouts in the editor. You set up both using a metadata schema.Metadata schema table
Useadd_scalar to add a scalar key to your metadata schema.
Use
add_enum and add_enum_options to add an enum and enum options to your metadata schema.
Use
add_embedding to add an embedding to your metadata schema.
Import your metadata schema to Encord
STEP 2: Create JSON for Import
For a list of supported file formats for each data type, go here.
clientMetadata to ensure they display correctly in custom Label Editor layouts.
-
The
"encord-layout-group"key determines which files are shown together — files with the same"encord-layout-group"value are displayed simultaneously. Both files in the example appears in the Label Editor simultaneously since they have the same"encord-layout-group"value. -
The
"encord-editor-grid-position"key, set to eitherAorB, specifies the exact position of each file within the label editor.
audioMetadata and one does not.
STEP 3: Import your Audio files
You can import your audio data, using the JSON file you created, using the UI or the SDK.Import with the UI
- Navigate to Data > Files & Folders in the Encord platform.
- Click into a Folder.
- Click + Upload files. A dialog appears.
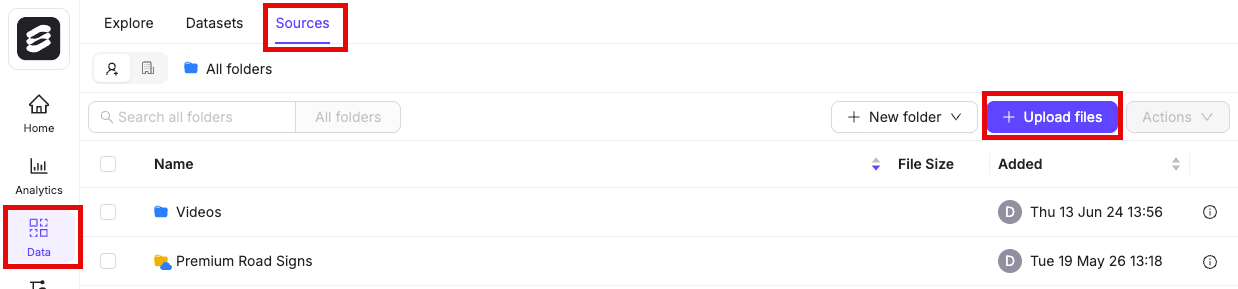
- Click Import from cloud data.

Import with the SDK
To use your data in Encord, it must be uploaded to the Encord Files & Folders storage. Once uploaded, your data can be reused across multiple Projects and contain no labels or annotations themselves. Files & Folders stores your data, while Projects store your labels. The following script creates a folder in Files & Folders and uses your AWS integration to register data in that folder. The following script creates a new folder in Files & Folders and initiates uploads from AWS. It works for all file types. Ensure that you:- Replace
<private_key_path>with the path to your private key. - Replace
<integration_title>with the title of the integration you want to use. - Replace
<folder_name>with the folder name. The scripts assume that the specified folder name is unique. - Replace
path/to/json/file.jsonwith the path to a JSON file specifying which cloud storage files should be uploaded. - Replace
A folder to store my fileswith a meaningful description for your folder. - Replace
"my": "folder_metadata"with any metadata you want to add to the folder.
- “Upload is still in progress, try again later!”: The registration has not finished. Run this script again later to check if the data registration has finished.
- “Upload completed”: The registration completed. If any files failed to upload, the URLs are listed.
- “Upload failed”: The entire registration failed, and not just individual files. Ensure your JSON file is formatted correctly.
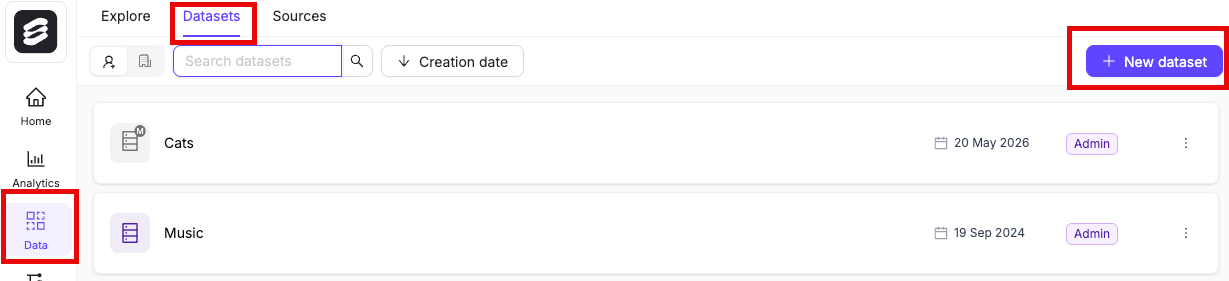
STEP 4: Create a Dataset
- Click the New dataset button in the Datasets section in Annotate.
- Give your Dataset a meaningful title and description. A clear title and description keeps your data organized.
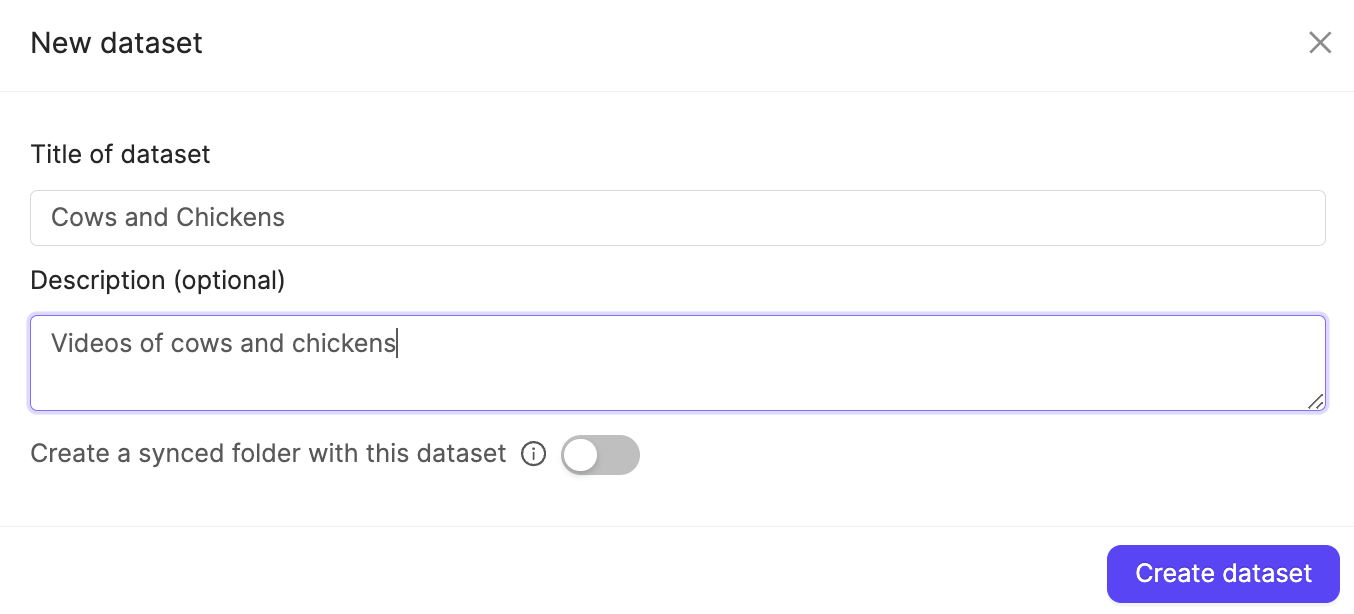
- Click Create dataset to create the Dataset.
Attach files
- Navigate to the Datasets section under the Annotate heading.
- Click the Dataset you want to attach data to.
- Click +Attach existing files.

- Select the folders containing the files you want to attach to the Dataset. To select individual files, double-click a folder to see its contents, and select the files you want to add to the Dataset.
- Click Attach data to attach the selected files to the Dataset.
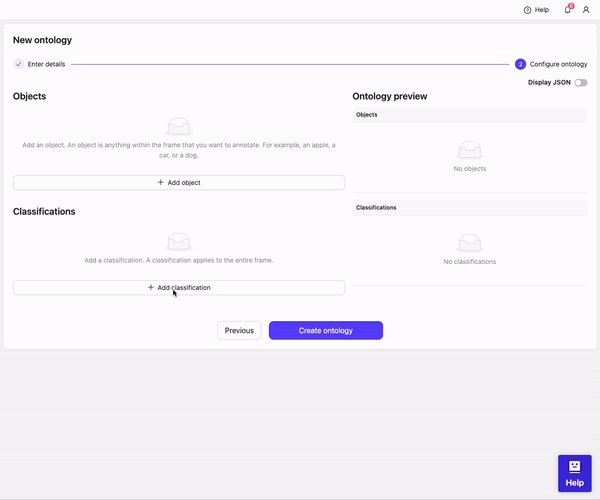
STEP 5: Create an Ontology
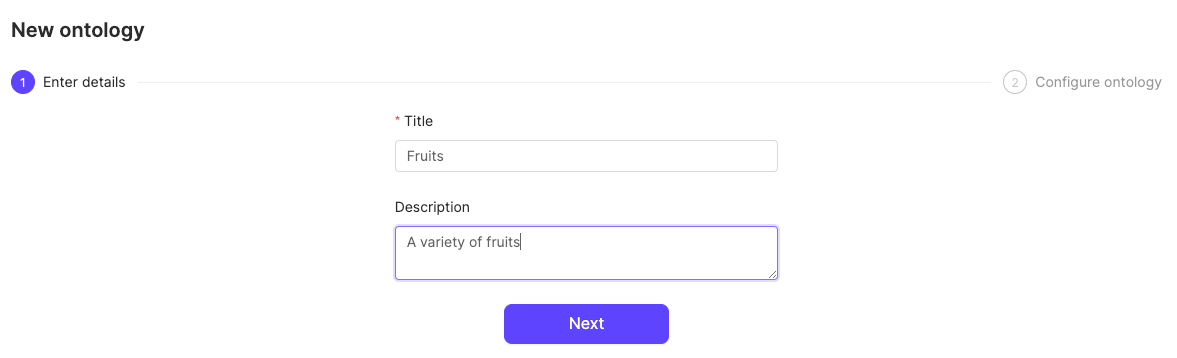
- Click the New ontology button in the Ontologies section to create a new Ontology.

- Give your Ontology a meaningful title and description. A clear title and description keeps your Ontologies organized. Click Next to continue.
- Define your Ontology structure.
- Click Add classification
- Type ‘Winner?’
- Click on 0 options to configure options
- Click Add option
- Enter the word Yes as an option
- Click Add option
- Enter the word No as an option
- Click Create ontology
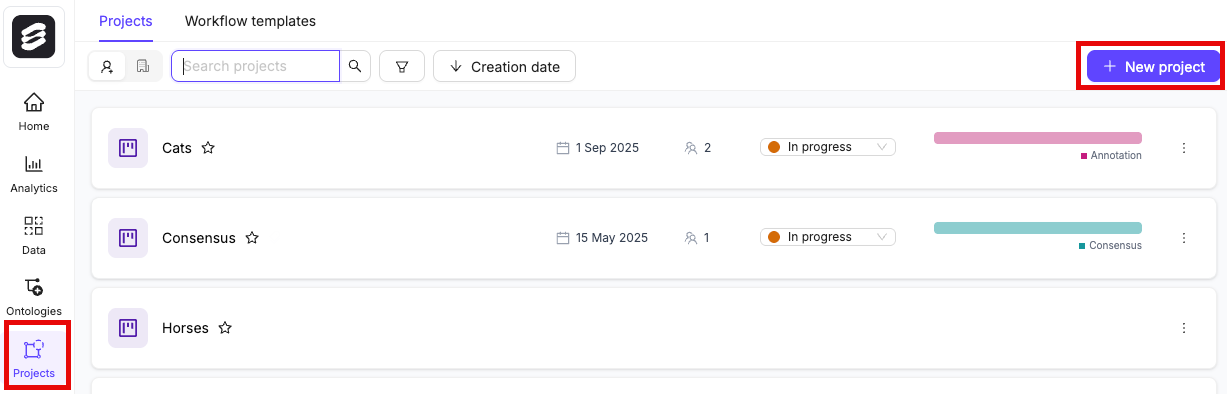
STEP 6: Create a Project
- In the Encord platform, navigate to Projects.
- Click the + New annotation project button to create a new Project.
- Give the Project a meaningful title and description.
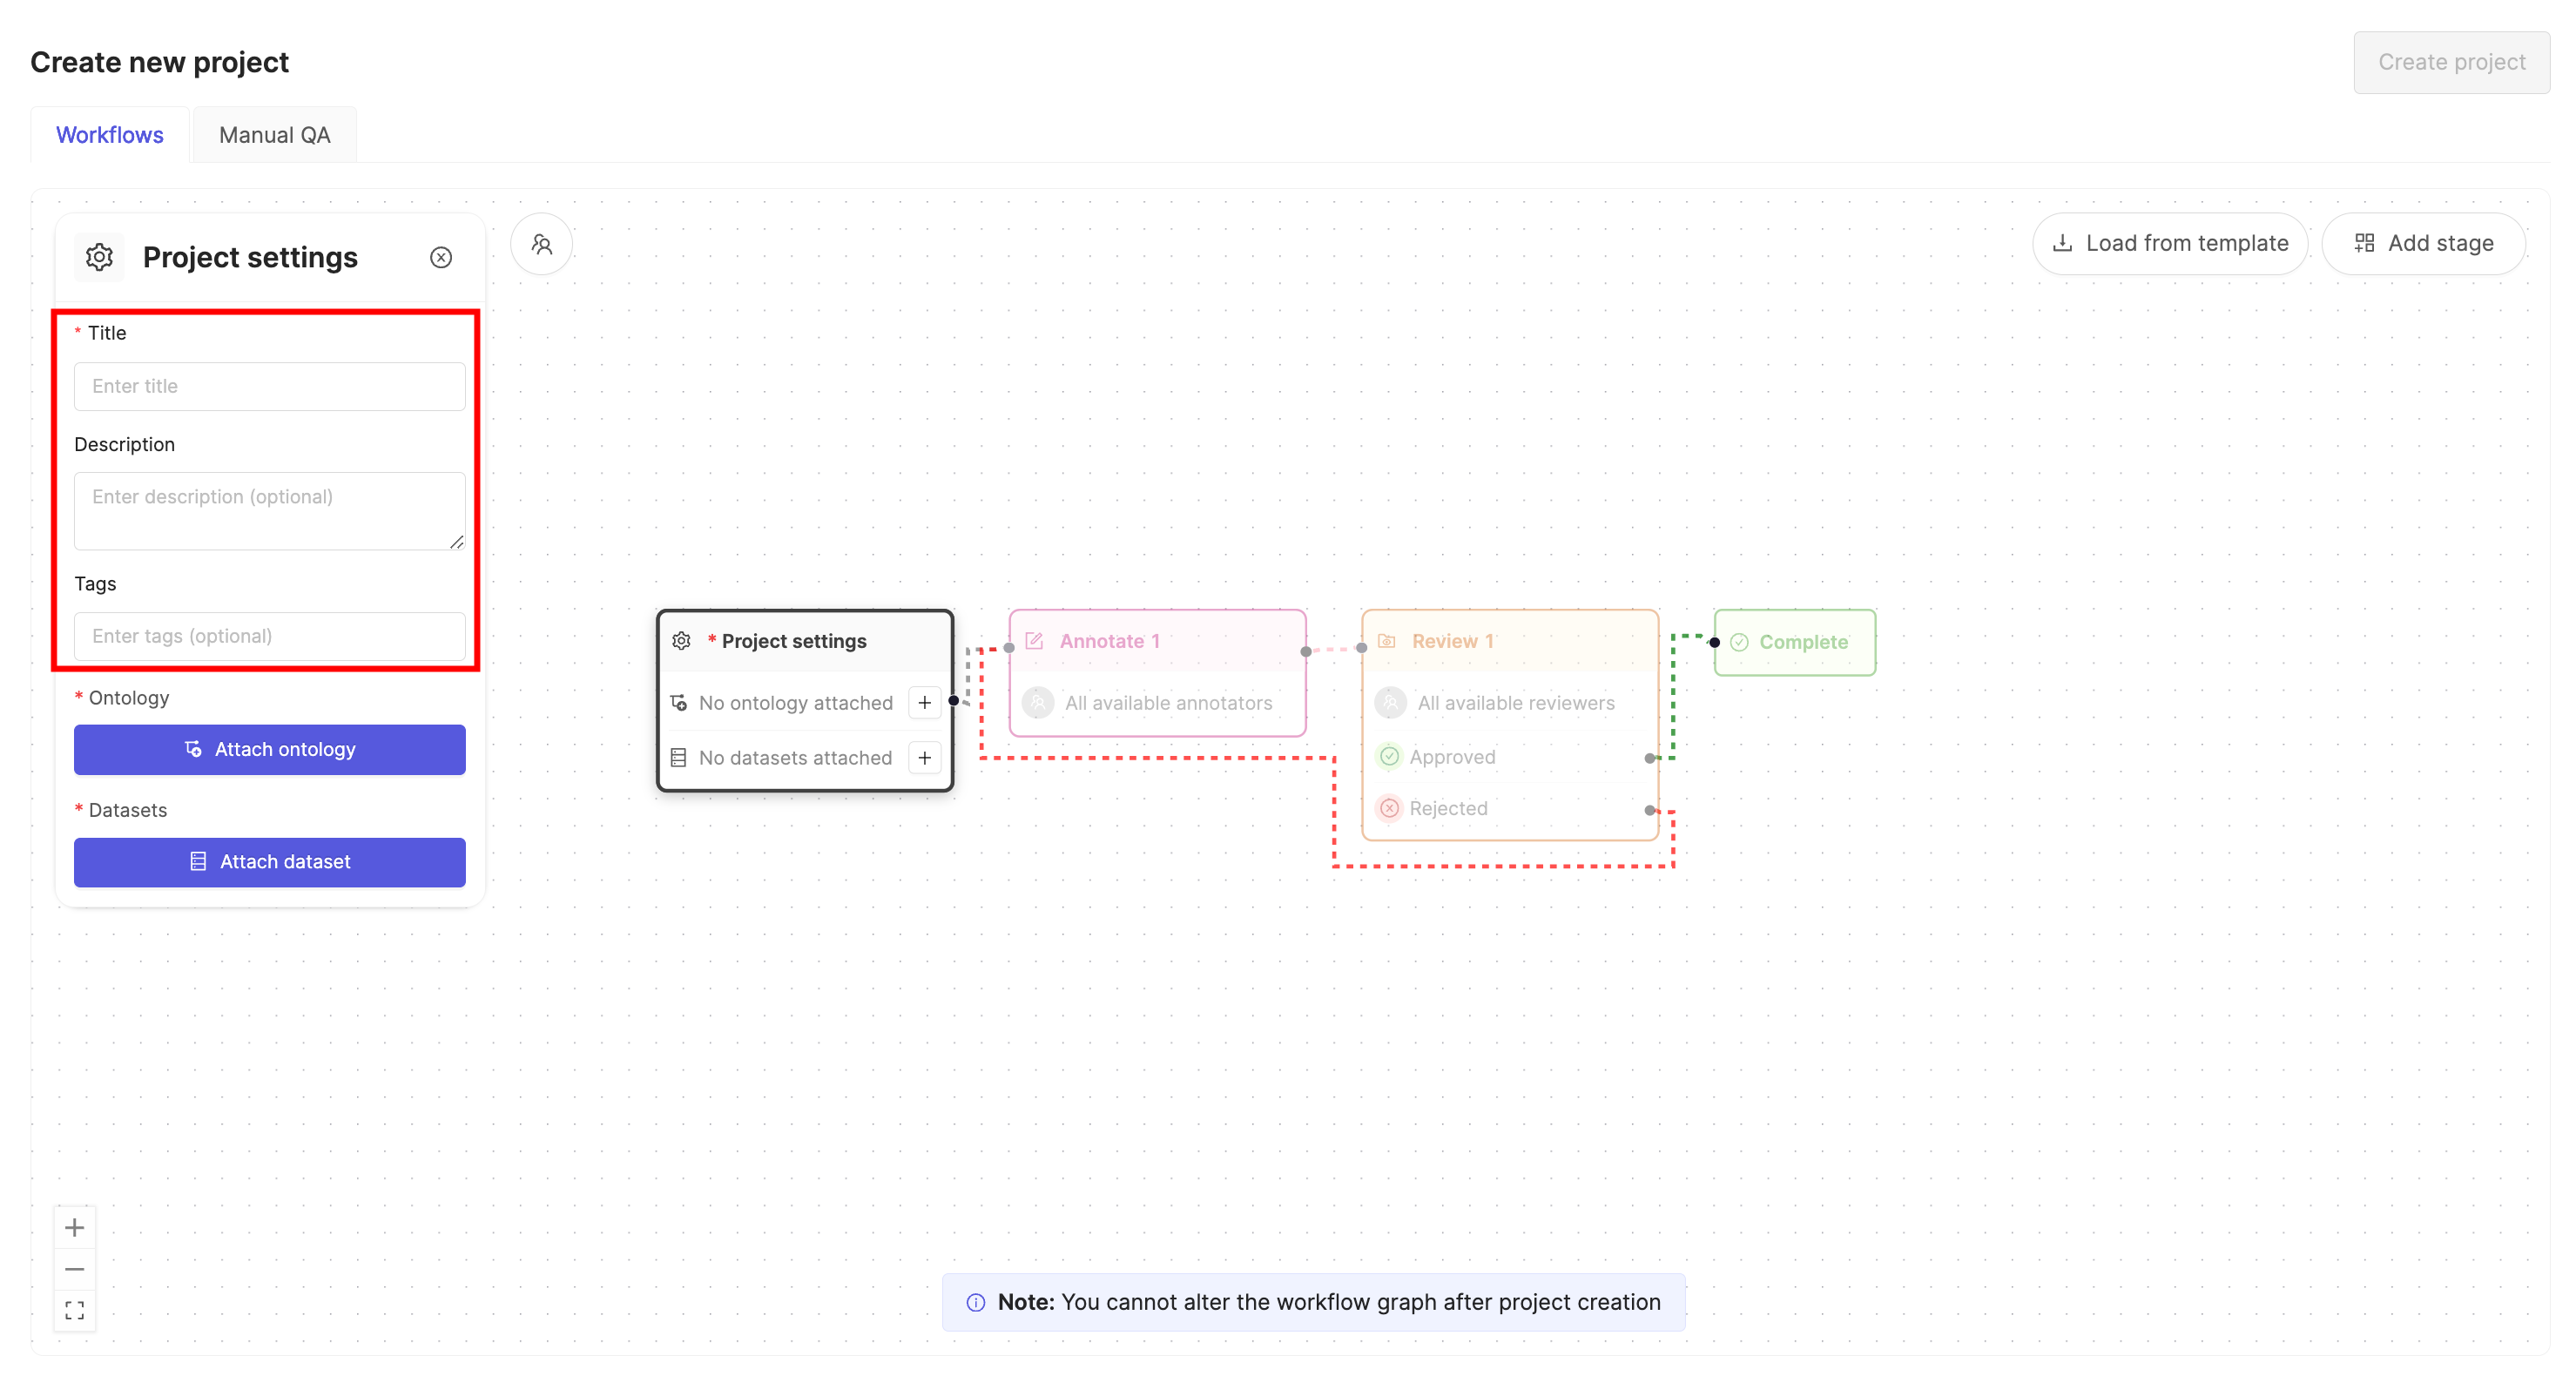
An optional Project tags drop-down is visible. Project tags are useful for categorizing and finding your Projects. Select as many tags as are relevant for your Project.
- Click the Attach ontology button.
- Select the Ontology you created in STEP 5 and click the Attach button.
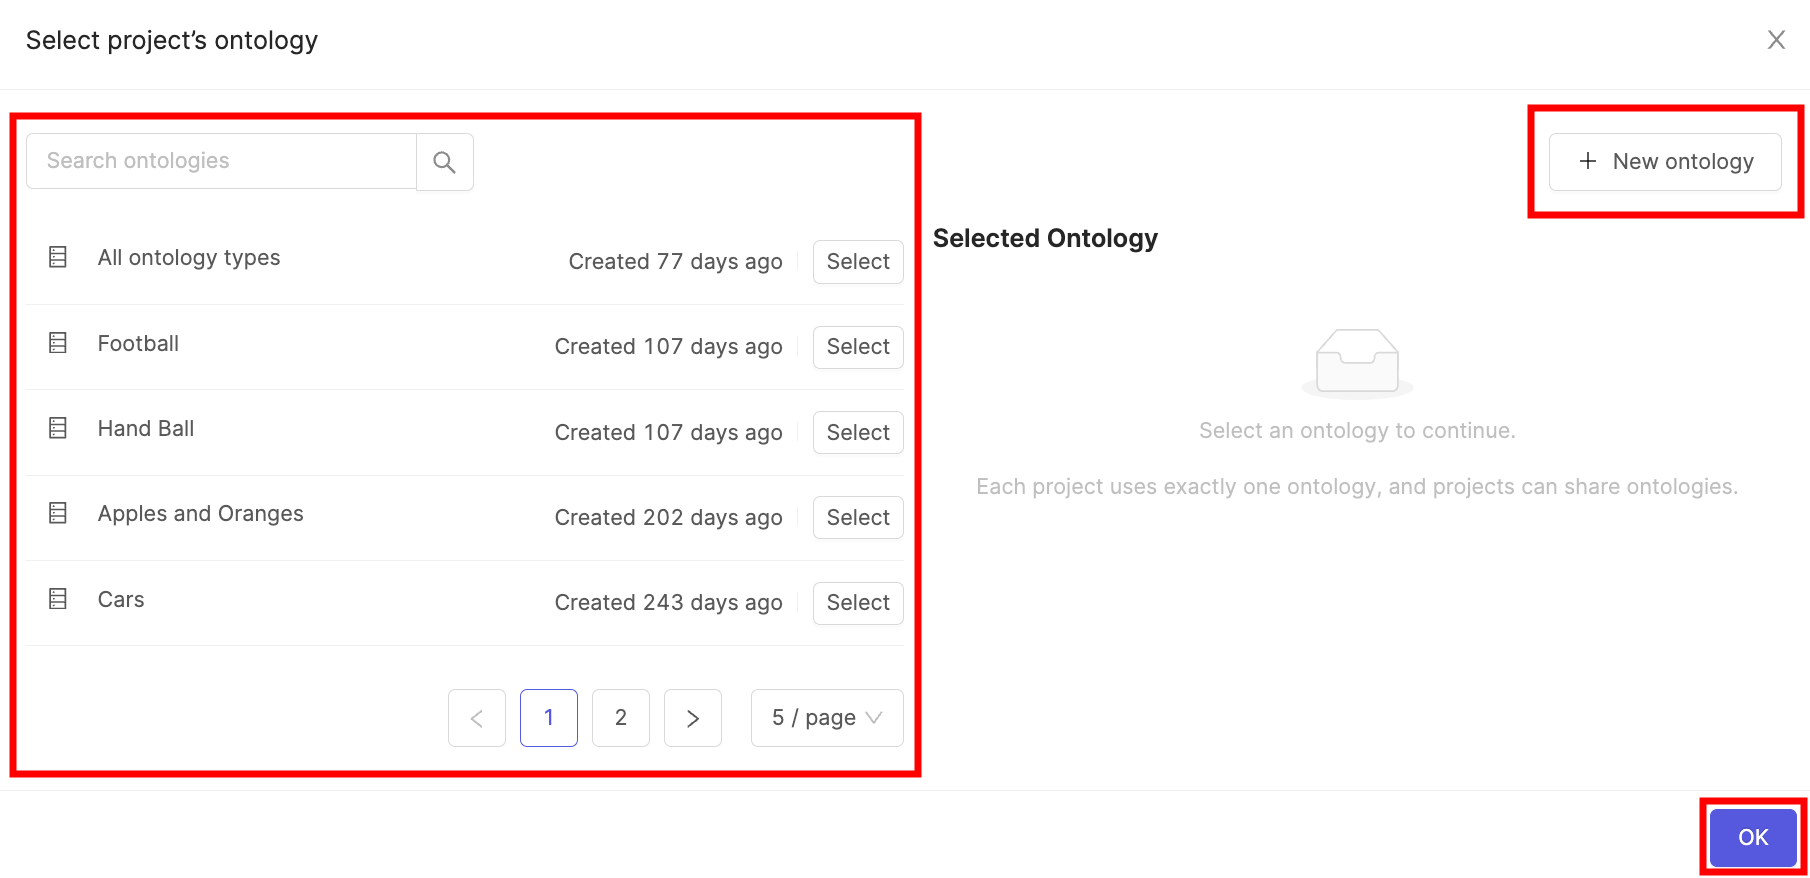
- Click OK to attach the Ontology to the Project.
- Click the Attach datasets button.
- Select the Dataset you created in STEP 4 and click the Attach button.
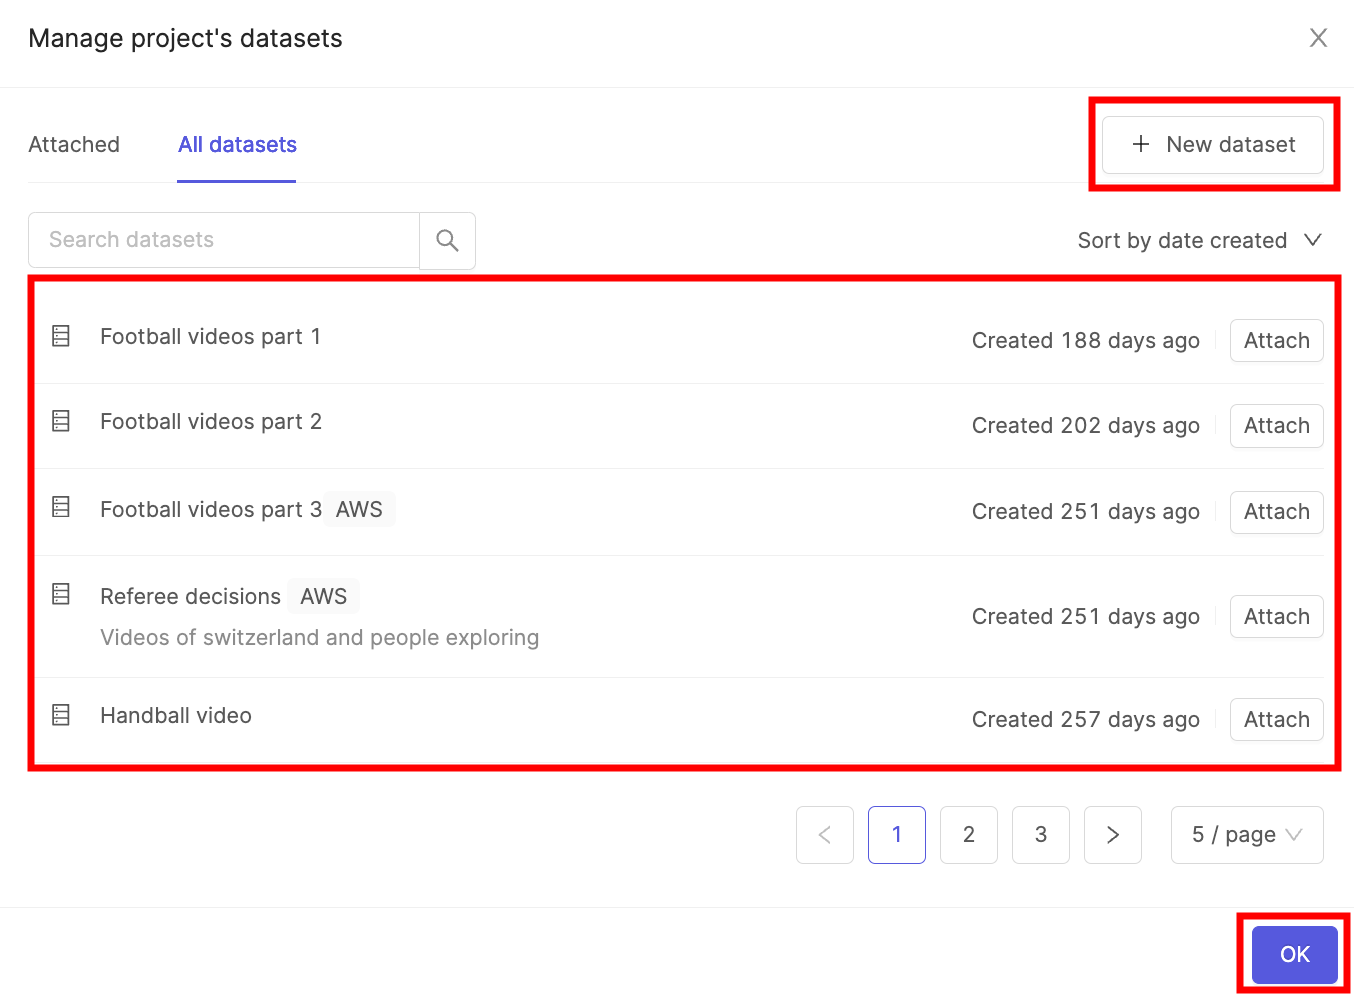
- Click OK to attach the Dataset(s) to the Project.
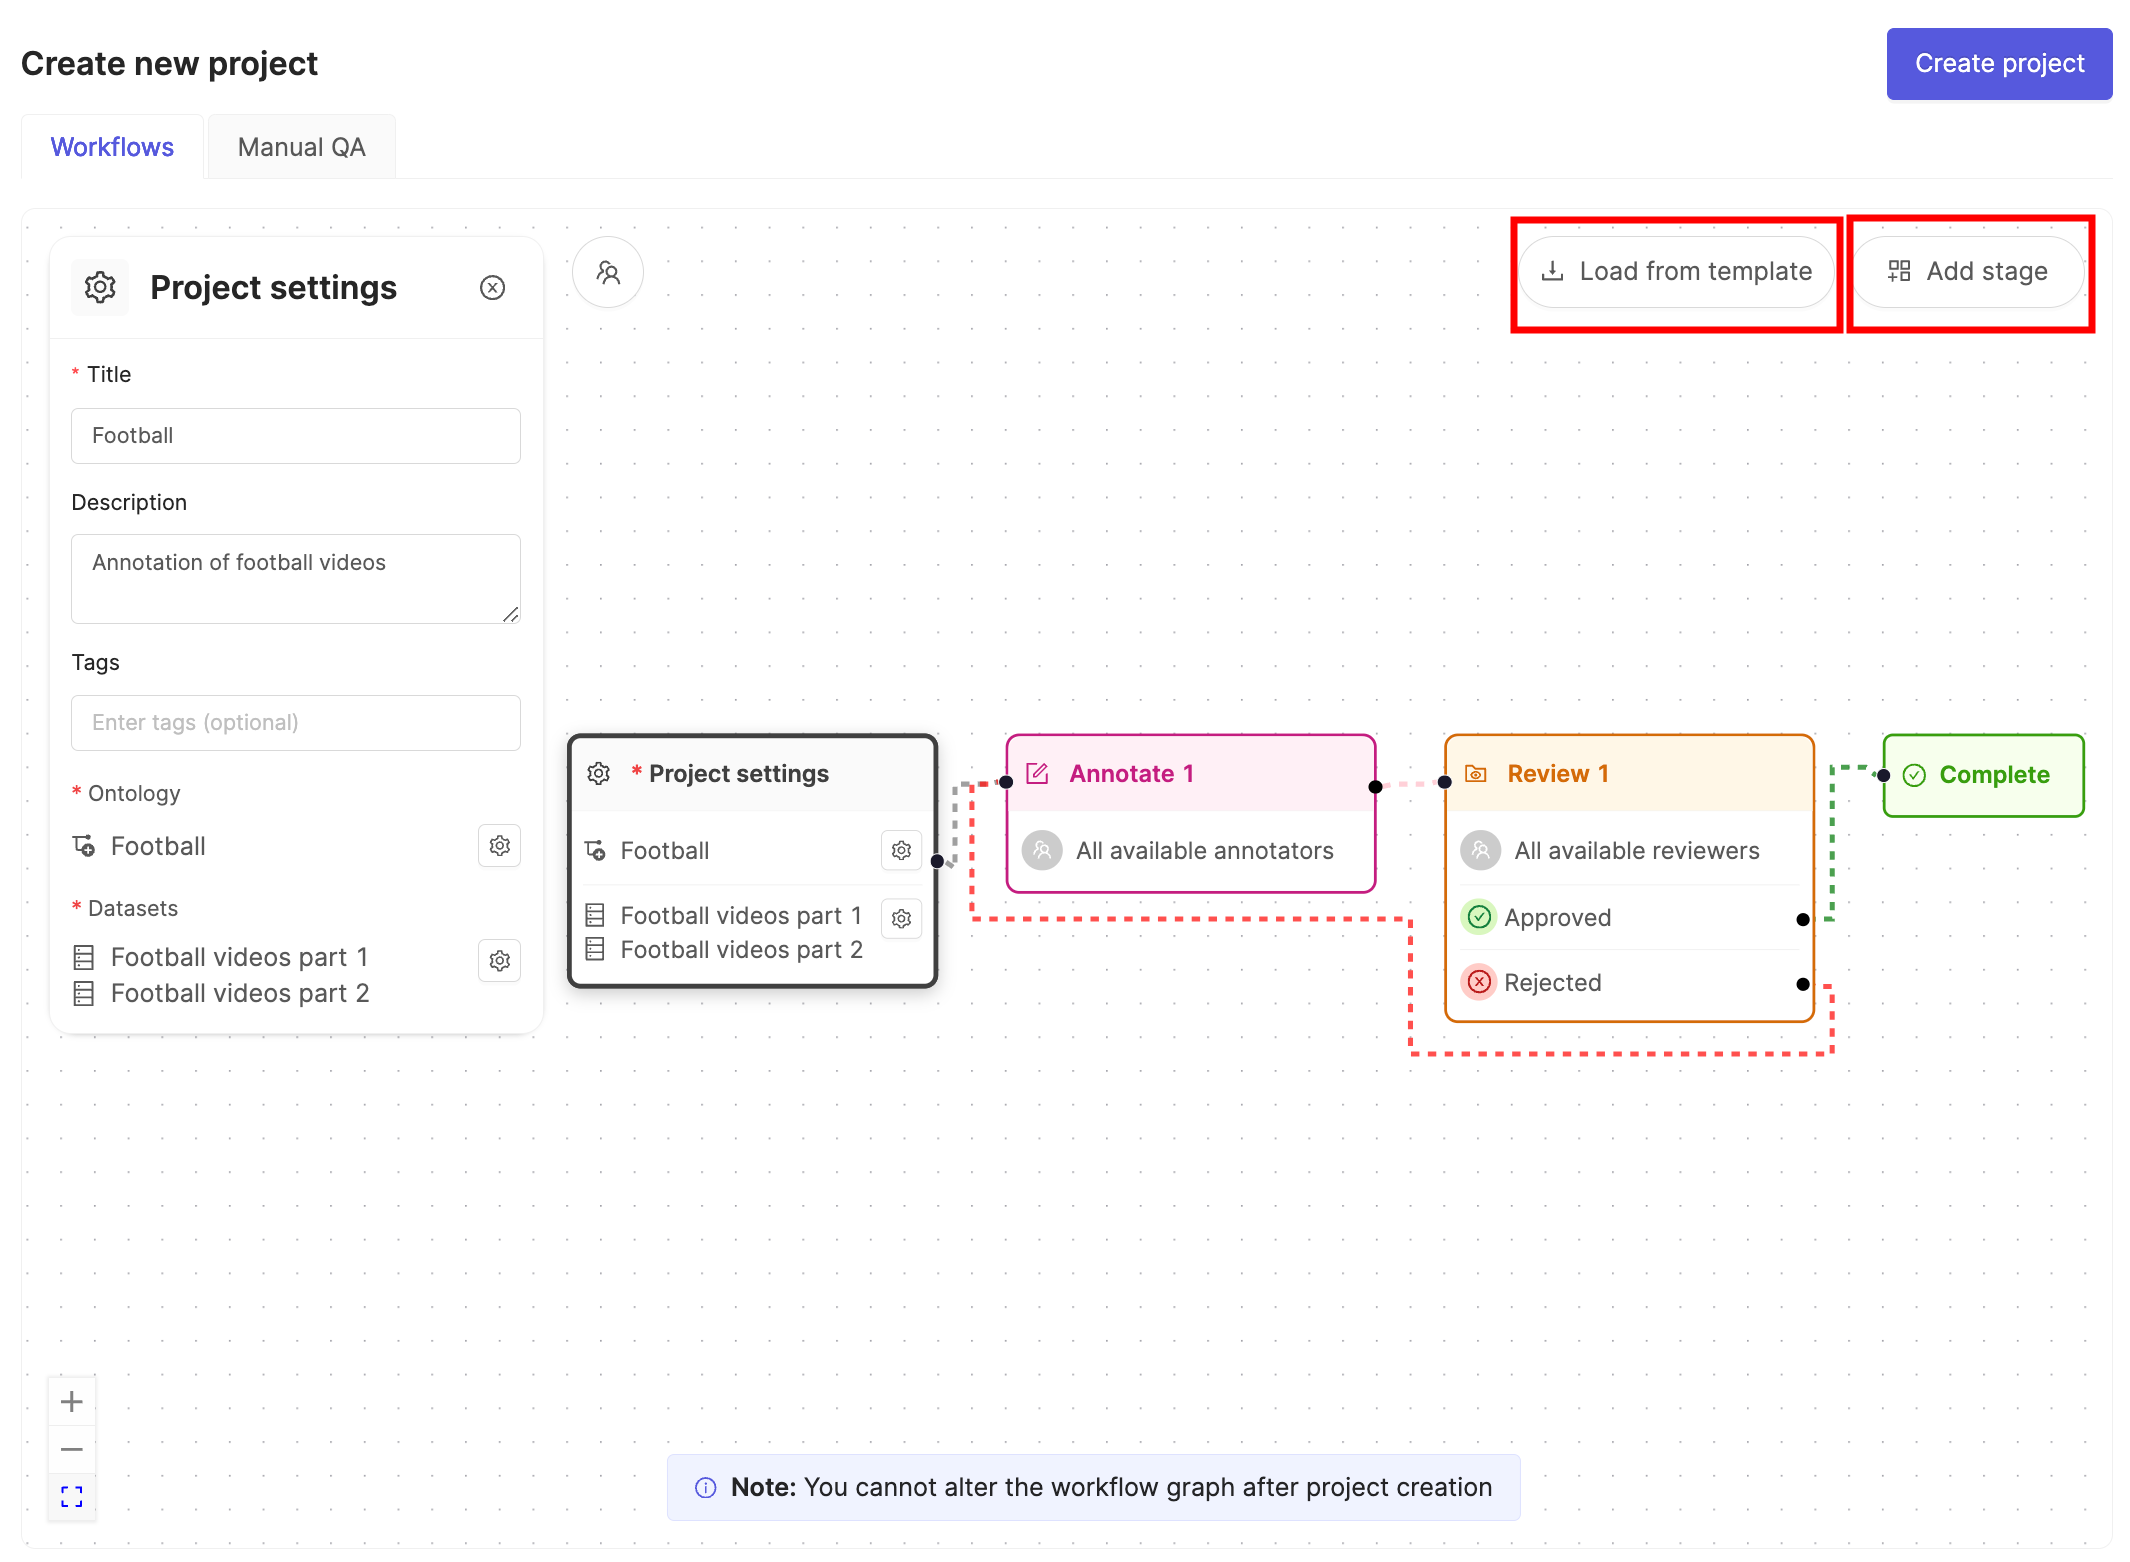
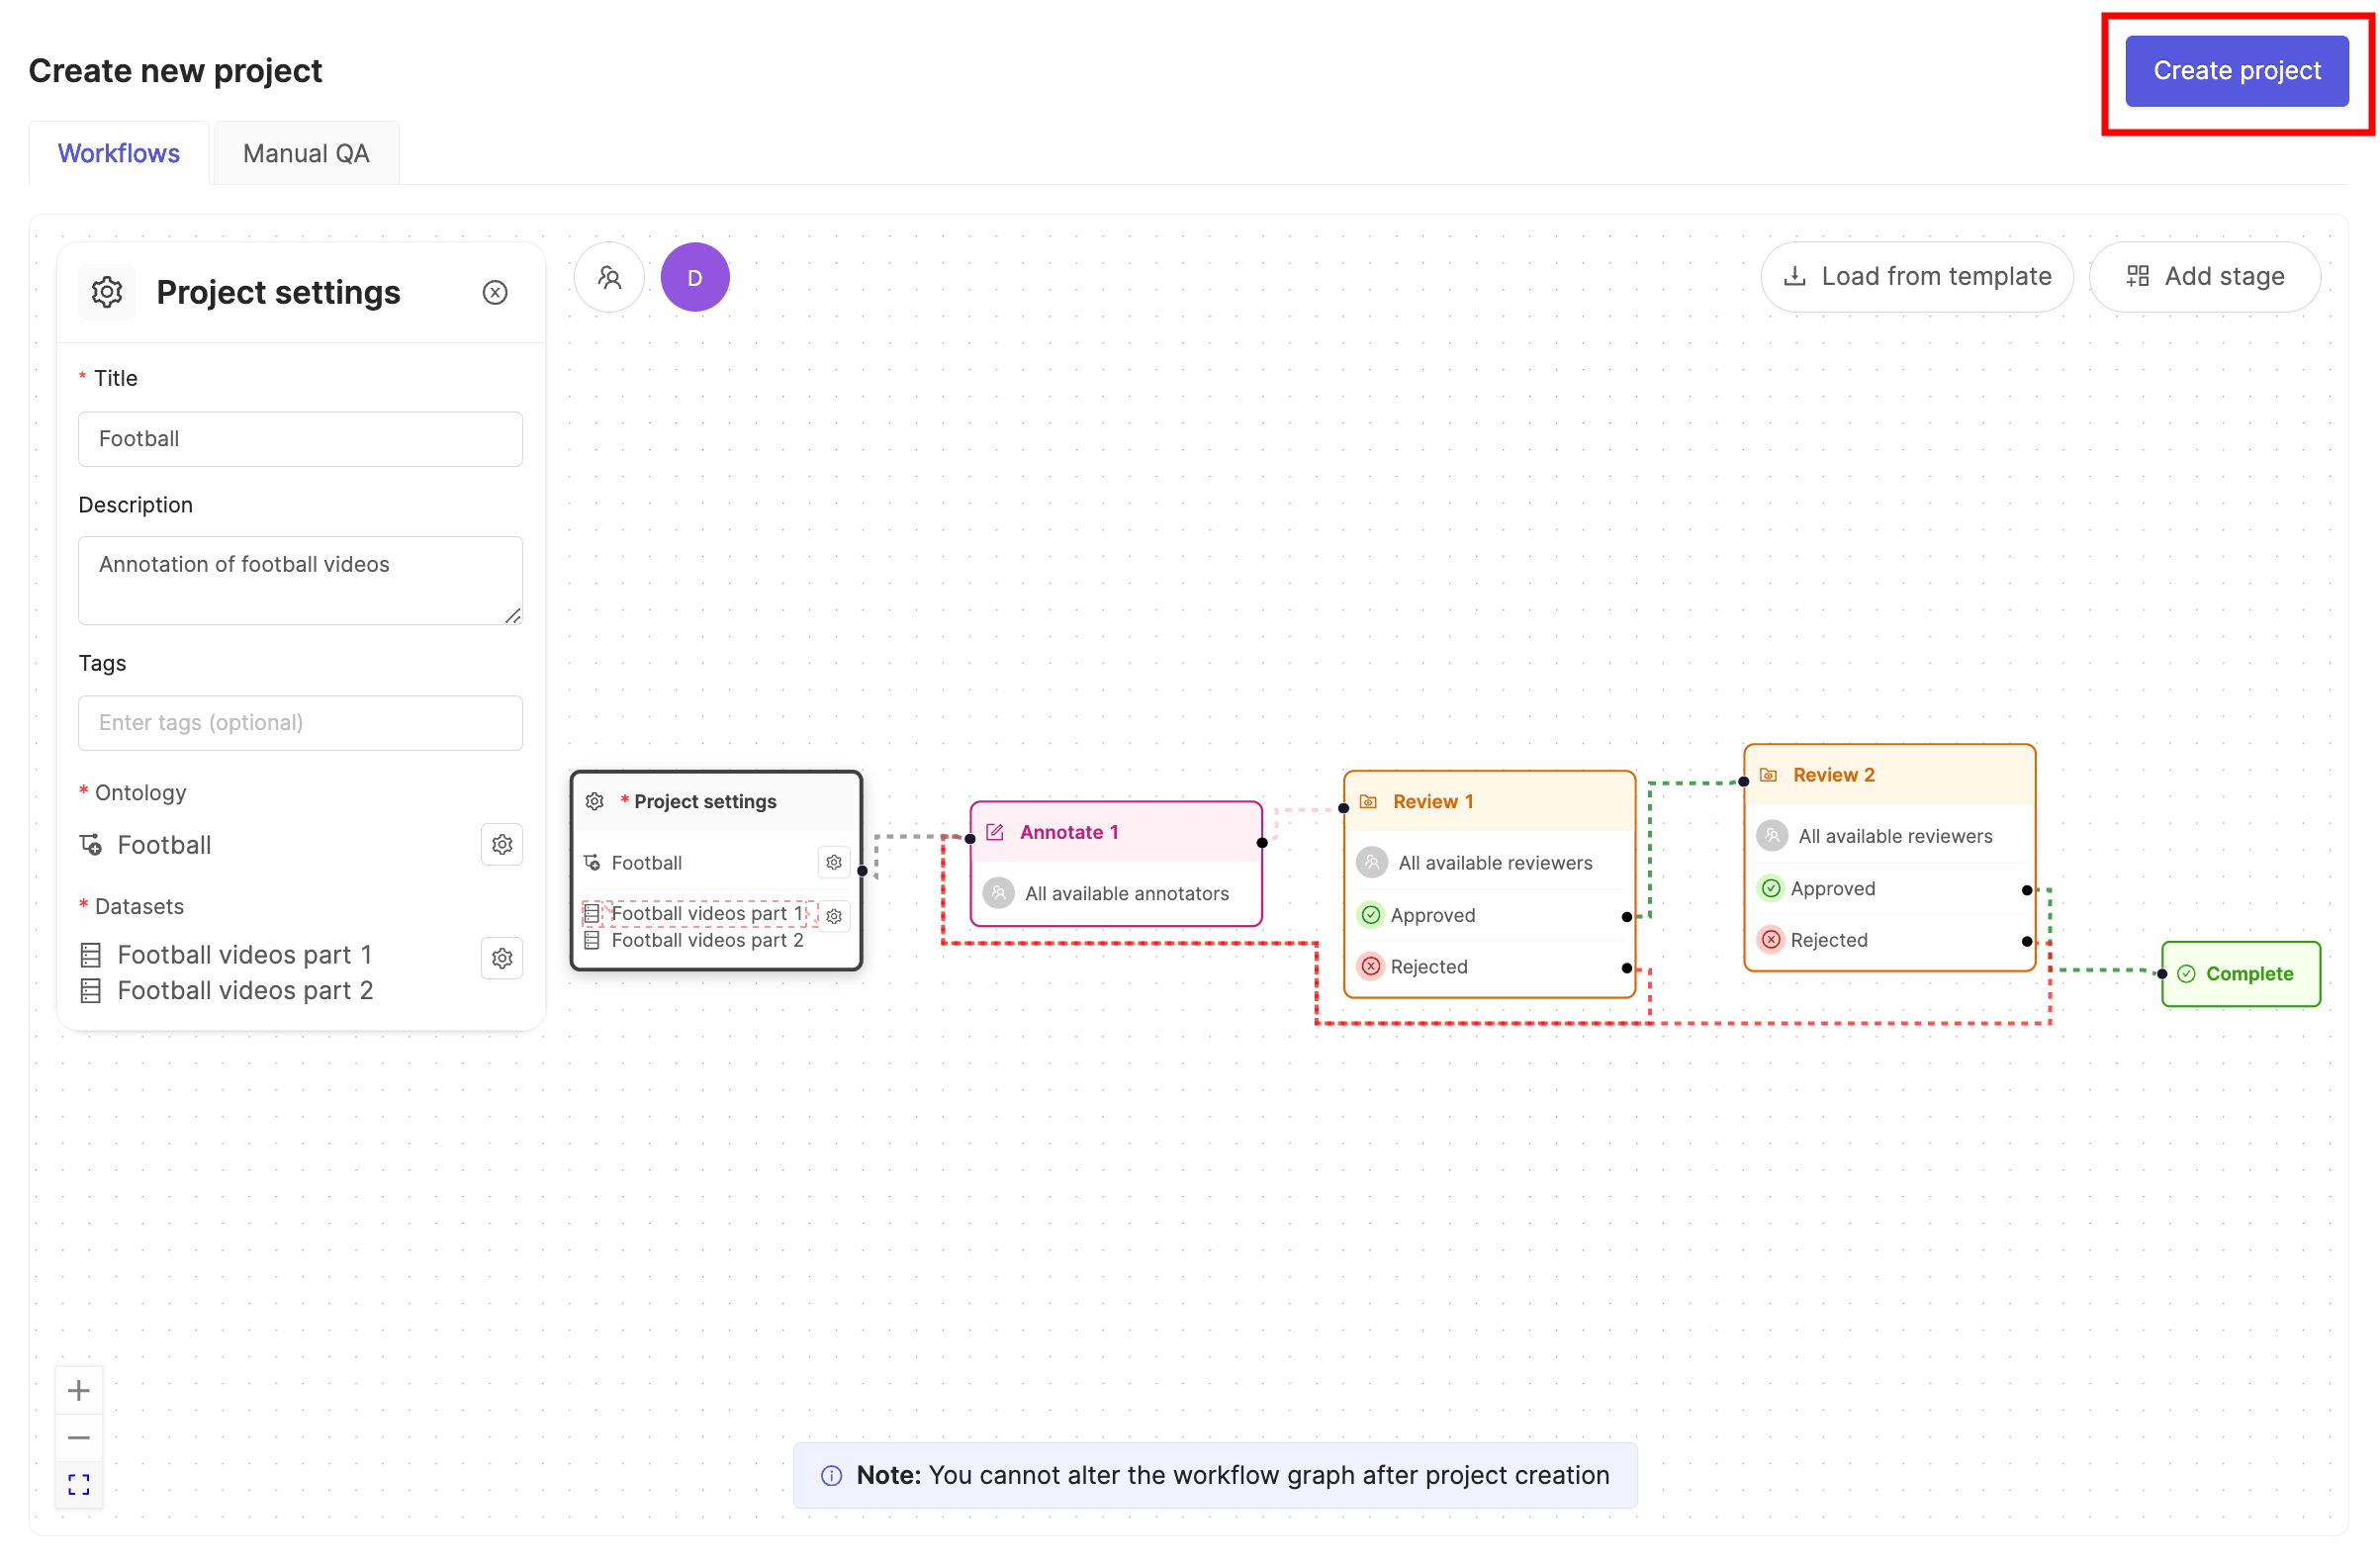
- Ensure the default Workflow shown suits your needs.
- Click Create project to finish creating the Project.
STEP 7: Import Custom Layout
After creating your Project, import a custom layout for the Label Editor. Start by creating a JSON file that determines the layout.Create a JSON for the Layout
Import the JSON
- Navigate to the Project settings.
- Click on Editor Layouts.
- Click Upload JSON.
- Select the JSON file containing the layout you want the Label Editor to have.

STEP 8: Label and Submit Audio Data
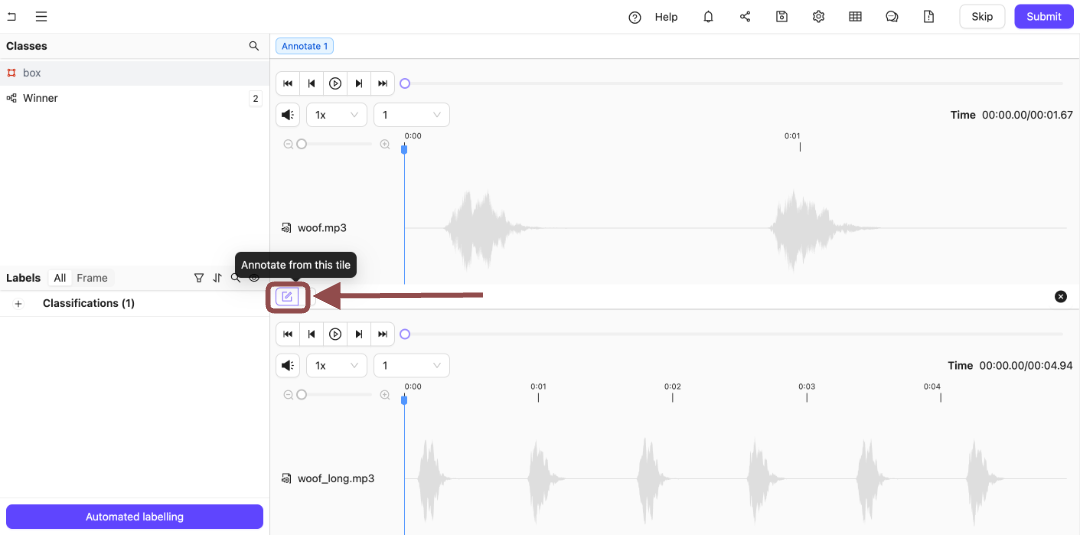
More than a single file appears in the Label Editor. Switch back and forth between the files you are labeling or reviewing using the Annotate from this tile icon.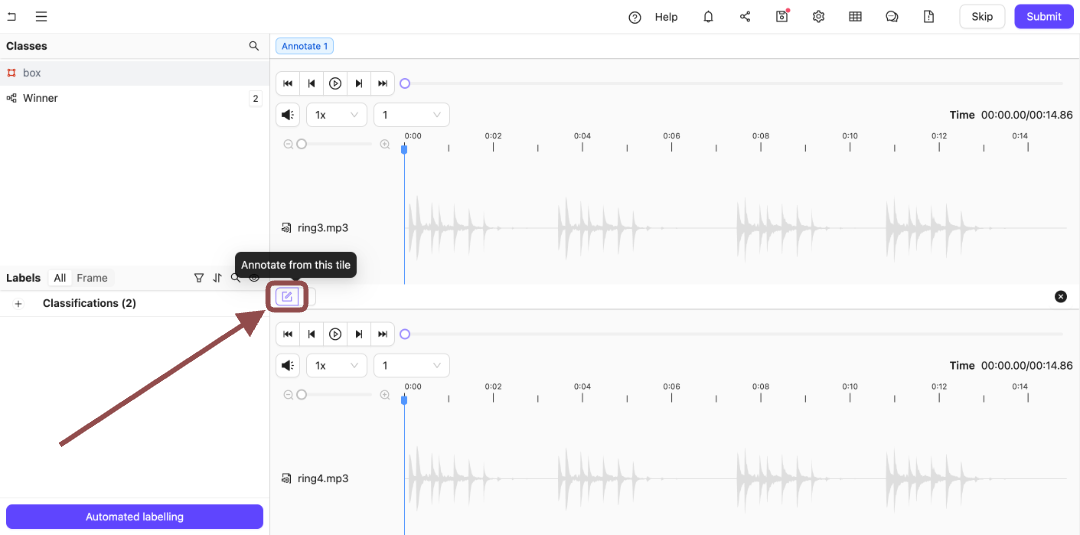
Label Audio Files
Label audio files using the Classification specified from your Ontology.
-
Go to Project > [Your Project Title] > Queue > Annotate.
The Project Annotate Queue appears with a list of audio files for labeling.

- Click Initiate next to a file from the Project Queue. Two audio files appear in the Label Editor.
-
Press
2to select the Winner Classification. The options for the Classification appear.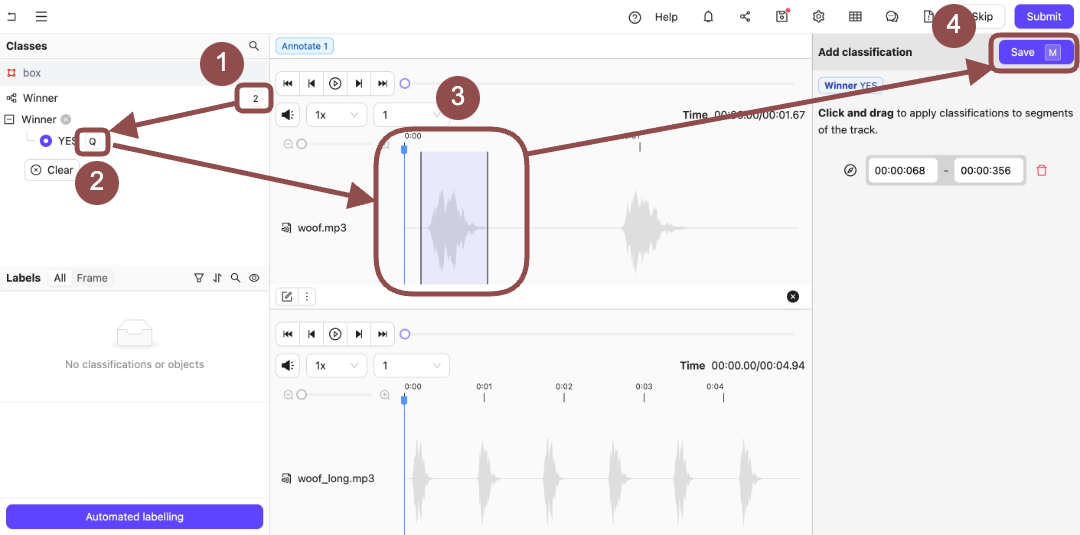
-
Press
Qto select Yes. - Click and then drag the sections of the audio file that appears at the top of the Label Editor.
-
Press
Nto save the Classifications on the audio file. -
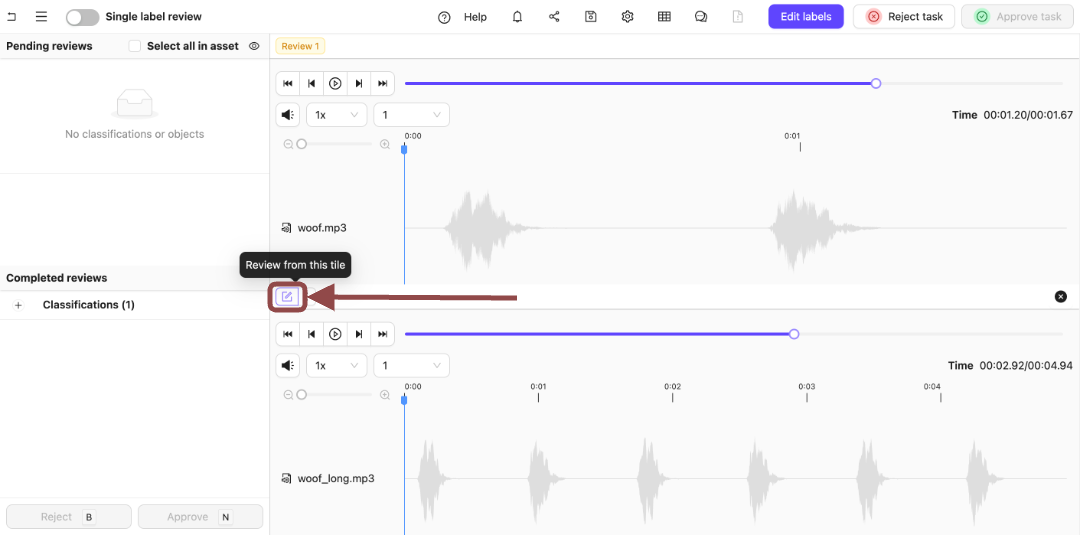
Click the Annotate from this tile icon to switch to annotating the bottom audio file.
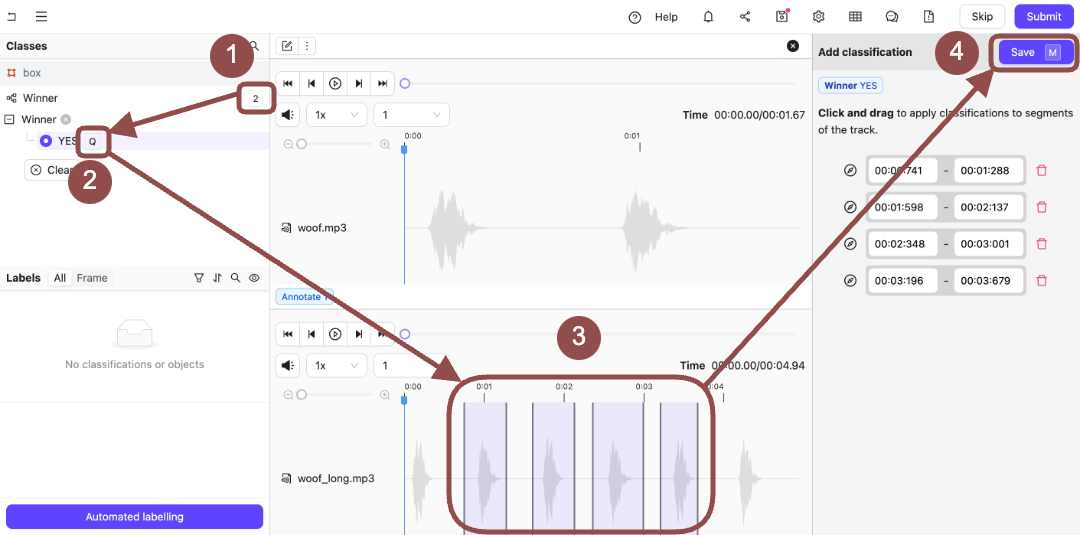
-
Press
Qto select Yes. - Click and then drag the sections of the audio file that appears at the top of the Label Editor.
-
Press
Nto save the Classifications on the audio file.
- Click Submit. The next set of audio files for annotation appears.
STEP 9: Review Audio Data
Approving tasks moves the tasks to the next stage in a workflow. In this example, that is Complete. Rejecting tasks sends the tasks back to the first stage in a workflow. In this example, that is Annotate.Approve

-
Go to Project > [Your Project Title] > Queue > Review.
The Project Review Queue appears with a list of audio files for labeling.
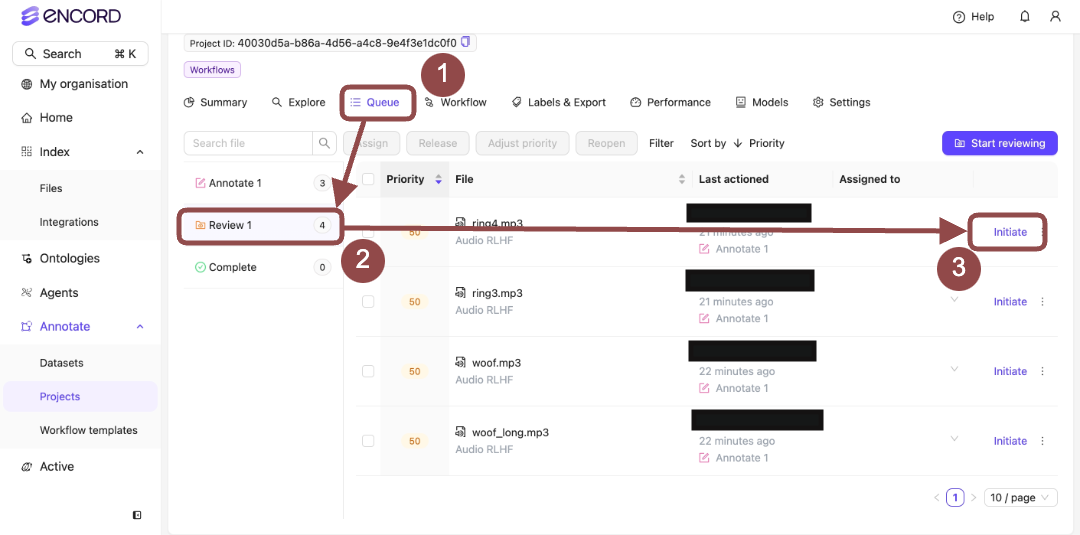
-
Click Initiate next to a file from the Project Queue.
Two audio files appear in the Label Editor.
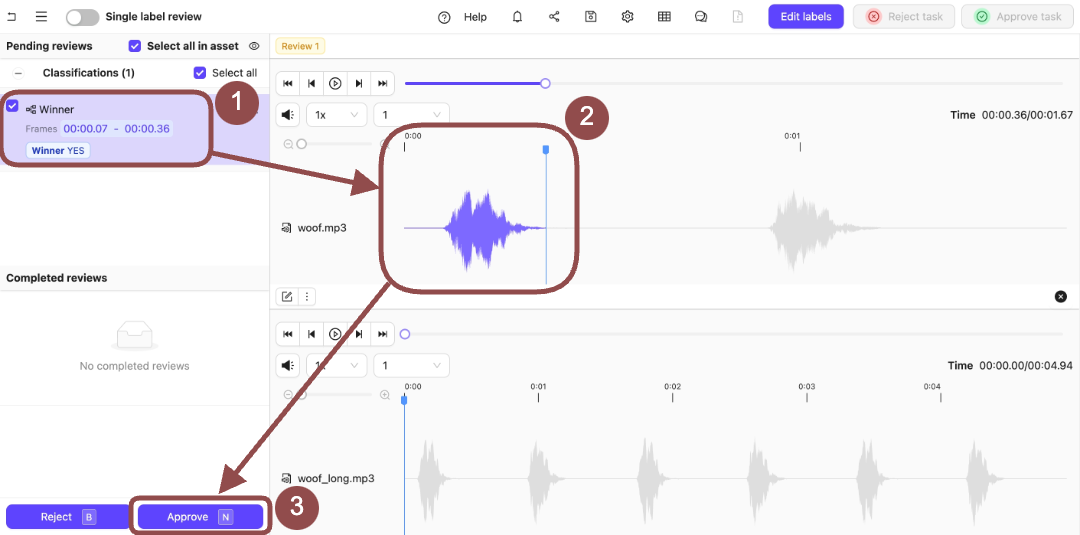
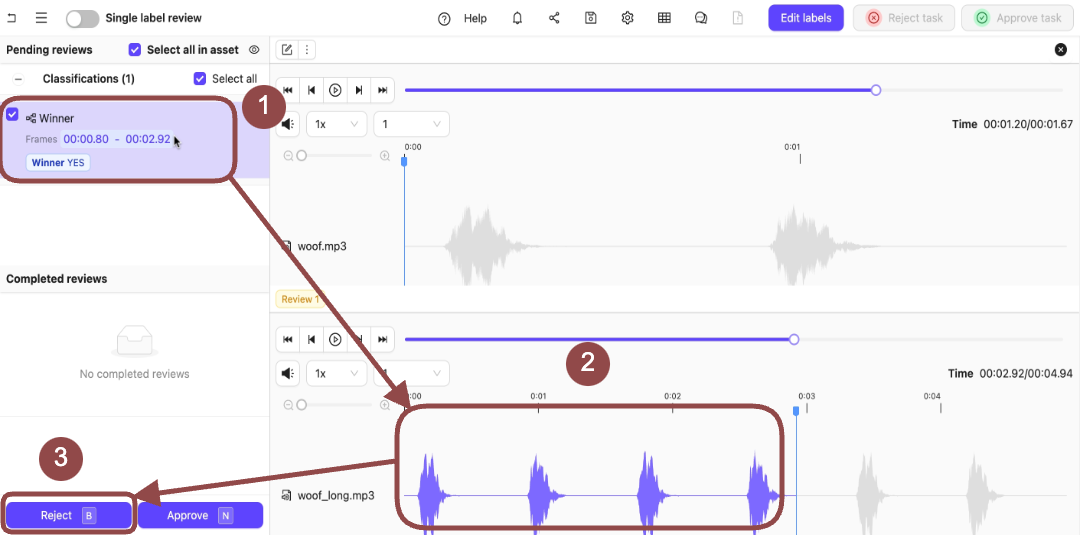
- Expand the Winner Classification. The options for the Classification appear.
- Select the Classifications applied to the audio file.
-
Press
Nto approve the Classifications on the audio file. -
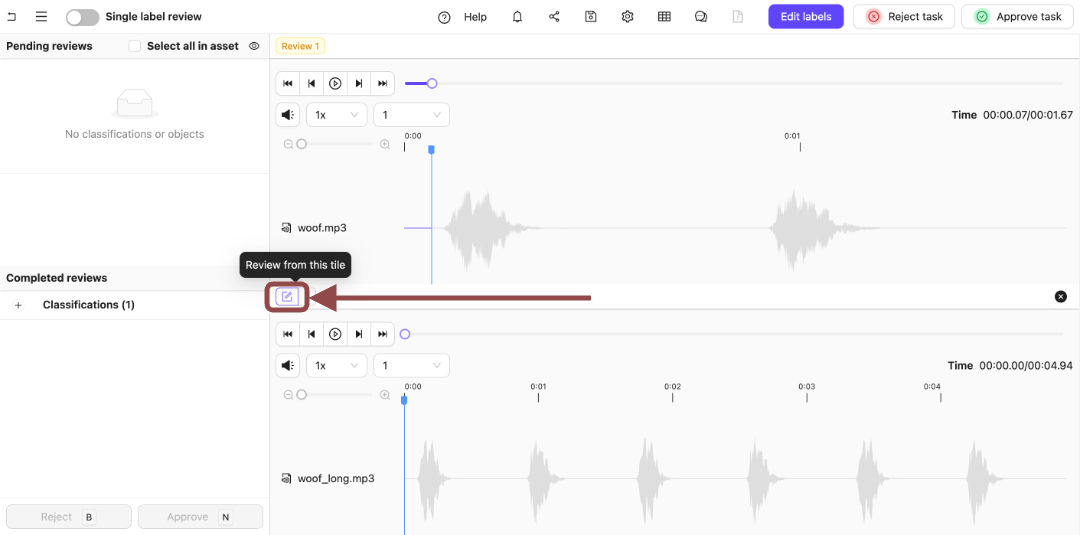
Press the Review from this file icon.
 .
.
-
Expand the Winner Classification.
The options for the Classification appear.
 .
.
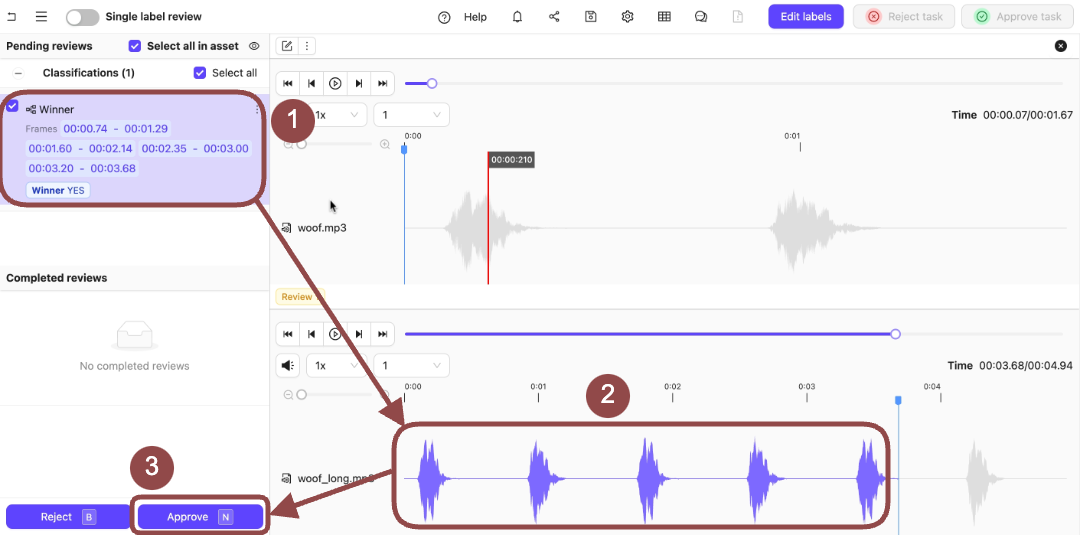
- Select the Classifications applied to the audio file.
-
Press
Nto approve the Classifications on the audio file. -
Click Approve task to move the task to the next stage.
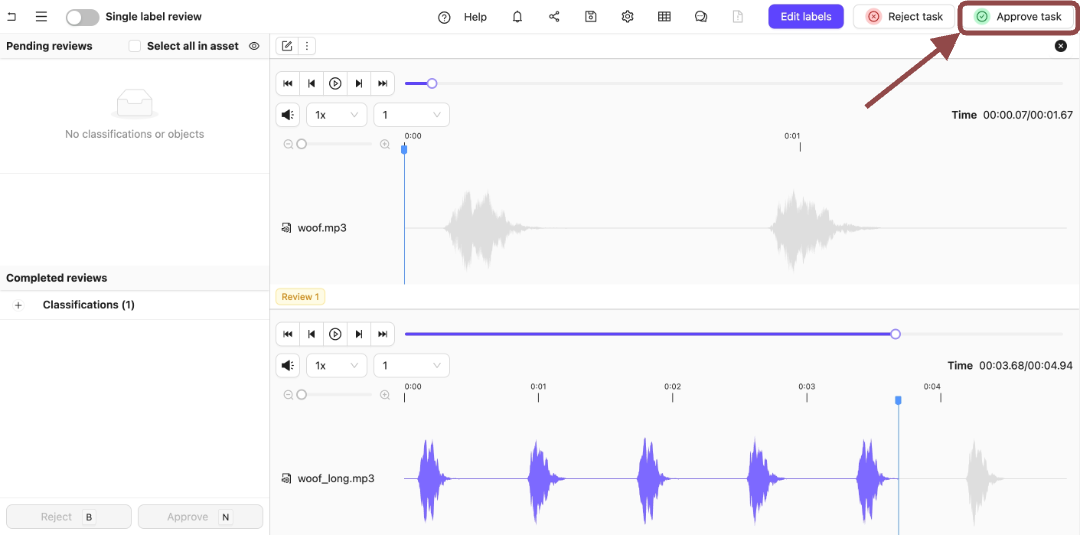 .
In this example, that is the Complete stage.
.
In this example, that is the Complete stage.
 .
.
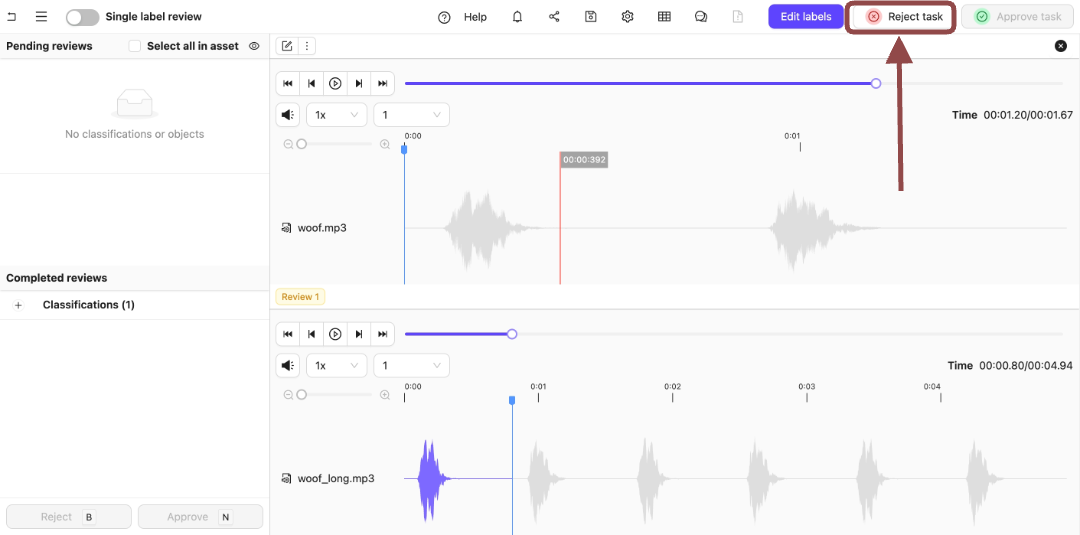
Reject
To reject labels on audio files:-
Go to Project > [Your Project Title] > Queue > Review.
The Project Review Queue appears with a list of audio files for labeling.
-
Click Initiate next to a file from the Project Queue.
Two audio files appear in the Label Editor.
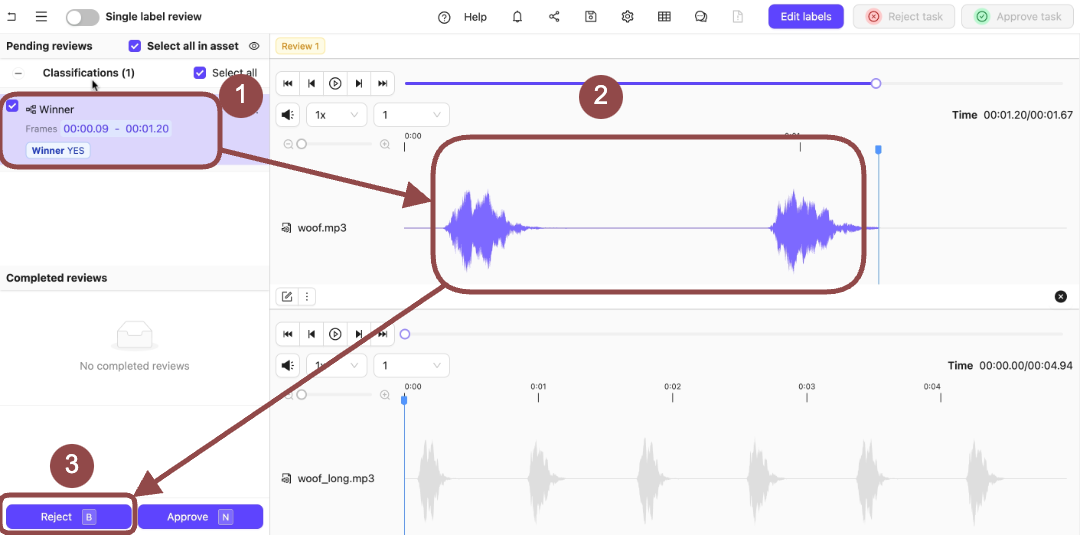
- Expand the Winner Classification. The options for the Classification appear.
- Select the Classifications applied to the audio file.
-
Press
Bto reject the Classifications on the audio file. A dialog appears. - Provide a reason for rejecting the Classification.
-
Press the Review from this file icon.
 .
.
-
Expand the Winner Classification.
The options for the Classification appear.
 .
.
- Select the Classifications applied to the audio file.
-
Press
Bto reject the Classifications on the audio file. - Click Reject task to reject the tasks.
 .
Both tasks then appear in the Annotate stage.
.
Both tasks then appear in the Annotate stage.
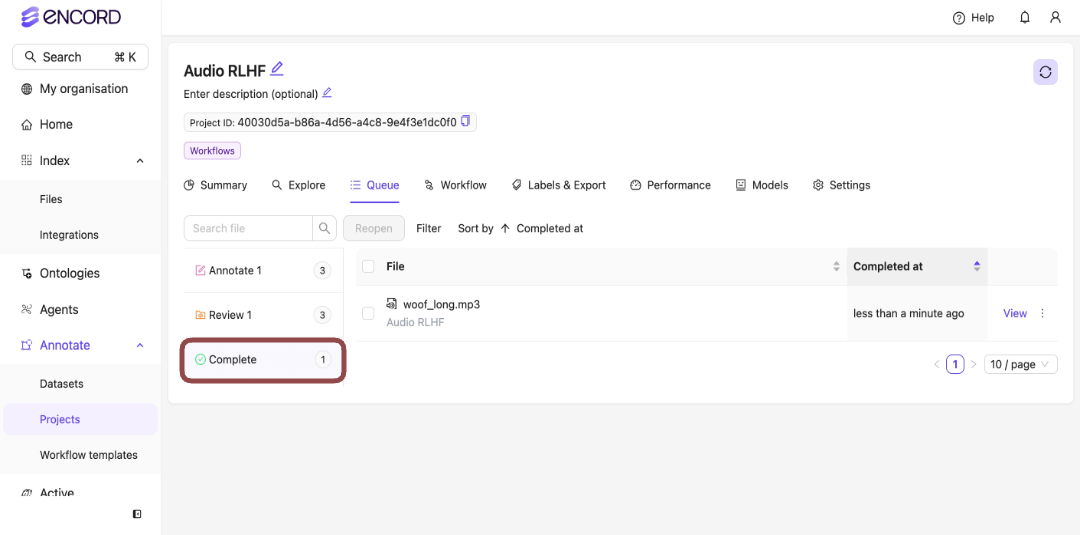
Complete
Files in the Complete stage can be reopened..