

| Type | File size limits | Ease of use |
|---|---|---|
| Zip upload | 50MB (250MB unzipped) | easier |
| Docker | NA | harder |
pip install encord-agents[vision]). Additionally, dependencies relying on C/C++ code require specific CPU architecture installations, often making testing only possible after deployment.
More detailed AWS Documentation on python lambda functions can be found here.
Building a lambda function using zip upload
The full AWS lambda documentation for zip files is available here.STEP 1: Create a local Project
To begin, set up your local project structure. This includes creating two directories, a virtual environment (for examplevenv), and a package directory for CPU-architecture-specific dependencies tailored to your cloud infrastructure.
- Create your virtual environment and install
encord-agents. Refer to the installation docs for detailed instructions.
- Create the “mirror” package directory for the upload.
We recommend explicitly installing
boto3, the AWS SDK, even though it’s typically present in Lambda environments. This ensures consistent dependency versions and avoids unexpected changes when AWS updates its infrastructure.STEP 2: Define the agent
- Create a
lambda_function.pyfile using the following template:
lambda_function.py
Make sure to name your file
lambda_function.py and your function lambda_handler if you are following this example, as these names are referenced in the --handler argument in Step 6.- Complete the
lambda_handlerfunction with the logic you want to execute when the agent is triggered.
STEP 3: (Optional) Test the Agent Locally
- In order to test your agent locally, you can add an
if __name__ == "__main__"declaration in the end of the file as follows:
lambda_function.py
- Make sure to update the Project and data hash to correspond to one of your data units.
- Run the file:
STEP 4: Create the ZIP file
- Create the zip file by first zipping what is in the
packagedirectory:
- Add your lambda function to the zip file:
STEP 5: Set up an execution role
Your Lambda function requires an execution role to define the permissions it needs to run.- Create the configuration file
trust-policy.jsonto be uploaded to AWS.
trust-policy.json
- Create a role with the trust policy:
Arn.
- Attach the basic lambda execution role to the role.
STEP 6: Upload the zip
- To upload the zip file to AWS, use the following command. Make sure to insert the
<lambda_function_name>you want to use and the proper roleArnfrom STEP 5.
- Proceed to Step A below to complete the setup.
Building a Lambda Function with Docker
The full AWS documentation for building docker images for lambda functions with Python is available here.STEP 1: Create a Local Project
Start by creating a local project directory.requirements.txt file.
requirements.txt
(Optional) local environment
If you want, you can create a local environment for testing before building the docker image.STEP 2: Define the Agent
- Create a
lambda_function.pyfile using the following template:
lambda_function.py
Make sure to name your file
lambda_function.py and your function lambda_handler if you’re following this example, as these names are referenced in the Docker image in the next step.lambda_handler function with the logic you want to execute when the agent is triggered.
You can find multiple examples of what can be done with editor agents here.
STEP 3: Build the Docker Image
- Create a
Dockerfilewith the following content.
Dockerfile
- Build the image locally.
You need to have
docker and buildx installed.STEP 4: (Optional) Test the agent locally
To test the agent locally, you can spin up the container with the following command.- Add the
ENCORD_SSH_KEYenv variable - Map the port 8080 to your own local port (9000 in this example)
- AWS architecture needs to be
amd64(orarm64see aws docs) - Run the latest built image (
encord-agents-example:latestin this example)
curl command. The functions/function/invocation path is required by Amazon.
There is a long-standing issue with Lambda Docker containers where the API differs between local and cloud execution. In this case, two relevant distinctions exist.See the Function URL section for more information on how to get the public endpoint.
Content-Type: Locally, the container expects a post request withContent-Type: application/x-www-form-urlencodedwhile the public url hosted by AWS expectsContent-Type: application/application-json.POSTdata: Locally, the post data needs to be{"body": {... content dict}}while the public url expects{... content dict}.
curl request for a publicly hosted lambda function would be:Step 5: Prepare ECR Container Repository
To associate a Lambda function with your container, the container must first be uploaded to the AWS Elastic Container Registry (ECR). For this, a container repository is required.- Run the
aws get-login-passwordcommand to authenticate the Docker CLI to your Amazon ECR registry.
- Set the
--regionvalue to the AWS Region where you want to create the Amazon ECR repository (we useeu-west-1in this example). - Replace 111122223333 with your AWS account ID.
- Create a repository in Amazon ECR using the create-repository command.
repositoryUri from the output.
Step 6: Upload the Local Docker Image
- To tag your local Docker image for Amazon ECR as the latest version, use the
docker tagcommand:
encord-agents-my-agent-name:latestis the name and tag of your local Docker image. This is the image name and tag that you specified in thedocker buildcommand above.- Replace
<ecr-repository-uri>with therepositoryUrithat you copied above. Make sure to include:latestat the end of the URI.
- Run the
docker pushcommand to deploy your local image to the Amazon ECR repository. Ensure you include:latestat the end of the repository URI.
STEP 7: Set up an Execution Role
Your Lambda function requires an execution role to define the permissions it needs to run.- Create the configuration file
trust-policy.jsonto be uploaded to AWS.
trust-policy.json
- Create a role with the trust policy.
Arn.
- Attach the basic lambda execution role to the role.
STEP 8: Creating a Lambda Function
ForImageUri, specify the repository URI from Step 5. Ensure you include :latest at the end of the URI.
Communication with Encord
STEP A: Configure Public Endpoint
Now the function is live but not publicly available to the internet. To make it accessible to the Encord platform, follow these steps: To make your live Lambda function publicly accessible to the Encord platform, follow these steps:- Go to https://console.aws.amazon.com/lambda and navigate to your newly created function.
- Go to the Configuration tab and choose the Function URL section.
- Click the Create function URL button.
- Choose
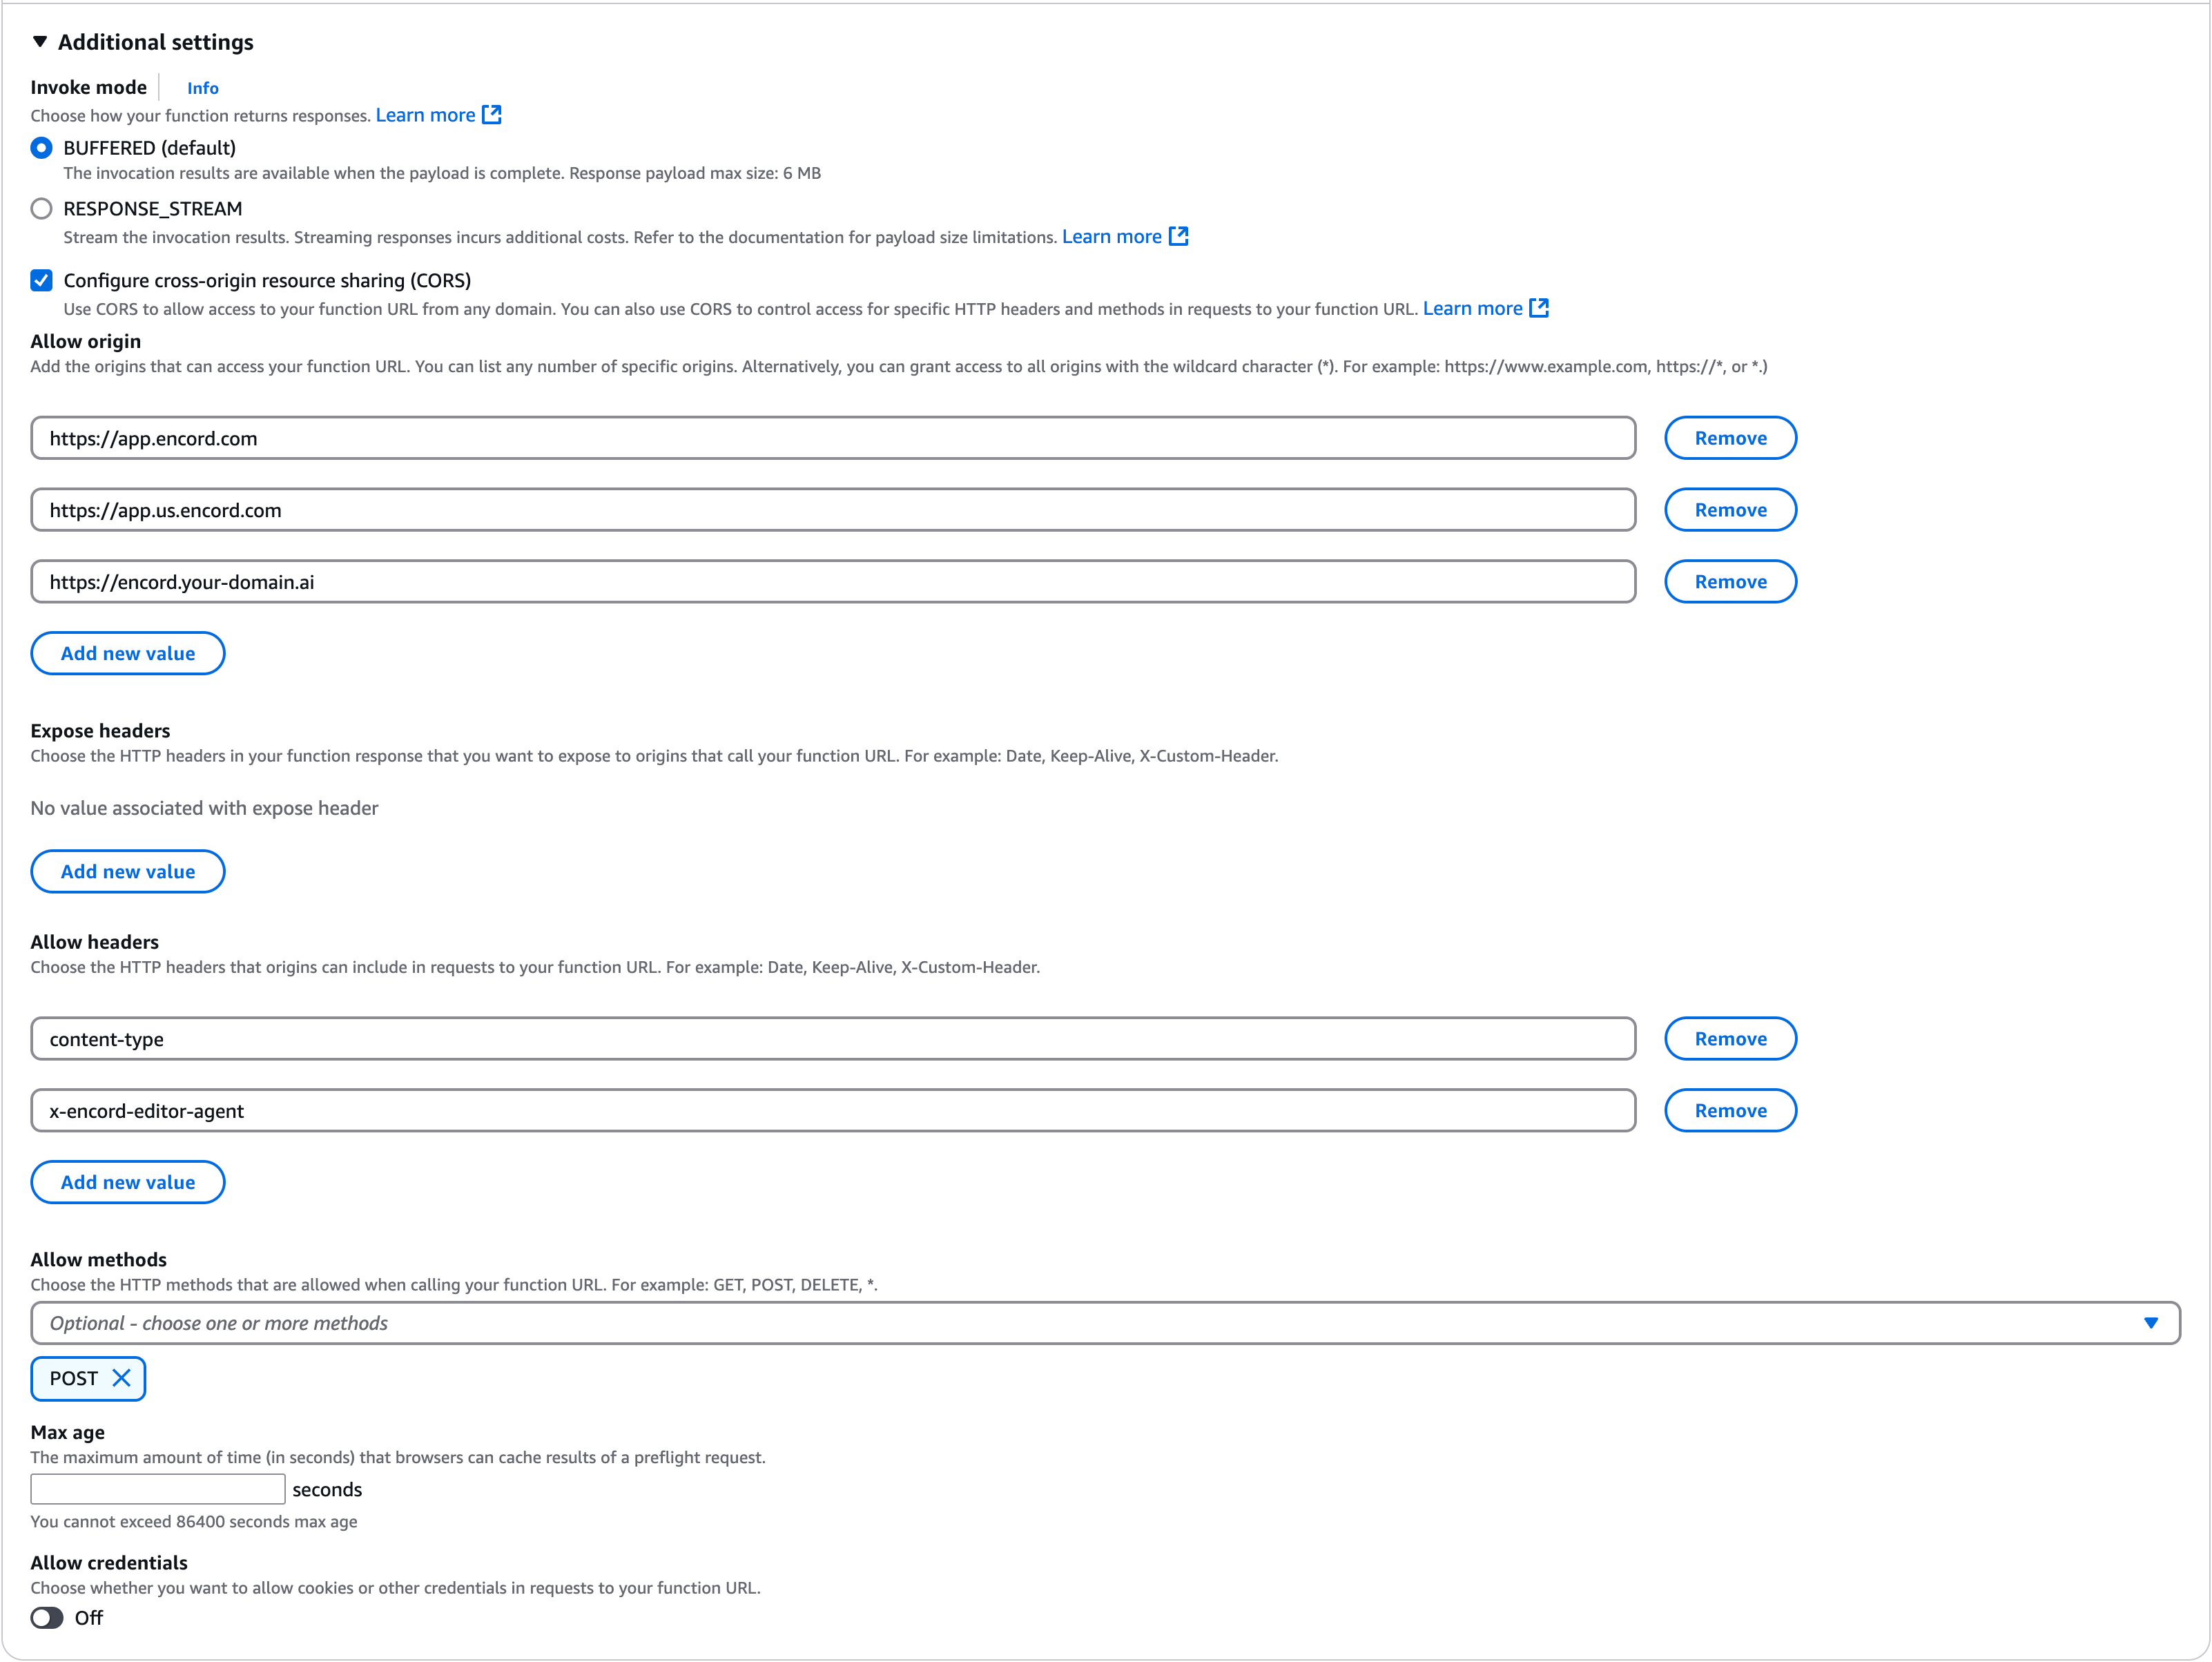
NONEfor Auth type. - Expand the Additional settings panel and check the Configure cross-origin resource sharing (CORS) box.
- In the Allow origin section, add
https://app.encord.com,https://app.us.encord.com, or your custom (VPC) domain. - Under the Allow headers section, add both
content-typeandx-encord-editor-agentvalues. - In the Allow methods section, choose
POST. - Click Save.
STEP B: Adding Secrets
Your agent requires an access key secret. In the AWS console where you configured the function URL, click the Environment variables tab on the left. Add theENCORD_SSH_KEY variable, along with any other necessary credentials (for example, HuggingFace, OpenAI, or Gemini).
STEP C: Associating the URL with Encord
Now that your AWS setup is complete, copy the Function URL displayed at the top of your AWS Lambda function’s web page. Then, navigate to the Encord app.- Click the Agents section on the left, and navigate to the Editor agents tab.
- Click the Register editor agent tab.
- Give the agent a name, (optionally) a description, and paste the function URL before clicking Register agent. [Image of Encord “Register editor agent” form]