GCP Examples

Basic Geometric Example using ObjectHashes

A simple example showing how to use objectHashes.

agent.py

from typing import Annotated

from encord.objects.ontology_labels_impl import LabelRowV2
from encord.objects.ontology_object_instance import ObjectInstance

from encord_agents.core.data_model import FrameData
from encord_agents.core.dependencies import Depends
from encord_agents.gcp.dependencies import dep_objects
from encord_agents.gcp.wrappers import editor_agent


@editor_agent
def handle_object_hashes(
    frame_data: FrameData,
    lr: LabelRowV2,
    object_instances: Annotated[list[ObjectInstance], Depends(dep_objects)],
) -> None:
    for object_inst in object_instances:
        print(object_inst)

Use Case: Selective OCR on Selected Objects

This functionality allows you to apply your own OCR model to specific objects selected directly within the Encord platform.

When you trigger your agent from the Encord app after selecting objects, the platform automatically sends a list of objectHashes to your agent. Your agent can then use the dep_objects method to gain immediate access to these specific object instances, which greatly simplifies integrating your OCR model for targeted processing.

Test the Agent

  1. Save the above code as agent.py.
  2. Run the following command to run the agent in debug mode in your terminal.
functions-framework --target=handle_object_hashes --debug --source agent.py
  1. Open your Project in the Encord platform and navigate to a frame with an object that you want to act on. Choose an object from the bottom left sider and click Copy URL as shown:

The url should have roughly this format: "https://app.encord.com/label_editor/{project_hash}/{data_hash}/{frame}/0?other_query_params&objectHash={objectHash}".

  1. In another shell operating from the same working directory, source your virtual environment and test the agent.
source venv/bin/activate
encord-agents test local agent '<your_url>'
  1. To see if the test is successful, refresh your browser to see the action taken by the Agent. If the test has run successfully, the agent can be deployed. Visit the deployment documentation to learn more.

Nested Classification using Claude 3.5 Sonnet

The goals of this example are:

  1. Create an editor agent that automatically adds frame-level classifications.
  2. Demonstrate how to use the OntologyDataModel for classifications.

Prerequisites

Before you begin, ensure you have:

Run the following commands to set up your environment:

python -m venv venv                 # Create a virtual Python environment  
source venv/bin/activate            # Activate the virtual environment  
python -m pip install encord-agents anthropic  # Install required dependencies  
export ANTHROPIC_API_KEY="<your_api_key>"     # Set your Anthropic API key  
export ENCORD_SSH_KEY_FILE="/path/to/your/private/key"  # Define your Encord SSH key  

Project Setup

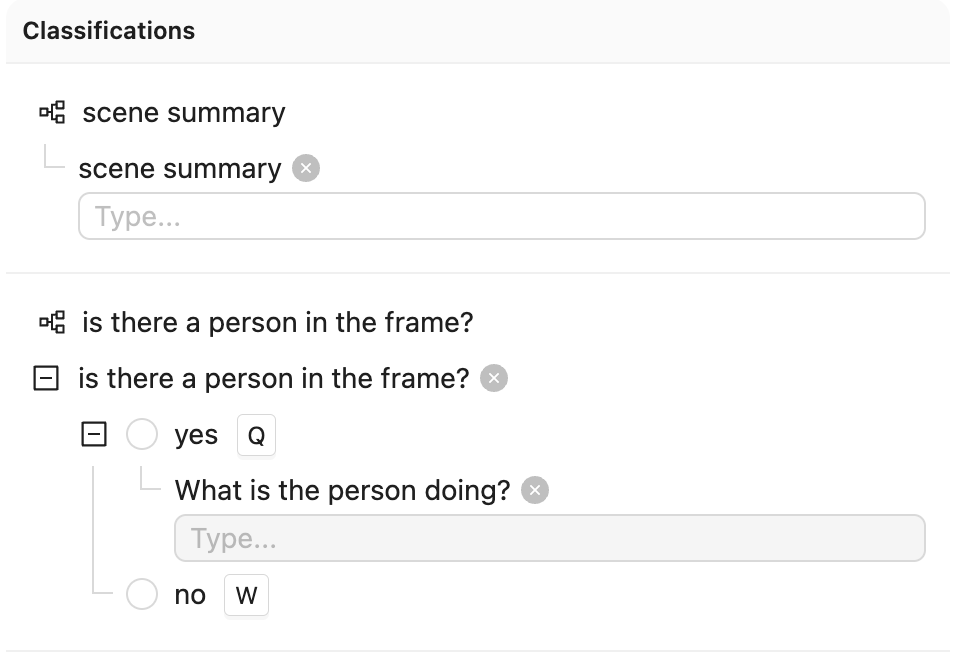
Create a Project with visual content (images, image groups, image sequences, or videos) in Encord. This example uses the following Ontology, but any Ontology containing classifications can be used.

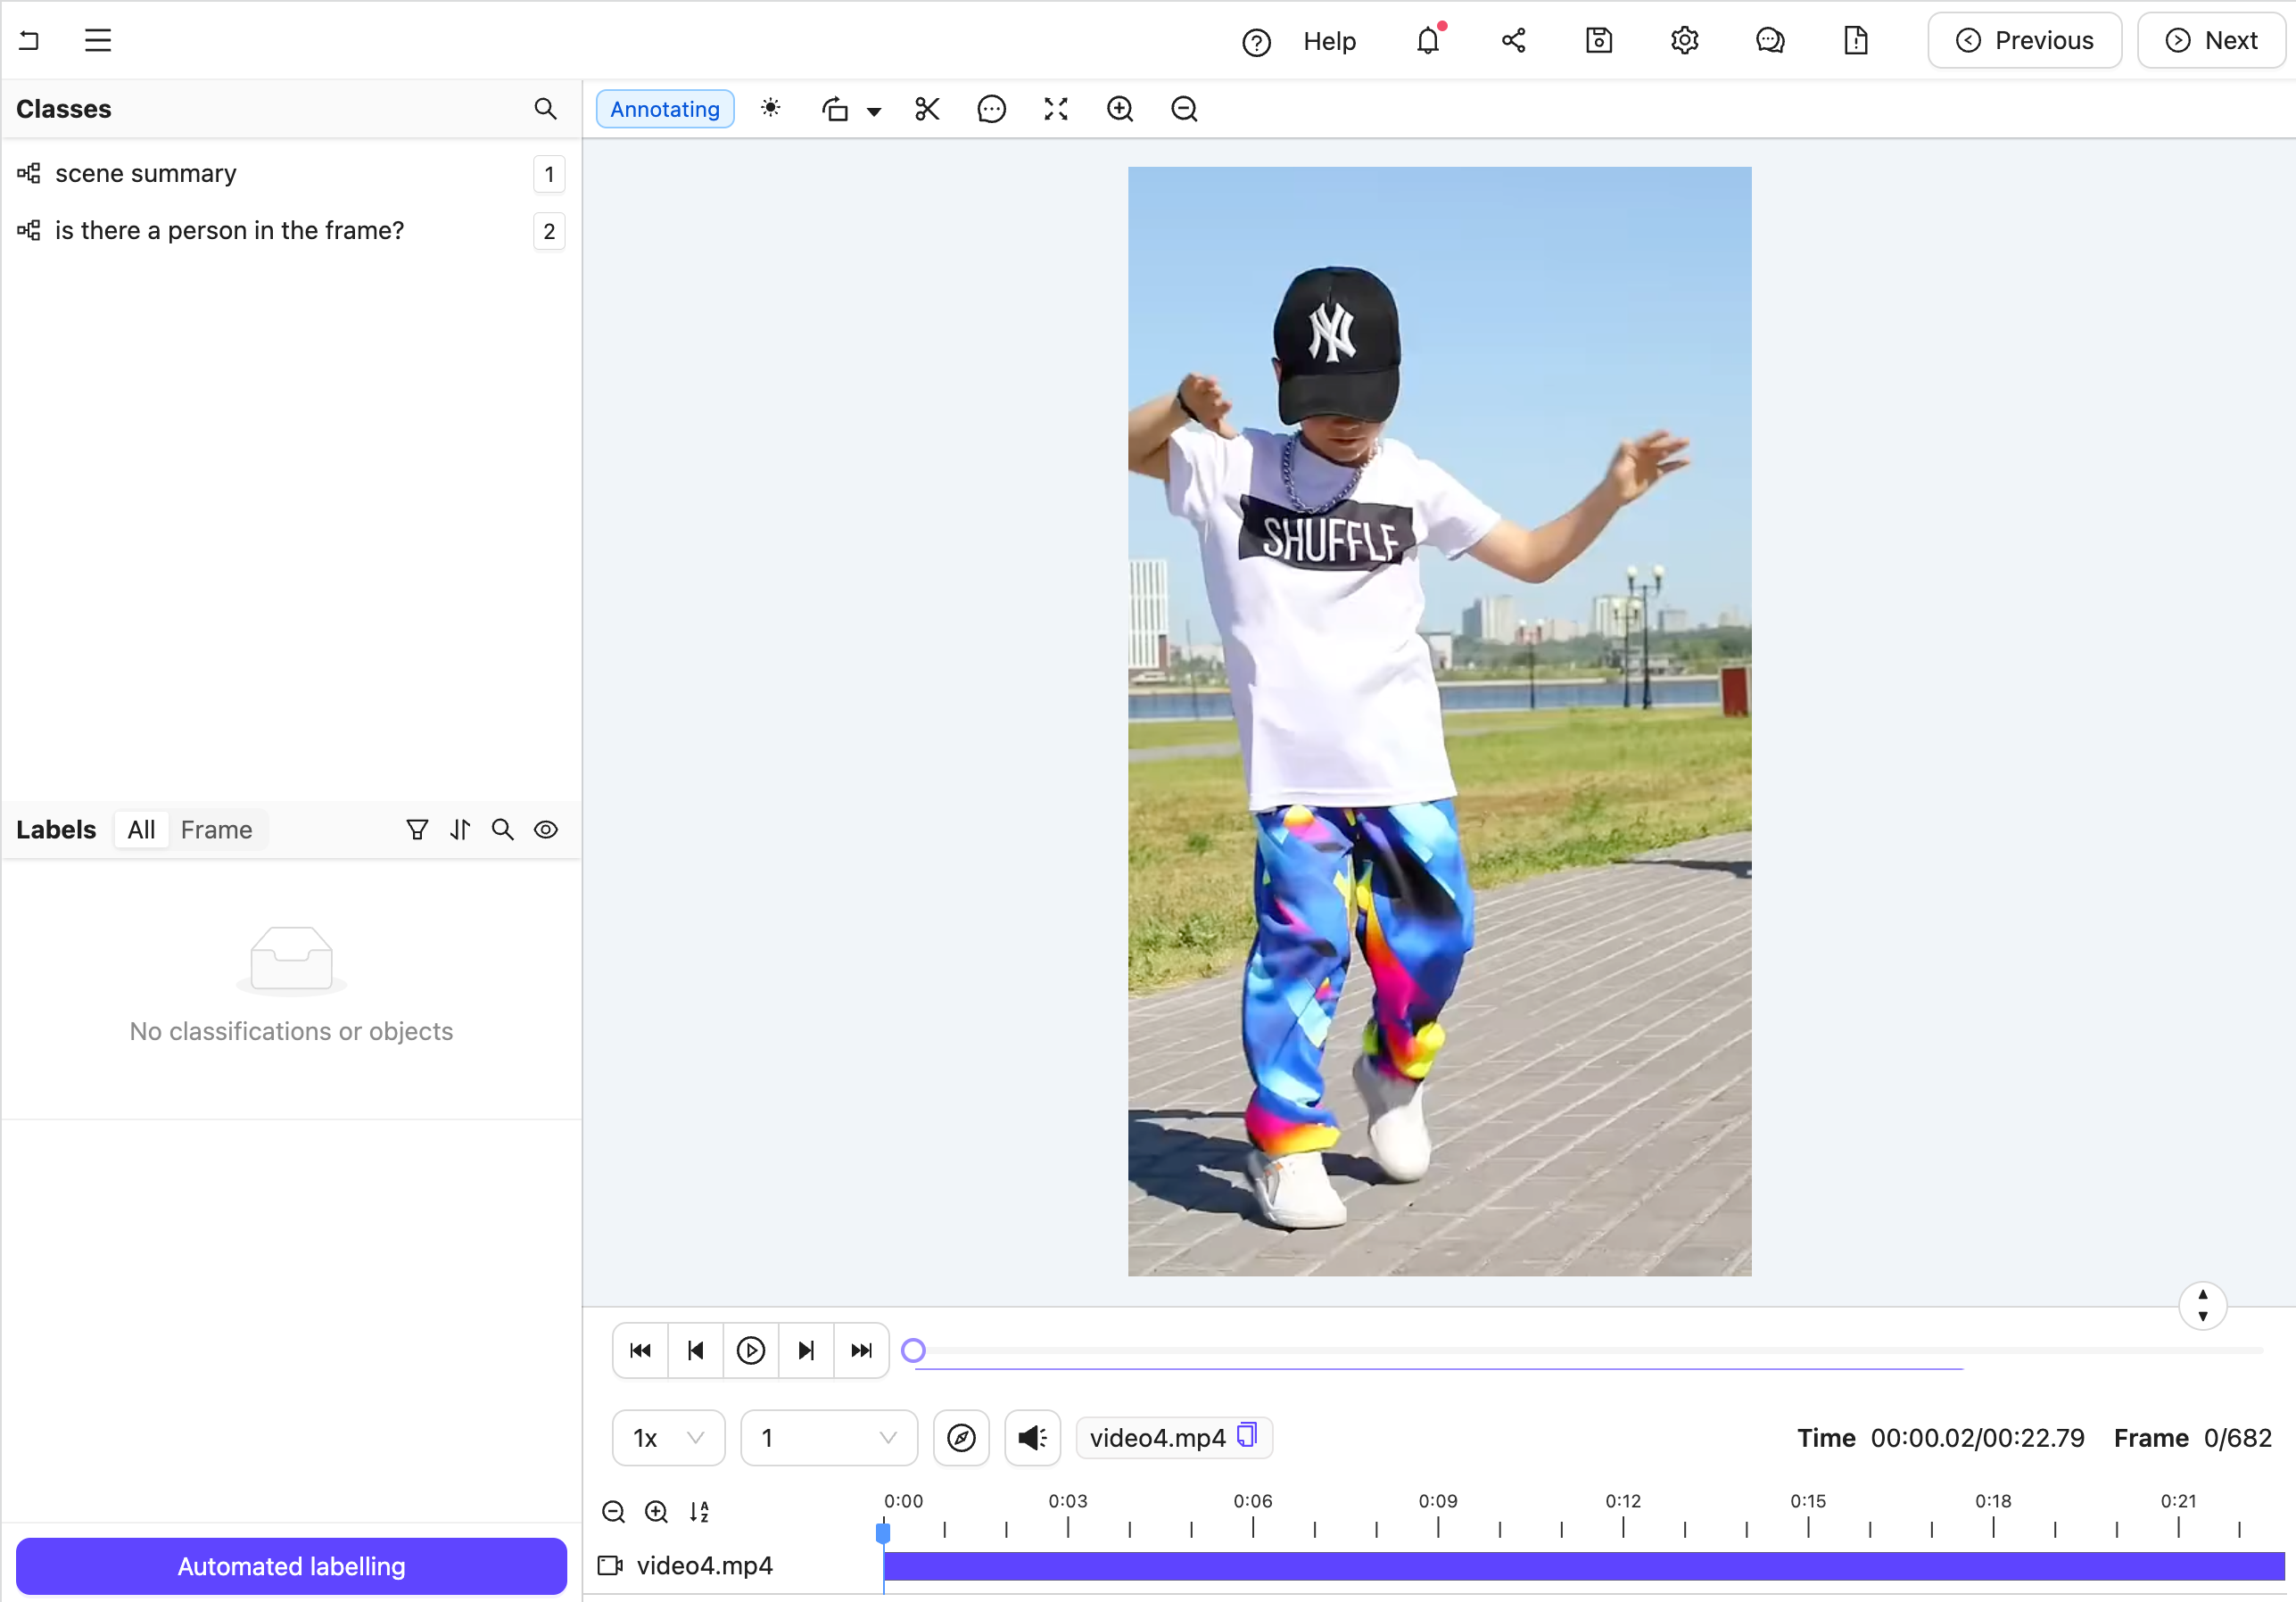
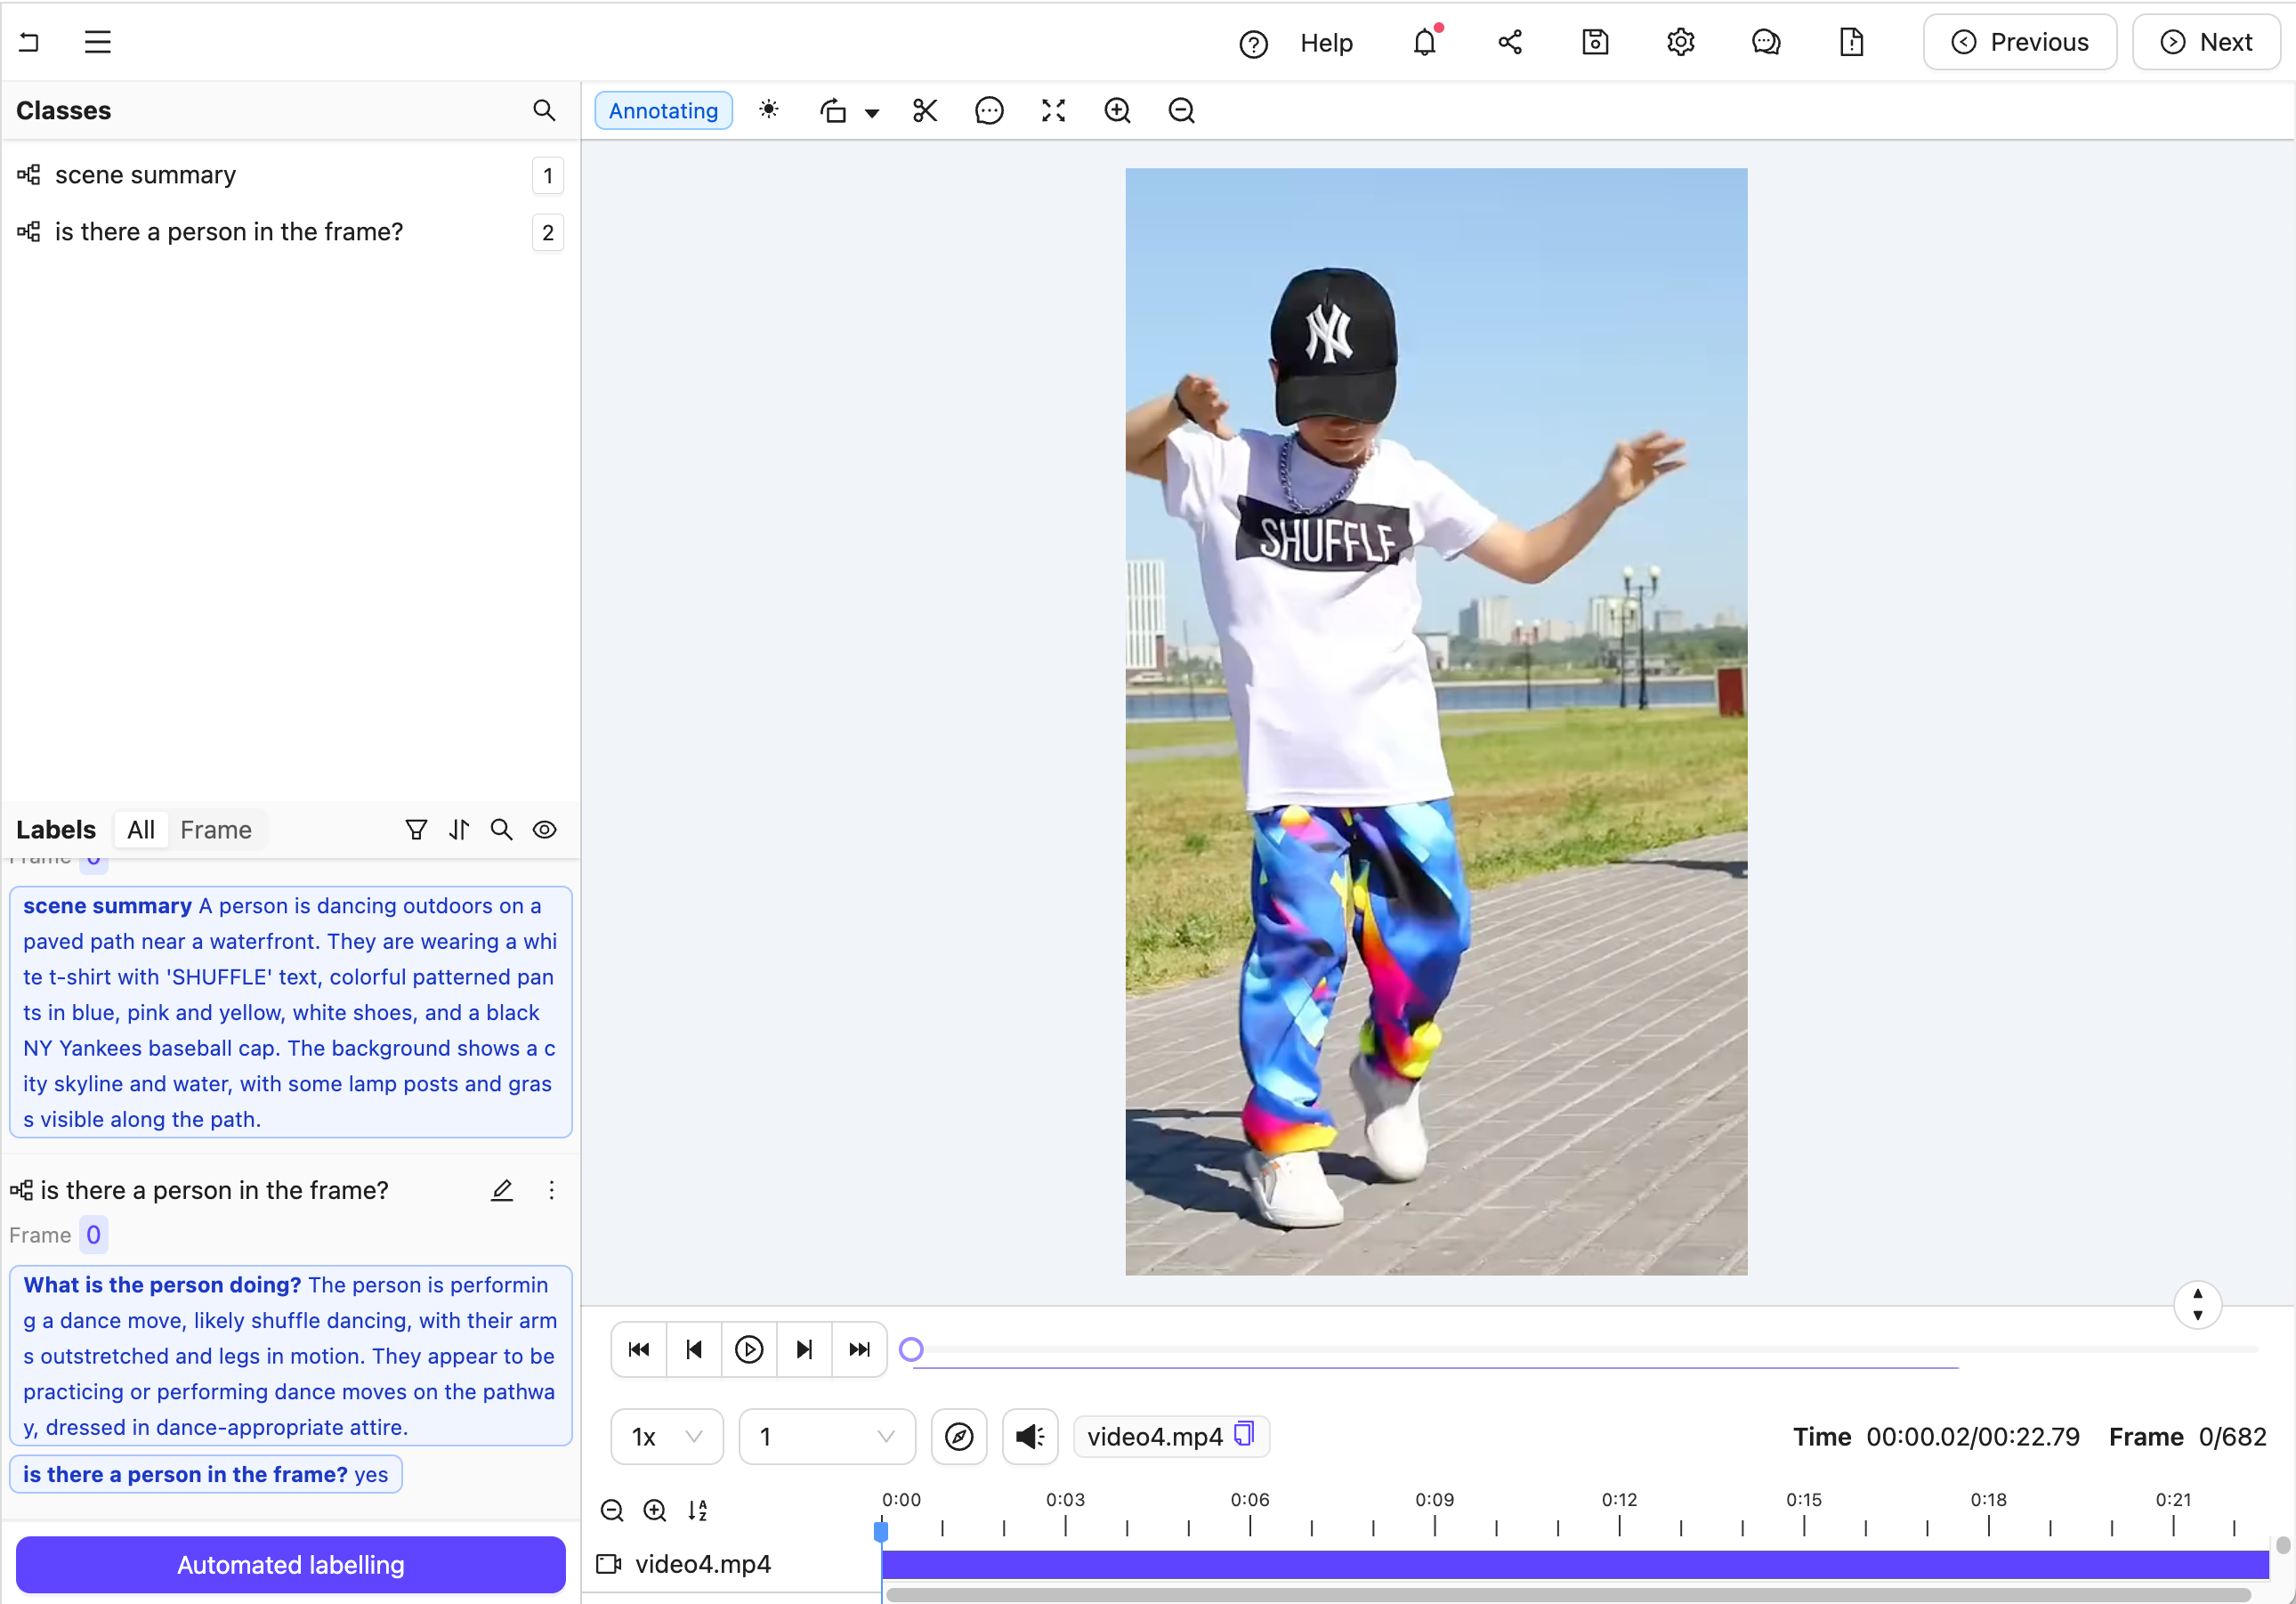
The aim is to trigger an agent that transforms a labeling task from Figure A to Figure B.

Figure A: No classification labels.

Figure B: Multiple nested classification labels generated by an LLM.

Create the Agent

This section provides the complete code for creating your editor agent, along with an explanation of its internal workings.

Agent Setup Steps

  1. Import dependencies, authenticate with Encord, and set up the Project. Ensure you insert your Project’s unique identifier.

  2. Create a data model and a system prompt based on the Project Ontology to tell Claude how to structure its response.

  3. Set up an Anthropic API client to establish communication with the Claude model.

  4. Define the Editor Agent. This includes

  • Retrieving Frame Content: It automatically fetches the current frame’s image data using the dep_single_frame dependency.
  • Analyzing with Claude: The frame image is then sent to the Claude AI model for analysis.
  • Parsing Classifications: Claude’s response is parsed and transformed into structured classification instances using the predefined data model.
  • Saving Results: The new classifications are added to the active label row, and the updated results are saved within the Project.
# 1. Import dependencies, authenticate with Encord, and set up the Project. Ensure you insert your Project's unique identifier.
import os

from anthropic import Anthropic
from encord.objects.ontology_labels_impl import LabelRowV2
from numpy.typing import NDArray
from typing_extensions import Annotated

from encord_agents.core.ontology import OntologyDataModel
from encord_agents.core.utils import get_user_client
from encord_agents.core.video import Frame
from encord_agents.gcp import Depends, editor_agent
from encord_agents.gcp.dependencies import FrameData, dep_single_frame

client = get_user_client()
project = client.get_project("<your_project_hash>")

# 2. Create a data model and a system prompt based on the Project Ontology to tell Claude how to structure its response
data_model = OntologyDataModel(project.ontology_structure.classifications)

system_prompt = f"""
You're a helpful assistant that's supposed to help fill in json objects 
according to this schema:

    ```json
    {data_model.model_json_schema_str}
    ```

Please only respond with valid json.
"""

# 3. Set up an Anthropic API client to establish communication with Claude 
ANTHROPIC_API_KEY = os.getenv("ANTHROPIC_API_KEY")
anthropic_client = Anthropic(api_key=ANTHROPIC_API_KEY)

# 4. Define the Editor Agent
@editor_agent()
def agent(
    frame_data: FrameData,
    lr: LabelRowV2,
    content: Annotated[NDArray, Depends(dep_single_frame)],
):
    # # Retrieving Frame Content: It automatically fetches the current frame's image data using the `dep_single_frame` dependency
    frame = Frame(frame_data.frame, content=content)
    # Analyzing with Claude: The frame image is then sent to the Claude AI model for analysis
    message = anthropic_client.messages.create(
        model="claude-3-5-sonnet-20241022",
        max_tokens=1024,
        system=system_prompt,
        messages=[
            {
                "role": "user",
                "content": [frame.b64_encoding(output_format="anthropic")],
            }
        ],
    )
    try:
        # Parsing Classifications: Claude's response is parsed and transformed into structured classification instances using the predefined data model
        classifications = data_model(message.content[0].text)
        for clf in classifications:
            clf.set_for_frames(frame_data.frame, confidence=0.5, manual_annotation=False)
            lr.add_classification_instance(clf)
    except Exception:
        import traceback

        traceback.print_exc()
        print(f"Response from model: {message.content[0].text}")
        
    # Saving Results: The new classifications are added to the active label row, and the updated results are saved within the Project.
    lr.save()

Test the Agent

  1. In your current terminal, run the following command to run the agent in debug mode.
functions-framework --target=agent --debug --source agent.py
  1. Open your Project in the Encord platform and navigate to a frame you want to add a classification to. Copy the URL from your browser.

The url should have the following format: "https://app.encord.com/label_editor/{project_hash}/{data_hash}/{frame}".

  1. In another shell operating from the same working directory, source your virtual environment and test the agent.
source venv/bin/activate
encord-agents test local agent '<your_url>'
  1. To see if the test is successful, refresh your browser to view the classifications generated by Claude. Once the test runs successfully, you are ready to deploy your agent. Visit the deployment documentation to learn more.

Nested Attributes using Claude 3.5 Sonnet

The goals of this example are:

  1. Create an editor agent that can convert generic object annotations (class-less coordinates) into class specific annotations with nested attributes like descriptions, radio buttons, and checklists.

  2. Demonstrate how to use both the OntologyDataModel and the dep_object_crops dependency.

Prerequisites

Before you begin, ensure you have:

Run the following commands to set up your environment:

python -m venv venv                 # Create a virtual Python environment  
source venv/bin/activate            # Activate the virtual environment  
python -m pip install encord-agents anthropic  # Install required dependencies  
export ANTHROPIC_API_KEY="<your_api_key>"     # Set your Anthropic API key  
export ENCORD_SSH_KEY_FILE="/path/to/your/private/key"  # Define your Encord SSH key  

Project Setup

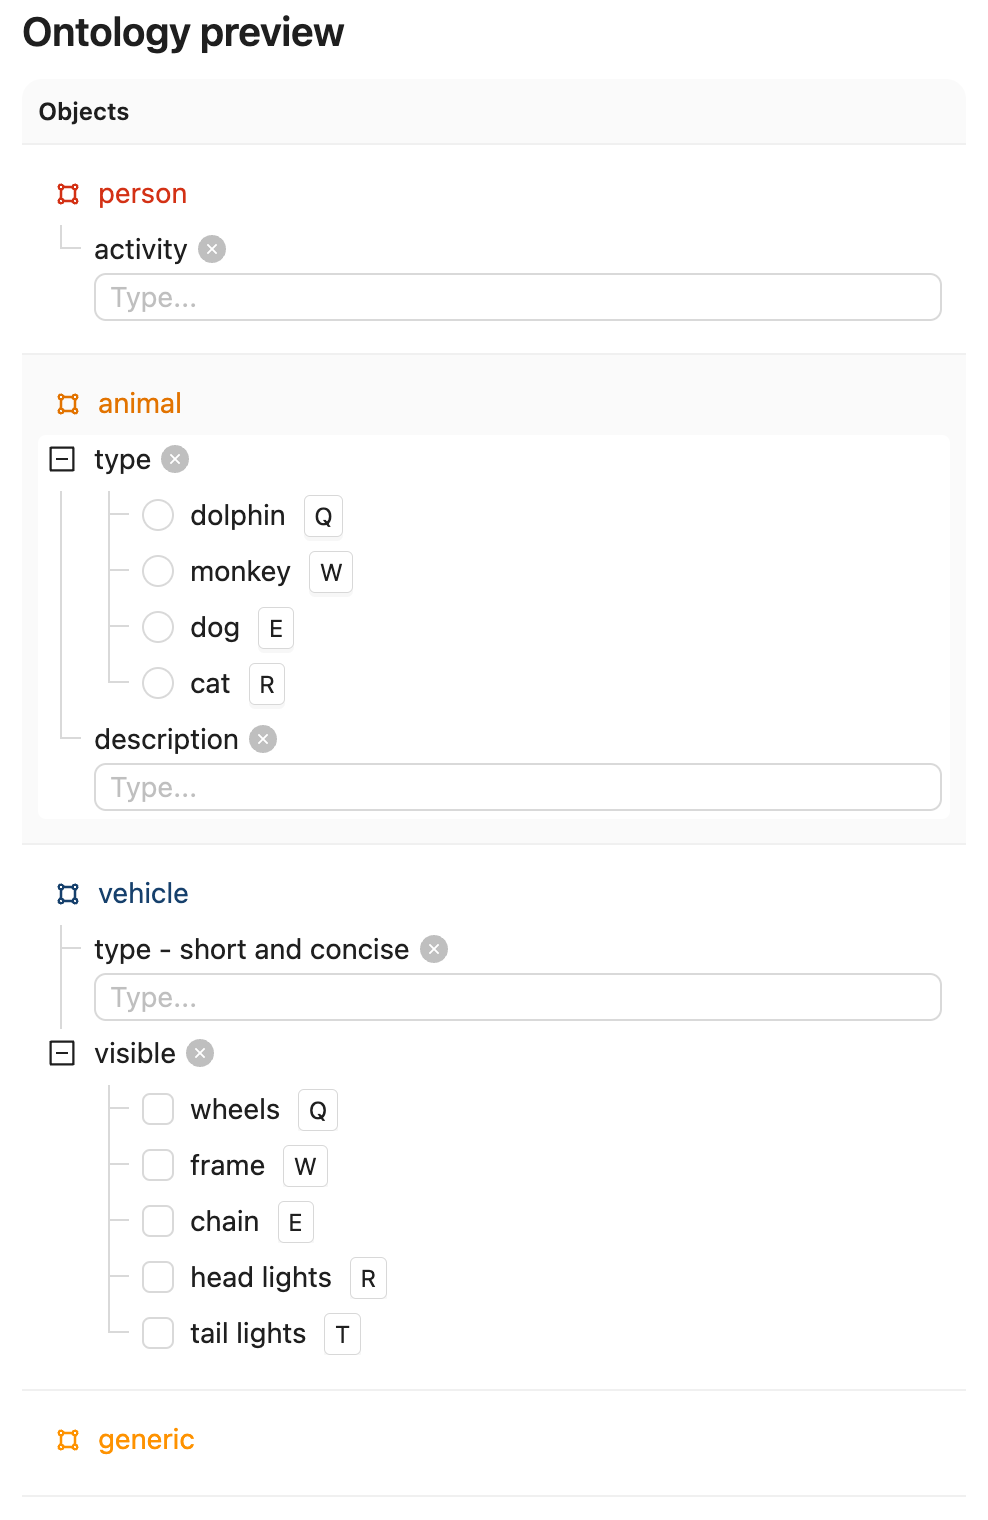
Create a Project with visual content (images, image groups, image sequences, or videos) in Encord. This example uses the following Ontology, but any Ontology containing classifications can be used provided the object types are the same and there is one entry called "generic".

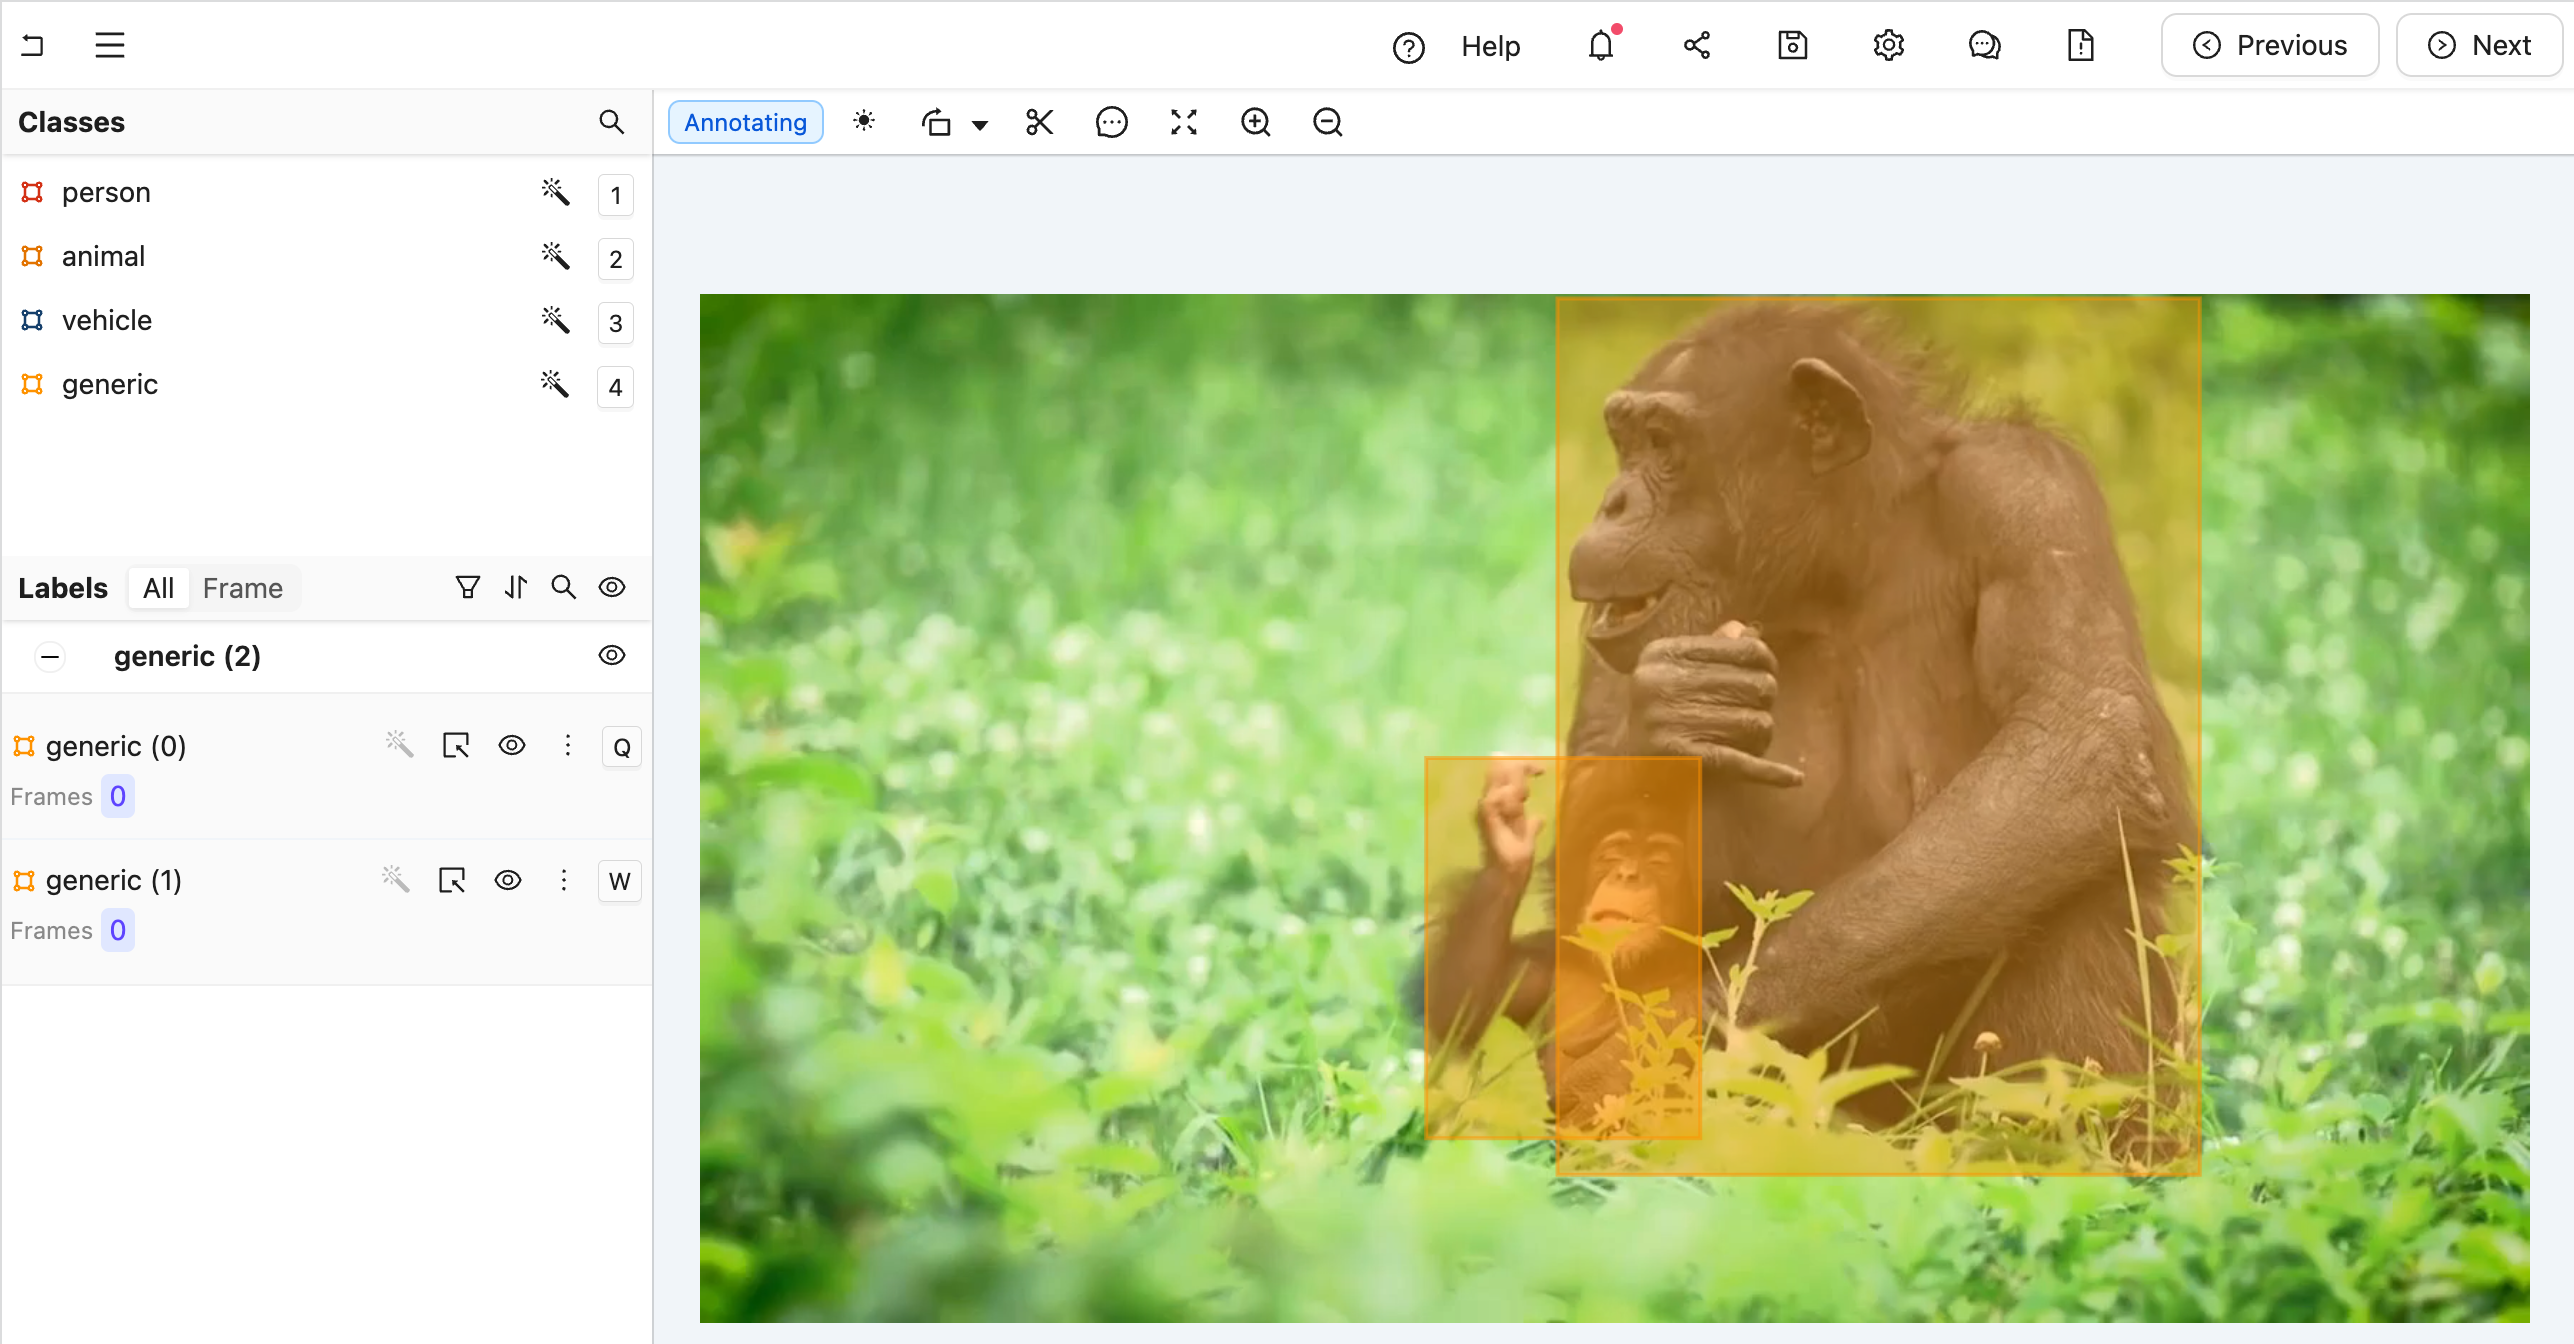
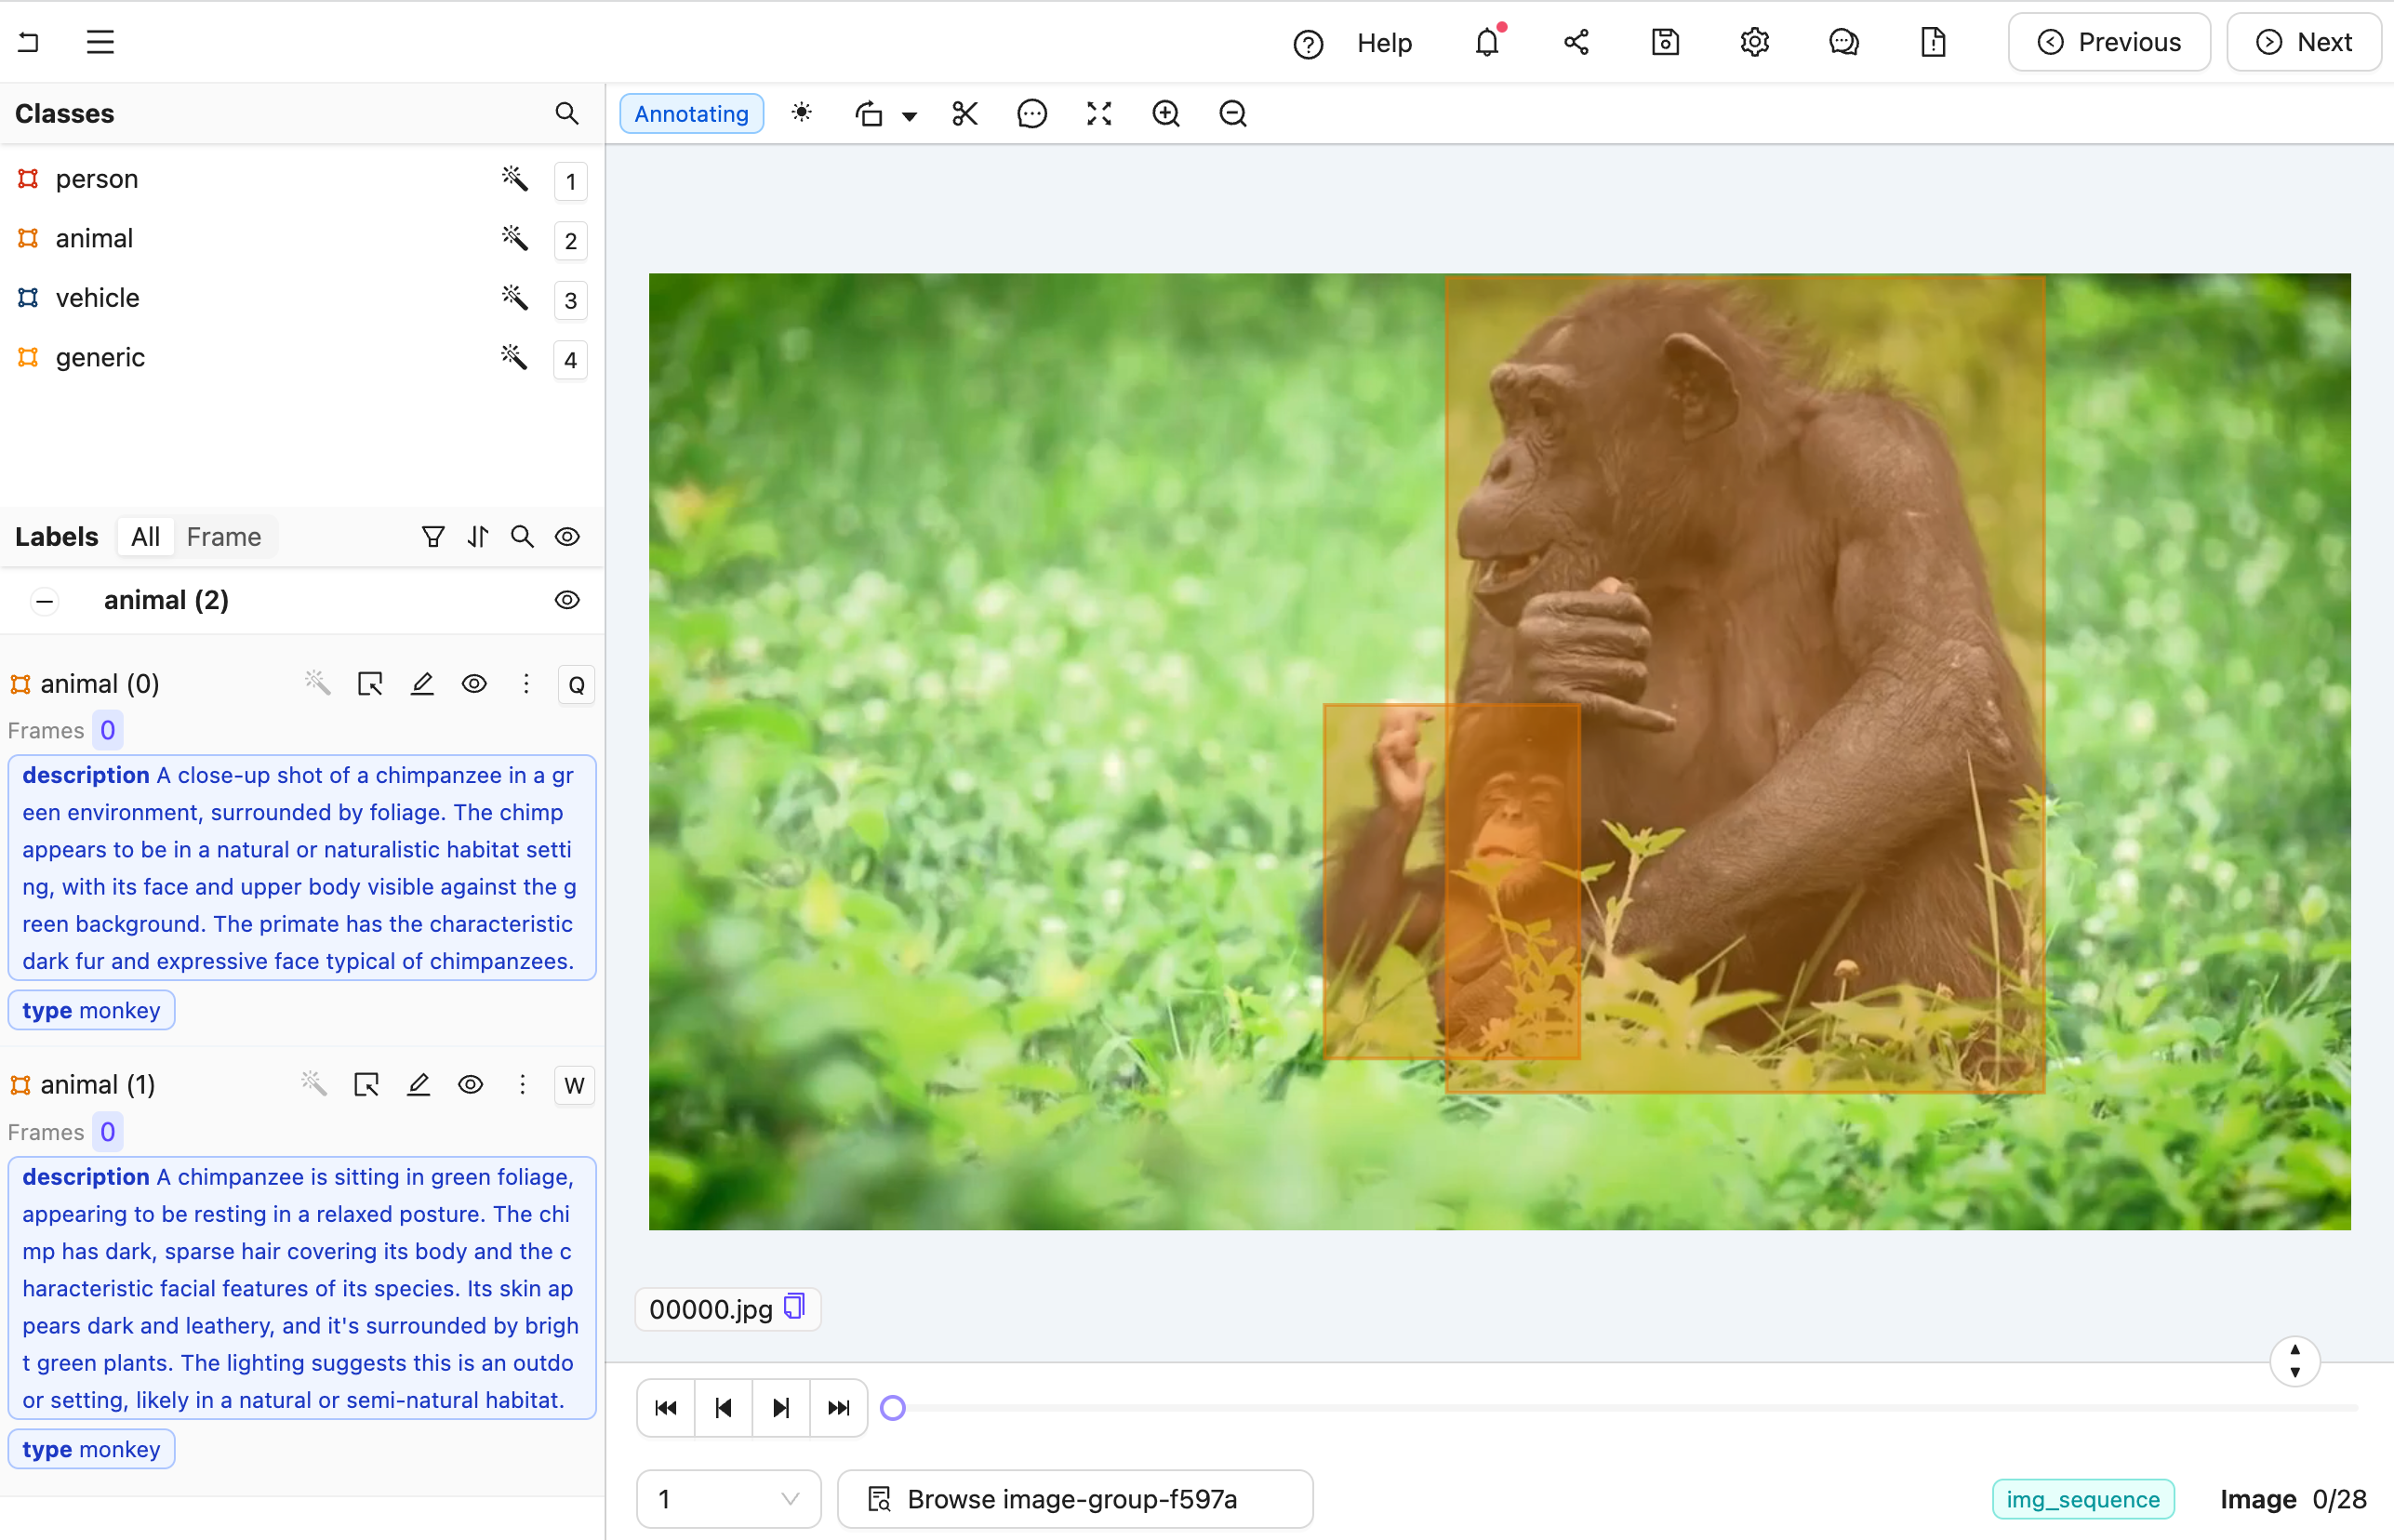
The goal is create an agent that takes a labeling task from Figure A to Figure B

Figure A: No classification labels.

Figure B: Multiple nested classification labels generated by an LLM.

Create the Agent

Some code blocks in this section have incorrect indentation. If you plan to copy and paste, we strongly recommend using the full code below instead of the individual sub-sections.

Create the Agent

This section provides the complete code for creating your editor agent, along with an explanation of its internal workings.

Agent Setup Steps

  1. Import dependencies, authenticate with Encord, and set up the Project. Ensure you insert your Project’s unique identifier.

  2. Extract the generic Ontology object and the specific objects of interest. This example sorts Ontology objects based on whether their title is "generic". The generic object is used to query image crops within the agent. Before that, other_objects is used to pass in the specific context we want Claude to focus on. The OntologyDataModel class helps convert Encord Ontology Objects into a Pydantic model and parse JSON into Encord ObjectInstances.

  3. Prepare the system prompt for each object crop using the data_model to generate the JSON schema. Only other_objects is passed to ensure the model can choose only from non-generic object types.

  4. Set up an Anthropic API client to establish communication with the Claude model. You must include your Anthropic API key.

  5. Define the Editor Agent.

  • All arguments are automatically injected when the agent is called. For details on dependency injection, see here.
  • The dep_object_crops dependency allows filtering. In this case, it includes only “generic” object crops, excluding those already converted to actual labels.
  1. Query Claude using the image crops. The crop variable has a convenient b64_encoding method to produce an input that Claude understands.

  2. Parse Claude’s message using the data_model. When called with a JSON string, it attempts to parse it with respect to the JSON schema we saw above to create an Encord object instance. If successful, the old generic object can be removed and the newly classified object added.

  3. Save the labels with Encord.

# 1. Import dependencies, authenticate with Encord, and set up the Project. Ensure you insert your Project's unique identifier
import os

from anthropic import Anthropic
from encord.objects.ontology_labels_impl import LabelRowV2
from typing_extensions import Annotated

from encord_agents.core.ontology import OntologyDataModel
from encord_agents.core.utils import get_user_client
from encord_agents.gcp import Depends, editor_agent
from encord_agents.gcp.dependencies import FrameData, InstanceCrop, dep_object_crops

# User client
client = get_user_client()
project = client.get_project("<project_hash>")

# 2. Extract the generic Ontology object and the specific objects of interest. This example sorts Ontology objects based on whether their title is `"generic"`
generic_ont_obj, *other_objects = sorted(
    project.ontology_structure.objects,
    key=lambda o: o.title.lower() == "generic",
    reverse=True,
)

# 3. Prepare the system prompt for each object crop using the `data_model` to generate the JSON schema
data_model = OntologyDataModel(other_objects)
system_prompt = f"""
You're a helpful assistant that's supposed to help fill in 
json objects according to this schema:

`{data_model.model_json_schema_str}`

Please only respond with valid json.
"""

# 4. Set up an Anthropic API client to establish communication with the Claude model. You must include your Anthropic API key

ANTHROPIC_API_KEY = os.getenv("ANTHROPIC_API_KEY")
anthropic_client = Anthropic(api_key=ANTHROPIC_API_KEY)


# 5. Define the Editor Agent
@editor_agent()
def agent(
    frame_data: FrameData,
    lr: LabelRowV2,
    crops: Annotated[
        list[InstanceCrop],
        Depends(dep_object_crops(filter_ontology_objects=[generic_ont_obj])),
    ],
):
    # 6. Query Claude using the image crops. The `crop` variable has a convenient `b64_encoding` method to produce an input that Claude understands.
    changes = False
    for crop in crops:
        message = anthropic_client.messages.create(
            model="claude-3-5-sonnet-20241022",
            max_tokens=1024,
            system=system_prompt,
            messages=[
                {
                    "role": "user",
                    "content": [crop.b64_encoding(output_format="anthropic")],
                }
            ],
        )

        # 7. Parse Claude's message using the `data_model`.
        try:
            instance = data_model(message.content[0].text)

            coordinates = crop.instance.get_annotation(frame=frame_data.frame).coordinates
            instance.set_for_frames(
                coordinates=coordinates,
                frames=frame_data.frame,
                confidence=0.5,
                manual_annotation=False,
            )
            lr.remove_object(crop.instance)
            lr.add_object_instance(instance)
            changes = True
        except Exception:
            import traceback

            traceback.print_exc()
            print(f"Response from model: {message.content[0].text}")

    # 8. Save the labels with Encord.
    if changes:
        lr.save()

Test the Agent

  1. In your current terminal, run the following command to run the agent in debug mode.
functions-framework --target=agent --debug --source agent.py
  1. Open your Project in the Encord platform and navigate to a frame you want to add a generic object to. Copy the URL from your browser.

The url has following format: "https://app.encord.com/label_editor/{project_hash}/{data_hash}/{frame}".

  1. In another shell operating from the same working directory, source your virtual environment and test the agent.
source venv/bin/activate
encord-agents test local agent <your_url>
  1. To see if the test is successful, refresh your browser to view the classifications generated by Claude. Once the test runs successfully, you are ready to deploy your agent. Visit the deployment documentation to learn more.

FastAPI Examples

Basic Geometric Example Using objectHashes

A simple example showing how to use objectHashes.

agent.py
from typing import Annotated

from encord.objects.ontology_labels_impl import LabelRowV2
from encord.objects.ontology_object_instance import ObjectInstance
from fastapi import Depends, FastAPI

from encord_agents.fastapi.cors import get_encord_app()
from encord_agents.fastapi.dependencies import (
    FrameData,
    dep_label_row,
    dep_objects,
)

# Initialize FastAPI app
app = get_encord_app()


@app.post("/handle-object-hashes")
def handle_object_hashes(
    frame_data: FrameData,
    lr: Annotated[LabelRowV2, Depends(dep_label_row)],
    object_instances: Annotated[list[ObjectInstance], Depends(dep_objects)],
) -> None:
    for object_inst in object_instances:
        print(object_inst)

Use Case: Selective OCR on Selected Objects

This functionality allows you to apply your own OCR model to specific objects selected directly within the Encord platform.

When you trigger your agent from the Encord app after selecting objects, the platform automatically sends a list of objectHashes to your agent. Your agent can then use the dep_objects method to gain immediate access to these specific object instances, which greatly simplifies integrating your OCR model for targeted processing.

Test the Agent

  1. Save the above code as agent.py.
  2. Run the following command to run the agent in debug mode in your terminal.
uvicorn main:app --reload --port 8080
  1. Open your Project in the Encord platform and navigate to a frame with an object that you want to act on. Choose an object from the bottom left sider and click Copy URL as shown:

The url should have roughly this format: "https://app.encord.com/label_editor/{project_hash}/{data_hash}/{frame}/0?other_query_params&objectHash={objectHash}".

  1. In another shell operating from the same working directory, source your virtual environment and test the agent.
source venv/bin/activate
encord-agents test local agent '<your_url>'
  1. To see if the test is successful, refresh your browser to see the action taken by the Agent. If the test has run successfully, the agent can be deployed. Visit the deployment documentation to learn more.

Nested Classification using Claude 3.5 Sonnet

The goals of this example is to:

  1. Create an editor agent that can automatically fill in frame-level classifications in the Label Editor.
  2. Demonstrate how to use the OntologyDataModel for classifications.
  3. Demonstrate how to build an agent using FastAPI that can be self-hosted.

Prerequisites

Before you begin, ensure you have:

Run the following commands to set up your environment:

python -m venv venv                   # Create a virtual Python environment  
source venv/bin/activate              # Activate the virtual environment 
python -m pip install "fastapi[standard]" encord-agents anthropic # Install required dependencies  
export ANTHROPIC_API_KEY="<your_api_key>" # Set your Anthropic API key 
export ENCORD_SSH_KEY_FILE="/path/to/your/private/key"  # Define your Encord SSH key 

Project Setup

Create a Project with visual content (images, image groups, image sequences, or videos) in Encord. This example uses the following Ontology, but any Ontology containing classifications can be used.

The aim is to trigger an agent that transforms a labeling task from Figure A to Figure B.

Figure A: No classification labels.

Figure B: Multiple nested classification labels generated by an LLM.

Create the Agent

This section provides the complete code for creating your editor agent, along with an explanation of its internal workings.

Agent Setup Steps

  1. Import dependencies, authenticate with Encord, and set up the Project. Ensure you insert your Project’s unique identifier.

  2. Create a data model and a system prompt based on the Project Ontology to tell Claude how to structure its response.

  3. Set up an Anthropic API client to establish communication with the Claude model.

  4. Define the Editor Agent. This includes:

  • Receiving frame data using FastAPI’s Form dependency.
  • Retrieving the associated label row and frame content using Encord Agents’ dependencies.
  • Constructing a Frame object from the content.
  • Sending the frame image to Claude for analysis.
  • Parsing Claude’s response into classification instances.
  • Adding these classifications to the label row and saving the updated data.
# 1. Import dependencies and set up the Project. The CORS middleware is crucial as it allows the Encord platform to make requests to your API.
import os

import numpy as np
from anthropic import Anthropic
from encord.objects.ontology_labels_impl import LabelRowV2
from fastapi import Depends
from numpy.typing import NDArray
from typing_extensions import Annotated

from encord_agents.core.data_model import Frame
from encord_agents.core.ontology import OntologyDataModel
from encord_agents.core.utils import get_user_client
from encord_agents.fastapi.cors import get_encord_app
from encord_agents.fastapi.dependencies import (
    FrameData,
    dep_label_row,
    dep_single_frame,
)

# Initialize FastAPI app
app = get_encord_app()

# 2. Set up the Project and create a data model based on the Ontology.

client = get_user_client()
project = client.get_project("<your_project_hash>")
data_model = OntologyDataModel(project.ontology_structure.classifications)

# 3. Set up Claude and create the system prompt that tells Claude how to structure its response.
system_prompt = f"""
You're a helpful assistant that's supposed to help fill in json objects 
according to this schema:

    ```json
    {data_model.model_json_schema_str}
    ```

Please only respond with valid json.
"""

ANTHROPIC_API_KEY = os.getenv("ANTHROPIC_API_KEY")
anthropic_client = Anthropic(api_key=ANTHROPIC_API_KEY)

# 4. Define the Editor Agent
@app.post("/frame_classification")
async def classify_frame(
    frame_data: FrameData,
    lr: Annotated[LabelRowV2, Depends(dep_label_row)],
    content: Annotated[NDArray[np.uint8], Depends(dep_single_frame)],
):
    # Receives frame data using FastAPI's Form dependency.
    # Note: FastAPI handles parsing the incoming request body (which implicitly includes frame_data,
    # and the dependencies (dep_label_row, dep_single_frame) resolve the lr and content).

    """Classify a frame using Claude."""
    # Constructs a `Frame` object with the content.
    frame = Frame(frame=frame_data.frame, content=content) 
    
    # Sends the frame image to Claude for analysis.
    message = anthropic_client.messages.create(
        model="claude-3-5-sonnet-20241022",
        max_tokens=1024,
        system=system_prompt,
        messages=[
            {
                "role": "user",
                "content": [frame.b64_encoding(output_format="anthropic")],
            }
        ],
    )
    try:
        # Parses Claude's response into classification instances.
        classifications = data_model(message.content[0].text) 
        for clf in classifications:
            clf.set_for_frames(frame_data.frame, confidence=0.5, manual_annotation=False)
            # Adds classifications to the label row
            lr.add_classification_instance(clf) 
    except Exception:
        import traceback

        traceback.print_exc()
        print(f"Response from model: {message.content[0].text}")

    # Saves the updated data.
    lr.save()

Test the Agent

  1. In your current terminal run the following command to runFastAPI server in development mode with auto-reload enabled.
uvicorn main:app --reload --port 8080
  1. Open your Project in the Encord platform and navigate to a frame you want to add a classification to. Copy the URL from your browser.

The url should have the following format: "https://app.encord.com/label_editor/{project_hash}/{data_hash}/{frame}"

  1. In another shell operating from the same working directory, source your virtual environment and test the agent.
source venv/bin/activate
encord-agents test local frame_classification '<your_url>'
  1. To see if the test is successful, refresh your browser to view the classifications generated by Claude. Once the test runs successfully, you are ready to deploy your agent. Visit the deployment documentation to learn more.

Nested Attributes using Claude 3.5 Sonnet

The goals of this example are:

  1. Create an editor agent that can convert generic object annotations (class-less coordinates) into class specific annotations with nested attributes like descriptions, radio buttons, and checklists.
  2. Demonstrate how to use both the OntologyDataModel and the dep_object_crops dependency.

Prerequisites

Before you begin, ensure you have:

Run the following commands to set up your environment:

python -m venv venv                 # Create a virtual Python environment  
source venv/bin/activate            # Activate the virtual environment  
python -m pip install encord-agents anthropic  # Install required dependencies  
export ANTHROPIC_API_KEY="<your_api_key>"     # Set your Anthropic API key  
export ENCORD_SSH_KEY_FILE="/path/to/your/private/key"  # Define your Encord SSH key  

Project Setup

Create a Project with visual content (images, image groups, image sequences, or videos) in Encord. This example uses the following Ontology, but any Ontology containing classifications can be used provided the object types are the same and there is one entry called “generic”.

The goal is to trigger an agent that takes a labeling task from Figure A to Figure B, below:

Figure A: No classification labels.

Figure B: Multiple nested classification labels generated by an LLM.

Create the Agent

This section provides the complete code for creating your editor agent, along with an explanation of its internal workings.

Agent Setup Steps

  1. Import Dependencies and Configure Project: Import necessary dependencies and set up your project. Remember to insert your project’s unique identifier.

  2. Create a data model and a system prompt based on the Project Ontology to tell Claude how to structure its response.

  3. Initialize Anthropic API Client: Set up an API client to establish communication with the Claude model.

  4. Define the Editor Agent:

  • Arguments are automatically injected when the agent is called (see dependency injection details [suspicious link removed]).
  • The dep_object_crops dependency filters to include only “generic” object crops that still need classification.
  • Call Claude with Image Crops: Use the crop.b64_encoding method to send each image crop to Claude in a format it understands.
  1. Parse Claude’s Response and Update Labels: The data_model parses Claude’s JSON response, creating a new Encord object instance. If successful, the original generic object is replaced with the newly classified instance on the label row.

  2. Save Labels.

# 1. Import dependencies and set up the Project. The CORS middleware is crucial as it allows the Encord platform to make requests to your API.
import os

import numpy as np
from anthropic import Anthropic
from encord.objects.ontology_labels_impl import LabelRowV2
from fastapi import Depends
from numpy.typing import NDArray
from typing_extensions import Annotated

from encord_agents.core.data_model import Frame
from encord_agents.core.ontology import OntologyDataModel
from encord_agents.core.utils import get_user_client
from encord_agents.fastapi.cors import get_encord_app
from encord_agents.fastapi.dependencies import (
    FrameData,
    dep_label_row,
    dep_single_frame,
)

# Initialize FastAPI app
app = get_encord_app()

# 2. Set up the Project and create a data model based on the Ontology.

client = get_user_client()
project = client.get_project("<your_project_hash>")
data_model = OntologyDataModel(project.ontology_structure.classifications)

# 3. Set up Claude and create the system prompt that tells Claude how to structure its response.
system_prompt = f"""
You're a helpful assistant that's supposed to help fill in json objects 
according to this schema:

    ```json
    {data_model.model_json_schema_str}
    ```

Please only respond with valid json.
"""

ANTHROPIC_API_KEY = os.getenv("ANTHROPIC_API_KEY")
anthropic_client = Anthropic(api_key=ANTHROPIC_API_KEY)

# 4. Define the Editor Agent
@app.post("/frame_classification")
async def classify_frame(
    frame_data: FrameData,
    lr: Annotated[LabelRowV2, Depends(dep_label_row)],
    content: Annotated[NDArray[np.uint8], Depends(dep_single_frame)],
):
    # Receives frame data using FastAPI's Form dependency.
    # Note: FastAPI handles parsing the incoming request body (which implicitly includes frame_data,
    # and the dependencies (dep_label_row, dep_single_frame) resolve the lr and content).

    """Classify a frame using Claude."""
    # Constructs a `Frame` object with the content.
    frame = Frame(frame=frame_data.frame, content=content) 
    
    # Sends the frame image to Claude for analysis.
    message = anthropic_client.messages.create(
        model="claude-3-5-sonnet-20241022",
        max_tokens=1024,
        system=system_prompt,
        messages=[
            {
                "role": "user",
                "content": [frame.b64_encoding(output_format="anthropic")],
            }
        ],
    )
    try:
        # Parses Claude's response into classification instances.
        classifications = data_model(message.content[0].text) 
        for clf in classifications:
            clf.set_for_frames(frame_data.frame, confidence=0.5, manual_annotation=False)
            # Adds classifications to the label row
            lr.add_classification_instance(clf) 
    except Exception:
        import traceback

        traceback.print_exc()
        print(f"Response from model: {message.content[0].text}")

    # Saves the updated data.
    lr.save()

Testing the Agent

  1. In your current terminal run the following command to runFastAPI server in development mode with auto-reload enabled.
fastapi dev agent.py --port 8080
  1. Open your Project in the Encord platform and navigate to a frame you want to add a classification to. Copy the URL from your browser.

The url should have roughly this format: "https://app.encord.com/label_editor/{project_hash}/{data_hash}/{frame}".

  1. In another shell operating from the same working directory, source your virtual environment and test the agent:
source venv/bin/activate
encord-agents test local object_classification '<your_url>'
  1. To see if the test is successful, refresh your browser to view the classifications generated by Claude. Once the test runs successfully, you are ready to deploy your agent. Visit the deployment documentation to learn more.

Video Recaptioning using GPT-4o-mini

The goals of this example are:

  1. Create an Editor Agent that automatically generates multiple variations of video captions.
  2. Demonstrate how to use OpenAI’s GPT-4o-mini model to enhance human-created video captions with a FastAPI-based agent.

Prerequisites

Before you begin, ensure you have:

Run the following commands to set up your environment:

python -m venv venv                 # Create a virtual Python environment  
source venv/bin/activate            # Activate the virtual environment  
python -m pip install encord-agents langchain-openai "fastapi[standard]" openai  # Install required dependencies  
export OPENAI_API_KEY="<your-api-key>"     # Set your OpenAI API key  
export ENCORD_SSH_KEY_FILE="/path/to/your/private/key"  # Define your Encord SSH key  

Project Setup

Create a Project containing videos in Encord.

This example requires an Ontology with four text classifications:

  • One text classification for human-created summaries of what is happening in the video.
  • Three text classifications to be automatically filled by the LLM.

The workflow for this agent is:

  1. A human watches the video and enters a caption in the first text field.

  2. The agent is then triggered and generates three additional caption variations for review.

  • Each video is first annotated by a human (ANNOTATE stage).
  • Next, a data agent automatically generates alternative captions (AGENT stage).
  • Finally, a human reviews all four captions (REVIEW stage) before the task is marked complete.

If no human caption is present when the agent is triggered, the task is sent back for annotation. If the review stage results in rejection, the task is also returned for re-annotation.

Create the Agent

This section provides the complete code for creating your editor agent, along with an explanation of its internal workings.

Agent Setup Steps

  1. Set up imports and create a Pydantic model for our LLM’s structured output

  2. Create a detailed system prompt for the LLM that explains exactly what kind of rephrasing we want

  3. We configure the LLM to use structured outputs based on our model

  4. Create a helper function to prompt the model with both text and image:

  5. Initialize the FastAPI app with the required CORS middleware:

  6. Define the agent to handle the recaptioning. This includes:

  • Retrieving the existing human-created caption, prioritizing captions from the current frame or falling back to frame zero.
  • Sending the first frame of the video along with the human caption to the LLM.
  • Processing the LLM’s response, which contains three different rephrasings of the original caption.
  • Updating the label row with the new captions, replacing any existing ones.
# 1. Set up imports and create a Pydantic model for our LLM's structured output.
import os
from typing import Annotated

import numpy as np
from encord.exceptions import LabelRowError
from encord.objects.classification_instance import ClassificationInstance
from encord.objects.ontology_labels_impl import LabelRowV2
from fastapi import Depends
from langchain_openai import ChatOpenAI
from numpy.typing import NDArray
from pydantic import BaseModel

from encord_agents import FrameData
from encord_agents.fastapi.cors import get_encord_app
from encord_agents.fastapi.dependencies import Frame, dep_label_row, dep_single_frame

# The response model for the agent to follow.
class AgentCaptionResponse(BaseModel):
    rephrase_1: str
    rephrase_2: str
    rephrase_3: str


# 2. Create a detailed system prompt for the LLM that explains exactly what kind of rephrasing we want.
SYSTEM_PROMPT = """
You are a helpful assistant that rephrases captions.

I will provide you with a video caption and an image of the scene of the video. 

The captions follow this format:

"The droid picks up <cup_0> and puts it on the <table_0>."

The captions that you make should replace the tags, e.g., <cup_0>, with the actual object names.
The replacements should be consistent with the scene.

Here are three rephrases: 

1. The droid picks up the blue mug and puts it on the left side of the table.
2. The droid picks up the cup and puts it to the left of the plate.
3. The droid is picking up the mug on the right side of the table and putting it down next to the plate.

You will rephrase the caption in three different ways, as above, the rephrases should be

1. Diverse in terms of adjectives, object relations, and object positions.
2. Sound in relation to the scene. You cannot talk about objects you cannot see.
3. Short and concise. Keep it within one sentence.

"""

# 3. Configure the LLM to use structured outputs based on our model.
llm = ChatOpenAI(model="gpt-4o-mini", temperature=0.4, api_key=os.environ["OPENAI_API_KEY"])
llm_structured = llm.with_structured_output(AgentCaptionResponse)


# 4. Create a helper function to prompt the model with both text and image.
def prompt_gpt(caption: str, image: Frame) -> AgentCaptionResponse:
    prompt = [
        {"role": "system", "content": SYSTEM_PROMPT},
        {
            "role": "user",
            "content": [
                {"type": "text", "text": f"Video caption: `{caption}`"},
                image.b64_encoding(output_format="openai"),
            ],
        },
    ]
    return llm_structured.invoke(prompt)


# 5. Initialize the FastAPI app with the required CORS middleware.
app = get_encord_app()


# 6. Define the agent to handle the recaptioning.
@app.post("/my_agent")
def my_agent(
    frame_data: FrameData,
    label_row: Annotated[LabelRowV2, Depends(dep_label_row)],
    frame_content: Annotated[NDArray[np.uint8], Depends(dep_single_frame)],
) -> None:
    # Get the relevant Ontology information
    # Recall that we expect
    # [human annotation, llm recaption 1, llm recaption 2, llm recaption 3]
    # in the Ontology
    cap, *rs = label_row.ontology_structure.classifications

    # Retrieve the existing human-created caption, prioritizing captions from the current frame or falling back to frame zero.
    instances = label_row.get_classification_instances(
        filter_ontology_classification=cap, filter_frames=[0, frame_data.frame]
    )
    if not instances:
        # nothing to do if there are no human labels
        return
    elif len(instances) > 1:

        def order_by_current_frame_else_frame_0(
            instance: ClassificationInstance,
        ) -> bool:
            try:
                instance.get_annotation(frame_data.frame)
                return 2  # The best option
            except LabelRowError:
                pass
            try:
                instance.get_annotation(0)
                return 1
            except LabelRowError:
                return 0

        instance = sorted(instances, key=order_by_current_frame_else_frame_0)[-1]
    else:
        instance = instances[0]

    # Read the actual string caption
    caption = instance.get_answer()

    # Send the first frame of the video along with the human caption to the LLM.
    frame = Frame(frame=0, content=frame_content)
    response = prompt_gpt(caption, frame)

    # Process the LLM's response, which contains three different rephrasings of the original caption.
    # Update the label row with the new captions, replacing any existing ones.
    for r, t in zip(rs, [response.rephrase_1, response.rephrase_2, response.rephrase_3]):
        # Overwrite any existing re-captions
        existing_instances = label_row.get_classification_instances(filter_ontology_classification=r)
        for existing_instance in existing_instances:
            label_row.remove_classification(existing_instance)

        # Create new instances
        ins = r.create_instance()
        ins.set_answer(t, attribute=r.attributes[0])
        ins.set_for_frames(0)
        label_row.add_classification_instance(ins)

    label_row.save()

Test the Agent

  1. In your current terminal, run the following command to run the FastAPI server:
ENCORD_SSH_KEY_FILE=/path/to/your_private_key \
OPENAI_API_KEY=<your-api-key> \
fastapi dev main.py
  1. Open your Project in the Encord platform, navigate to a video frame, and add your initial caption. Copy the URL from your browser.

  2. In another shell operating from the same working directory, source your virtual environment and test the agent:

source venv/bin/activate
encord-agents test local my_agent '<your_url>'
  1. Refresh your browser to view the three AI-generated caption variations. Once the test runs successfully, you are ready to deploy your agent. Visit the deployment documentation to learn more.

Cotracker3 Keypoint tracking

CoTracker3, a keypoint tracking algorithm by Meta, is an ideal example for demonstrating Modal agents. Its moderately sized (100MB) model performs excellently when deployed on Modal with serverless GPU access.

Prerequisites

We strongly recommend first completing the general Modal tutorial, which covers registering Encord credentials and provides simpler agent code. This example introduces a new dependency: pulling in model weights and additional ML dependencies.

Additionally, create a Python venv with:

python -m venv venv
source venv/bin/activate
python -m pip install encord-agents modal

as in the original modal tutorial.

Additionally to bring in the cotracker dependency, we found the most straightforward way to be:

git clone https://github.com/facebookresearch/co-tracker.git
mv co-tracker/cotracker ./cotracker

Create the Modal Agent

Here is the full code for the Modal Agent.

from pathlib import Path

import modal
from encord.objects.coordinates import (
    PointCoordinate,
)
from encord.objects.ontology_labels_impl import LabelRowV2
from encord.objects.ontology_object_instance import ObjectInstance
from fastapi import Depends
from typing_extensions import Annotated

from encord_agents.fastapi.dependencies import (
    FrameData,
    dep_asset,
    dep_label_row,
    dep_objects,
)

# 1. Define the Modal image.
# This specifies the base environment, installs system dependencies,
# downloads the CoTracker3 model weights, and installs Python packages.
image = (
    modal.Image.debian_slim(python_version="3.12")
    .apt_install("libgl1", "libglib2.0-0", "wget")
    .run_commands(
        "wget https://huggingface.co/facebook/cotracker3/resolve/main/scaled_offline.pth",
    )
    .pip_install(
        "fastapi[standard]",
        "encord-agents",
        "torch",
        "torchvision",
        "tqdm",
        "imageio[ffmpeg]",
    )
    .add_local_python_source("cotracker") # Assuming 'cotracker' is a local directory with CoTracker source
)

# 2. Define the Modal app.
# This creates the Modal application instance, linking it to the defined image.
app = modal.App(name="encord-agents-cotracker-3-with-model", image=image)


# Helper function to read video frames from a given path using imageio.
def read_video_from_path(path):
    import imageio
    import numpy as np

    try:
        reader = imageio.get_reader(path)
    except Exception as e:
        print("Error opening video file: ", e)
        return None
    frames = []
    for i, im in enumerate(reader):
        frames.append(np.array(im))
    return np.stack(frames)


# 3. Define the endpoint and CoTracker3 usage.
# This is the main function that runs on Modal, exposed as a web endpoint.
@app.function(
    secrets=[modal.Secret.from_name("encord-ssh-key")], # Accesses a Modal secret for Encord authentication
    gpu="L4" # Specifies that the function requires a GPU (L4 type)
)
@modal.web_endpoint(method="POST")
def cotracker3(
    frame_data: FrameData, # Injected frame metadata from Encord webhook
    lr: Annotated[LabelRowV2, Depends(dep_label_row)], # Injected label row object
    object_instances: Annotated[list[ObjectInstance], Depends(dep_objects)], # Injected list of selected objects
    asset: Annotated[Path, Depends(dep_asset)], # Injected path to the local video asset
):
    import imageio
    import numpy
    import torch
    from cotracker.predictor import CoTrackerPredictor

    # Initialize CoTracker3 model, moving to GPU if available
    model = CoTrackerPredictor(checkpoint="/scaled_offline.pth")
    if torch.cuda.is_available():
        model = model.cuda()

    # Ensure only one object is selected for tracking
    assert len(object_instances) == 1
    obj_inst = object_instances[0]
    
    # Read the video from the asset path and convert to PyTorch tensor
    video = read_video_from_path(asset)
    video_tensor = torch.from_numpy(video).permute(0, 3, 1, 2)[None].float()

    # Move video tensor to GPU if available
    if torch.cuda.is_available():
        video_tensor = video_tensor.cuda()
        
    # Extract query point from the selected object instance's annotation
    annotation = obj_inst.get_annotation(frame_data.frame)
    assert isinstance(annotation.coordinates, PointCoordinate)
    assert lr.width # Ensure label row dimensions are available
    assert lr.height

    # Prepare the query tensor for CoTracker (frame number, x-coordinate, y-coordinate)
    query = torch.tensor(
        [
            [
                frame_data.frame,
                annotation.coordinates.x * lr.width, # Convert normalized x to pixel x
                annotation.coordinates.y * lr.height, # Convert normalized y to pixel y
            ],
        ]
    )
    if torch.cuda.is_available():
        query = query.cuda()
        
    # Run CoTracker to predict tracks based on the query point
    pred_tracks, _ = model(video_tensor, queries=query[None])
    
    # Update the object instance with predicted tracks for each frame
    for frame_num, coord in enumerate(pred_tracks.reshape(-1, 2)):
        try:
            obj_inst.set_for_frames(
                coordinates=PointCoordinate(x=float(coord[0]) / lr.width, y=float(coord[1]) / lr.height),
                frames=frame_num,
            )
        except Exception:
            # Skip frames where updating might fail (e.g., if coordinates are out of bounds)
            continue
            
    # Save the updated label row with the new tracked object instance
    lr.save()

Create the Modal Agent

Once the code is saved as app.py, deploy it using modal deploy app.py.

This agent uses an L4 GPU, incurring usage charges, though it typically operates within Modal’s $5 free allowance.

To trigger the agent, right-click on a keypoint in the Encord platform.

Agent Examples in the Making

The following example are being worked on:

  • Tightening Bounding Boxes with SAM
  • Extrapolating labels with DINOv
  • Triggering internal notification system
  • Label assertion