> ## Documentation Index
> Fetch the complete documentation index at: https://docs.encord.com/llms.txt
> Use this file to discover all available pages before exploring further.
# Supported Data
To ensure seamless data loading in Encord, allowlist [https://app.encord.com/](https://app.encord.com/) or [https://app.us.encord.com/](https://app.us.encord.com/) in any 3rd party VPNs, firewalls, or URL isolators. This helps prevent potential issues with opening your data in Encord.
## Supported File Formats
The Encord platform supports more file formats than those listed below. If you do not see a format you want supported, contact us at [support@encord.com](mailto:support@encord.com).
| Data Unit Type |
Supported file formats |
| Point Cloud Data |
* .pcd - Point Cloud Data
* .ply - Polygon File Format
* .las - LAS point cloud (up to LAS v1.3)
* .laz - Compressed LAS (up to LAS v1.3)
* .mcap - MCAP container
* .bag - ROS bag files
* .db3 - ROS2 SQLite bag files
|
| Time Series |
* .csv
|
| Single Image |
* .jpeg
* .png
* .webp
* .avif
* .bmp
* .tiff
* .tif
|
| Image group |
* .jpeg
* .png
* .webp
* .avif
* .bmp
* .tiff
* .tif
|
| Images sequence |
* .jpeg
* .png
* .webp
* .avif
* .bmp
|
| Video |
* .mp4
* .mov\*
* .webm
* .mkv
\* MOV files are only supported in Safari due to Chromium browser limitations. We recommend using Chrome for all other workflows. [More info here.](https://developer.mozilla.org/en-US/docs/Web/Media/Guides/Formats/Containers)
|
| Audio |
* .mpeg
* .wav
* .x-wav
* .flac
|
| Documents |
* .pdf
|
| Text |
* .html
* .json
* .xml
* .txt
|
***
## Point Cloud Data
PCD Projects use "Scenes". Scenes are the data units that your Taskers, and possibly your Agents, work with to create and review your labels.
A Scene can be one of the following:
* A single PCD file (.pcd, .ply, .las, .laz, and so on)
* A group of videos and PCD files bound together as a coherent group.
Encord supports the following formats for Point Cloud Data:
* .pcd - Point Cloud Data
* .ply - Polygon File Format
* .las - LAS point cloud (up to LAS v1.3)
* .laz - Compressed LAS (up to LAS v1.3)
* .e57 - E57 point cloud
* .mcap - MCAP container
* .bag - ROS bag files
* .db3 - ROS2 SQLite bag files
Encord supports the following for multimodal Scenes:
* Videos up to 1GB in size
* Single point cloud files up to 20 million points/200-300 MB
* Up to 9 videos in a Scene
* Up to 1000 frames in each Scene
* Up to 50 cloud data points per frame. We downsample to 10 million points per frame when points per frame exceeds 10 million.
## Single images
Single images are individual images that are uploaded to Encord as separate files. Each single image constitutes its own data unit, hence images are listed individually.
We support the following file types for single images:
`.jpeg`, `.png`, `.webp`, `.avif`, `.bmp`, `.tiff`\*, `.tif`\*
To learn how to upload images from your cloud storage, follow the links below:
* [JSON](/platform-documentation/Curate/add-files/index-register-cloud-data#json-format)
* [CSV](/platform-documentation/Curate/add-files/index-register-cloud-data#csv-format)
***
## Image groups
Image groups are collections of images that are grouped together into a single data unit. They can contain images of varying orientations and no data is lost in the process of creating an image group.
For faster uploads, use image groups instead of image sequences. Image groups bundle multiple images into a single data unit, while image sequences convert images into a video, which requires more processing power and time.
We support the following file types for image groups:
`.jpeg`, `.png`, `.webp`, `.avif`, `.bmp`, `.tiff`\*, `.tif`\*
\* Due to Chromium-based browser limitations, TIFF files can only be viewed in the Label Editor using the Safari browser.
To learn how to upload image groups from your cloud storage, follow the links below:
* [JSON](/platform-documentation/Curate/add-files/index-register-cloud-data#json-format)
* [CSV](/platform-documentation/Curate/add-files/index-register-cloud-data#csv-format)
***
## Image sequences
Image sequences are collections of images that are grouped together into a single data unit, and annotated in the same way as videos. As a result, image sequences are able to make use of powerful machine learning features such as automated labeling.
Only images with the same dimensions can be combined into an image sequence. If your upload includes images with varying dimensions, a separate image sequence is created for each unique dimension.
For faster uploads, use image groups instead of image sequences. Image groups bundle multiple images into a single data unit, while image sequences convert images into a video, which requires more processing power and time.
We support the following file types for image sequences:
`.jpeg`, `.png`, `.webp`, `.avif`, `.bmp`, `.tiff`\*, `.tif`\*
To learn how to upload image sequences from your cloud storage, follow the links below:
* [JSON](/platform-documentation/Curate/add-files/index-register-cloud-data#json-format)
* [CSV](/platform-documentation/Curate/add-files/index-register-cloud-data#csv-format)
#### Creating image sequences
Image sequences can be created [when importing files into Encord](/platform-documentation/Curate/index-files#create-image-groups-and-image-sequences), or by [batching images in **Data** > **Files & Folders**](/platform-documentation/Curate/files/index-batch-images) into image sequences.
Only images with the same dimensions can be combined into an image sequence. If your upload includes images with varying dimensions, a separate image sequence is created for each unique dimension.
***
## Videos
Video files can be uploaded or registered on the Encord platform and annotated frame by frame, allowing you to track elements throughout the video. While each frame is treated as an individual image during annotation, the video remains a single data package.
The following video formats, contains, and codecs are supported.
| Video Formats and Containers | Supported Codecs |
| ---------------------------- | ---------------- |
| matroska, webm | vp8 |
| matroska, webm | vp9 |
| matroska, webm | libdav1d |
| mov, mp4, m4a, 3gp, 3g2, mj2 | libdav1d |
| mov, mp4, m4a, 3gp, 3g2, mj2 | h264 |
| mov, mp4, m4a, 3gp, 3g2, mj2 | h265 (hevc) |
VP9 in an MP4 container is supported but not verified in all environments.
For optimized performance we recommend using the following video formats:
* **`.mp4` with `H.264`** – We recommend using H.264 as the default codec, unless you have specific requirements that necessitate H.265. H.265 may present compatibility issues in some cases.
* **`.mp4` with `VP9`**.
File uploads must be less than 1 GB or 200,000 frames (2hr at 30FPS). See our [guidelines for optimal performance](/platform-documentation/General/best-practices#guidelines-for-optimal-performance) for more details.
Use the following pages to learn how to upload videos from your cloud storage.
* [JSON](/platform-documentation/Curate/add-files/index-register-cloud-data#json-format)
* [CSV](/platform-documentation/Curate/add-files/index-register-cloud-data#csv-format)
### Resizing Videos
Videos can be re-sized using [ffmpeg](https://ffmpeg.org/) to fit the required specifications in the following ways:
* Lowering their resolution.
* Lowering their frame rate.
* Specify a key frame interval.
Follow the steps below to reduce the video file size by adjusting the resolution, as well as the number of frames per second (fps).
1. [Download and install ffmpeg](https://ffmpeg.org/download.html).
2. Open Command Line (on Windows) or Terminal (on Mac & Linux).
3. Run the command shown below, substituting the values for your desired resolution as well as fps, followed by the path to the video you'd like to downsize.
```shell theme={"dark"}
ffmpeg -i normal-video.mp4 -c:v libx265 -an -movflags faststart -tune zerolatency -f mp4 -vf "scale=-1:1080,fps=30"
```
The example above resizes `normal-video-downsampled.mp4` to `30 fps` and a resolution of `-1:1080px`. This means that the video height is set to `1080px`, while the `-1` adjusts the width so that the aspect ratio remains the same as in the original.
The following example imports the video by generic key frame intervals using the global variable `-g` (every 30 frames).
```shell theme={"dark"}
ffmpeg -i normal-video.mp4 -c:v libx265 -an -movflags faststart -tune zerolatency -f mp4 -g 30
```
The following example imports the video by key frame intervals by specific codec `-x264opts keyint=` (every 30 frames for codec H264).
```shell theme={"dark"}
ffmpeg -i normal-video.mp4 -an -movflags faststart -tune zerolatency -f -c:v libx264 -x264opts keyint=30"
```
[Click here](http://trac.ffmpeg.org/wiki/Scaling) to learn more about scaling with ffmpeg.
Decreasing a video's resolution and/or frame rate reduces its quality, making this option suitable only for customers who do not require high-quality videos.
### Pixel aspect ratio
To ensure accurate labels, only videos with a [pixel aspect ratio](https://en.wikipedia.org/wiki/Pixel_aspect_ratio) of 1:1 should be used in Encord.
To check the pixel aspect ratio of your file, run the following `ffprobe` command, where `input-file.mp4` is the full file path to the file you want to output the pixel aspect ratio for. `ffprobe` refers to pixel aspect ratio as 'sample aspect ratio (SAR)'.
```bash theme={"dark"}
ffprobe -v error -select_streams v:0 -show_entries stream=sample_aspect_ratio -of default=noprint_wrappers=1:nokey=1 input-file.mp4
```
The `ffprobe` command outputs 'N/A' if the file's SAR is not defined in the video's metadata.
***
### Converting Videos to Images
In machine learning, most infrastructures and codebases are tailored for image data rather than video. Therefore, when working with videos, a common prerequisite is to convert videos into a series of images. This process is essential for training ML models that do not directly support video inputs. We outline two approaches for extracting images from videos, each catering to different needs.
**Approach 1: Extracting Every Frame as an Image**
This approach requires [ffmpeg](https://ffmpeg.org/). [Download and install ffmpeg](https://ffmpeg.org/download.html) if you have not already.
This method involves decompressing each frame of a video into separate image files. It's straightforward and useful when you need to analyze or process every frame individually. Navigate to the directory your video is in and run the following command in your Terminal, replacing `your_video.mp4` with the name of your video file, and `/path/to/output/dir/frame` with the path to your output directory.
```Terminal theme={"dark"}
ffmpeg -i your_video.mp4 -start_number 0 /path/to/output/dir/frame_%d.png -hide_banner
```
**Approach 2: In-Memory Frame Iteration with Python**
For scenarios where saving individual image files is unnecessary, you can iterate over video frames directly in memory using Python. This method is efficient for immediate processing or conversion to formats like TFRecords.
This approach requires that the `pyav` Python library is installed.
```python theme={"dark"}
import av
# Open the video file
with av.open('your_video.mp4') as container:
# Loop through streams in the container
for frame in container.decode(video=0):
# Process the frame. For example, convert the frame to a PIL Image and show it
img = frame.to_image()
img.show()
```
***
## DICOM & NIfTI
Encord provides native support for Digital Imaging and Communications in Medicine (DICOM) & Neuroimaging Informatics Technology Initiative (NIfTI) browser rendering and data annotations.
Our [Ontologies](/platform-documentation/Annotate/annotate-ontologies/annotate-ontologies) allow you to create any type of labeling protocol - for example RECIST, which requires measuring the longest diameter of a lesion.
With the DICOM editor, you can:
* Annotate modalities such as CT, X-ray, MRI, , Mammograms, and Retinal Fundoscopy images.
* Label using any annotation type in 2D (with 3D in the works), and seamlessly toggle between axial, coronal, and sagittal views.
* Render 20,000 pixel intensities and set custom window widths & levels.
* Natively display DICOM metadata.
* Track and interpolate objects between slices.
* Reduce manual annotations with automation features.
Due to DICOM being a large and open standard Encord accepts most data types. Examples include: CT, MR, US, MG, TOMO, but many more are accepted.
Learn how to upload DICOM files from your cloud storage [here](/platform-documentation/Curate/add-files/index-register-cloud-data#json-format)
### Multi-frame DICOM Support
We support multi-frame DICOMs, making it even easier and faster to load data onto our platform! Multi-frame DICOM support can save time and streamline workflows due to a reduced amount of header data repetition.
Simply upload your multi-frame DICOM files like you would any other files - either via the user interface, or using our python SDK.
### Caching DICOM data
Caching allows frequently accessed DICOM files to be stored securely in your local browser memory, allowing them to be retrieved quickly and efficiently. As a result you can expect faster load times when accessing medical imaging data.
This is particularly beneficial for busy healthcare professionals who require quick access to patient records and diagnostic imaging.
***
## Re-encode Videos
Re-encoding within the Encord platform is only available to Enterprise customers. Contact [sales@encord.com](mailto:sales@encord.com) for more information.
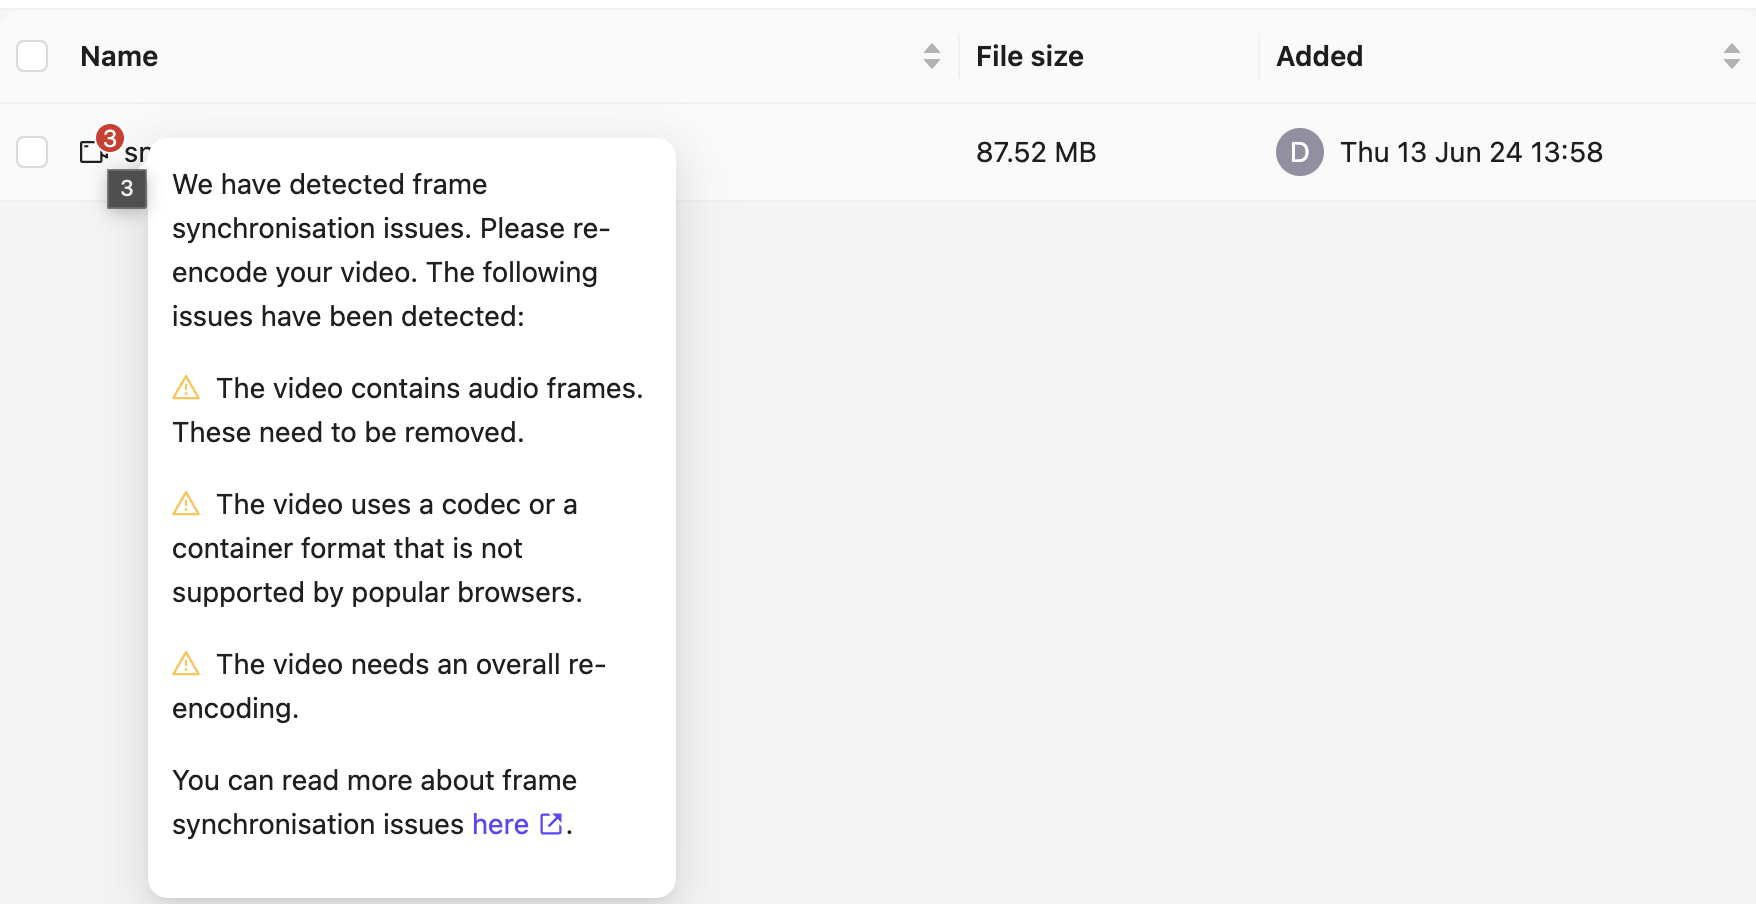
Encord automatically checks all uploaded videos for re-encoding, a process that ensures they meet our platform's requirements. This prevents [frame synchronization issues](/platform-documentation/General/general-supported-data#frame-synchronization-issues) and guarantees accurate labels.
If a video requires re-encoding, a red badge on the file icon indicates the number of issues. You can view each issue by selecting the file and checking the details pane or by hovering over the badge.
## How to Re-Encode
You can Re-encode your videos in the **Files & Folders** or **Datasets** interfaces, but we strongly recommend doing so at the **Files & Folders** level. Videos re-encoded at the Folder level can be used in any Project, while those re-encoded at the Dataset or Project level are restricted to their associated resources.
### Re-encode from Folders
Re-encoding is only available to Enterprise customers. Contact [sales@encord.com](mailto:sales@encord.com) for more information.
1. Go to **Data > Sources**.
2. Go into the Folder where the video you want to re-encode resides.
3. Perform one of the following:
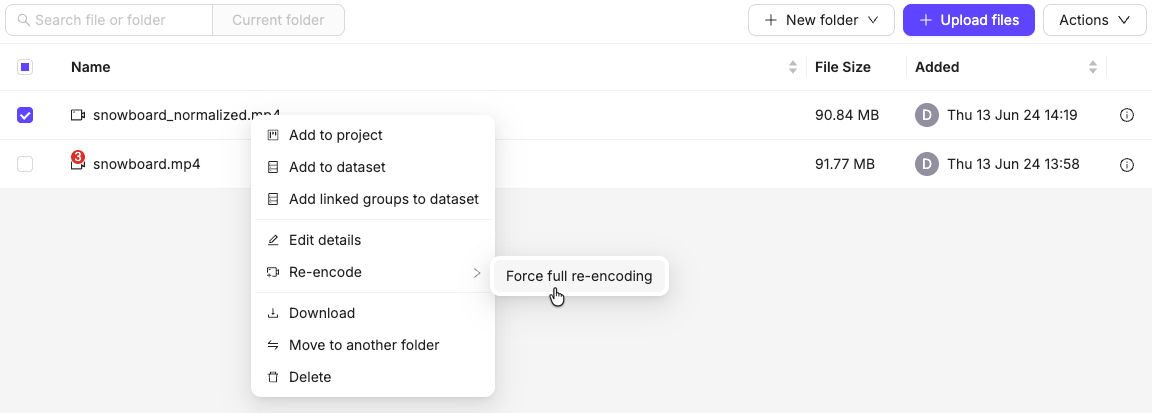
* Right-click the video and select **Re-encode** and select the [type of re-encoding](/platform-documentation/Curate/files/files-re-encoding#types-of-re-encoding) to perform.
* Select one or more videos and click **Actions > Re-encode** and select the type of re-encoding to perform.
4. Check the progress of the re-encoding job by clicking the bell icon in the top-right of the app.
When the process is complete a new video file with the word "normalized" appended to the name appears in the folder. For example, if you re-encoded `snowboard.mp4`, the new video is `snowboard_normalized.mp4`.
### Re-encode from Datasets
Re-encoding is only available to Enterprise customers. Contact [sales@encord.com](mailto:sales@encord.com) for more information.
1. Go to **Data** > **Datasets**.
A list of all Datasets available appears on the *Datasets* page.
2. Go into the Dataset where the video you want to re-encode resides.
3. Select one or more videos.
4. Click **Re-encode** and select the [type of re-encoding](/platform-documentation/Curate/files/files-re-encoding#types-of-re-encoding) to perform.
5. Check the progress of the re-encoding job by clicking the bell icon in the top-right of the app. The number displayed in red signifies how many new notifications you have.
When the process is complete a new video file with the word "normalized" appended to the name appears in the folder. For example, if you re-encoded `snowboard.mp4`, the new video is `snowboard_normalized.mp4`.
## Types of Re-encoding
### Automatically fix detected issue
**Re-encode (Auto)**: Encord performs a spot fix for any detected encoding issues. This is quicker than a full re-encoding, but for some issues, a full re-encoding is required.
### Force full re-encoding
**Re-encode (Full)**: Encord performs a full re-encoding of the video to a specific frame rate and video codec, regardless of the issues detected. This method ensures all issues are resolved, but it can take significantly more time to perform.
### Re-encode Locally
Some cases, such as corrupted metadata, might require you to re-encode your data locally before uploading them to the Encord platform.
Use the following `ffmpeg` command, replacing `video.mp4` with the name of the file you want to re-encode, and `re-encoded-video.mp4` with the name you want the re-encoded file to have:
```bash theme={"dark"}
ffmpeg -err_detect aggressive -fflags discardcorrupt -i video.mp4 -r 30 -c:v libx264 -movflags faststart -an -tune zerolatency re-encoded-video.mp4
```
Since browsers require a constant frame rate, we apply the -r 30 flag (30 fps). Verify your video’s frame rate and adjust the value accordingly.
We recommend using the average frame rate of your video to set the constant rate (rounded to the nearest whole number).
You can figure out the average frame rate of your video with this command:
```bash theme={"dark"}
ffprobe -v 0 -select_streams v:0 -show_entries stream=r_frame_rate -of default=noprint_wrappers=1:nokey=1 video.mp4 | bc -l
```
You may need to install `ffprobe` & `bc`
Here is a summary of the various flags:
* `-err_detect aggressive`: Improves error detection during decoding.
* `-fflags discardcorrupt`: Discards corrupted packets to maintain integrity.
* `-r 30`: This sets the frame rate to a constant 30 frames per second (FPS). Feel free to adjust `30` to your desired frame rate.
* `-c:v libx264`: Specifies the `H.264` codec for video re-encoding.
* `-movflags faststart`: Optimizes for web playback by moving video metadata to the beginning of the file.
* -an: This ensures the audio is removed from the re-encoded video.
* `-tune zerolatency`: Configures for low-latency encoding scenarios.
### Frame Synchronization Issues
Our servers use [FFmpeg](https://ffmpeg.org/) to extract video frames individually, ensuring precise label alignment. This process assigns each label to a specific frame index for accurate mapping within the video. However, a video's frame rate can be inconsistent when embedded in a browser, which may affect the synchronization of displayed frames.
If we detect any of the following frame synchronization issues after uploading a video your video must be [re-encoded](/platform-documentation/General/general-supported-data#re-encode-videos).
A video has "audio frames" whenever the video has any audio with it. We have observed unexpected behavior where the browser video player would sometimes increase the display length of specific frames when audio frames were present. As we can only seek frames by timestamps in the browser, whenever we detect audio frames we recommend to remove those.
**Detecting the problem:**
* Check the warnings on the Encord platform.
* Listen for sound in the video. Unfortunately this is not a guarantee as sometimes there can be audio frames even when there is no audible sound present.
* By running:
```bash theme={"dark"}
ffprobe -i $YOUR_FILE -show_streams -select_streams a -loglevel error
```
If there is no output, there are no audio frames. If you see some output, there are some audio frames.
**Fixing the problem:**
Re-encode the video in the Encord platform. This will copy all the video frames but will drop all the audio frames.
The issue known as "ghost frames" arises when video frames have negative timestamps. This can happen when videos are cut at the beginning, but a keyframe with a negative timestamp is retained.
Various video players may display a varying number of frames with negative timestamps, ranging from 0 to all. Unfortunately, we have no control over the browser's video player, so we cannot predict how many negative keyframes it will display.
To ensure accurate labeling, we must avoid labeling any frames with negative timestamps. Therefore, we kindly request that you re-encode the video to remove any negative timestamps. This process will resolve the "ghost frames" issue and ensure smooth annotation.
**Detecting the problem:**
* Check the warnings on the Encord platform.
* By using different media players and observing whether some of them start at different frames in the video.
* By running:
```bash theme={"dark"}
ffprobe -show_packets -select_streams v -read_intervals %+3 -of json $YOUR_FILE
```
This will show the video packets of the first 3 seconds in a JSON format.
You will see an output such as
```bash theme={"dark"}
[...]
"packets": [
{
"codec_type": "video",
"stream_index": 0,
"pts": -16384,
"pts_time": "-1.066667",
"dts": -16896,
"dts_time": "-1.100000",
"duration": 512,
"duration_time": "0.033333",
"size": "71396",
"pos": "37476",
"flags": "KD"
},
[...]
```
If in any of the packets you have a negative value for `pts`, you know that there might be some ghost frames.
**Fixing the problem:**
Re-encode the video in the Encord platform. These are the transformations we apply when we detect ghost frames:
* The audio frames are dropped.
* The video frames are re-encoded (i.e. the images in the videos are decompressed and compressed again).
* All unsupported file formats are converted to `.mp4` files.
* Corrupted frames are dropped.
Some videos have variable frame rates. This could come for example from a dashcam which tries to write frames as fast as it can.
**Detecting the problem:**
* Check the warnings on the Encord platform
* Run the same ffprobe command as for ghost frames (above) and check if the distance between the `pts` is variable
**Fixing the problem:**
Re-encode the video in the Encord platform. These are the transformations we apply when we detect a variable frame rate:
* A constant frame rate is applied to the video. This requires some dropping and duplicating of frames and is handled by the `-vsync cfr` FFmpeg flag.
* All the transformations that are applied to videos with ghost frames.
You may also see a frame synchronization warning in the Label Editor when trying to open the video task:

For a more detailed check, you can use [ffprobe](https://ffmpeg.org/ffprobe.html) (part of the FFmpeg suite) to inspect your video's properties. [Download FFmpeg here](https://www.ffmpeg.org/download.html).
#### Existing labels before re-encoding
When you upload pre-existing labels for a video that requires re-encoding, there is a risk that your labels might become misplaced. This can occur for two reasons:
* The original labels were created incorrectly due to frame synchronization issues on other platforms.
* The video's variable frame rate changed during re-encoding.
If you re-encode your video, we strongly encourage verify the accuracy of your pre-existing labels. Should you find that your labels are misaligned, contact the support assistance.
***
## Supported Browsers
We recommend the Google Chrome or Brave web-browsers when using Encord.
* We recommend [disabling hardware acceleration](https://www.howtogeek.com/412738/how-to-turn-hardware-acceleration-on-and-off-in-chrome/#:~:text=In%20the%20Settings%20menu%2C%20expand,Relaunch%E2%80%9D%20to%20apply%20the%20changes) in Chrome when working with **videos** or **image sequences**, as it can cause rendering issues and unexpected behavior in the browser.
* We recommend **enabling** hardware acceleration when working with [**PCD Scenes**](/platform-documentation/Curate/add-files/add-pcd-data) to ensure smoother performance and faster rendering.
### HEVC (High Efficiency Video Coding)/H265 Support
HEVC (High Efficiency Video Coding), also known as H265, requires at least the following hardware specs for a good experience:
* 4GB of RAM
* Mac: 2016 (or later) or any M series
* Windows: AMD Ryzen or Intel 7th gen
If your computer has the above specs and continues to have issues with H265 videos, we recommend re-encoding the videos as h.264 encoding.