> ## Documentation Index
> Fetch the complete documentation index at: https://docs.encord.com/llms.txt
> Use this file to discover all available pages before exploring further.
# Direct Access
Direct access integrations let you register data in Encord without requiring Encord to sign your URLs. However, this means you must supply your own direct, pre-signed URLs.
Alternatively, you can use unsigned URLs, but that requires a custom setup and additional Terraform code.
Direct access integrations support all data modalities.
Direct Access integrations are often paired with [*Strict client-only access*](/platform-documentation/General/annotate-data-integrations#strict-client-only-access) for enhanced security when supplying private cloud data. This combination ensures the highest level of data protection: *Strict client-only access* prevents Encord from accessing your data, while Direct Access keeps Encord from signing the URLs, maintaining your data's confidentiality. However, when *Strict client-only access* in enabled, all features relying on data conversion cannot be used.
Direct access integrations cannot be used to access data with cloud provider user-based access controls.
## Use cases
1. Public Dataset Aggregation: Researchers or analysts may need to aggregate public datasets from various sources for analysis or modeling purposes. Direct access integrations allow them to seamlessly gather data from publicly accessible sources without the need for authentication, simplifying the data acquisition process.
2. Third-Party Data Integration: Businesses often rely on third-party data providers for enriching their datasets or enhancing analytical insights. With direct access integrations, organizations can easily incorporate data from external sources by providing pre-signed URLs, streamlining the integration process and enabling timely access to valuable data.
3. Private Data Access: Workspaces may have proprietary datasets stored in private cloud environments with restricted access controls, such as IP allowlists. Direct access integrations with [*Strict client-only access*](/platform-documentation/General/annotate-data-integrations#strict-client-only-access) enable authorized users to directly upload and access this data in Encord without compromising security or violating access policies.
4. Data protection: Direct access paired with [*Strict client-only access*](/platform-documentation/General/annotate-data-integrations#strict-client-only-access) ensures compliance with stringent security requirements and regulatory standards, at the expense of some of Encord's more advanced features.
## Set Up Direct Access Integration
### Create the Integration
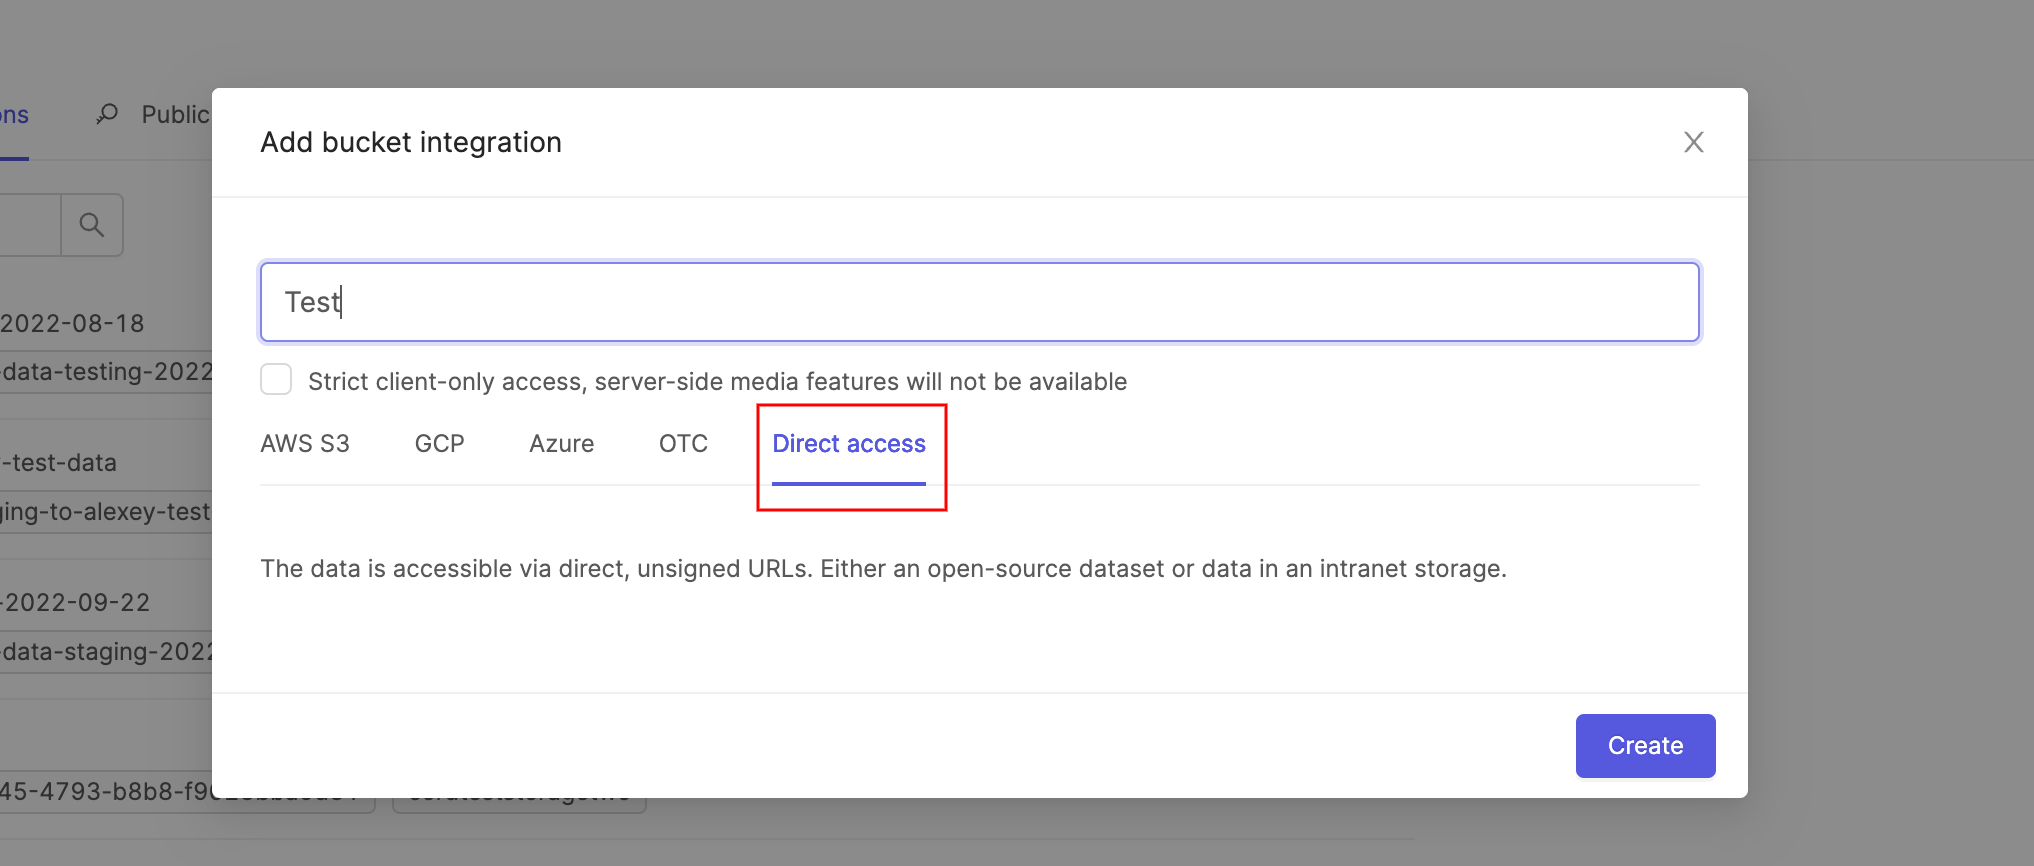
1. Click **Add integration**, in the *Integrations* section, to create a new integration.
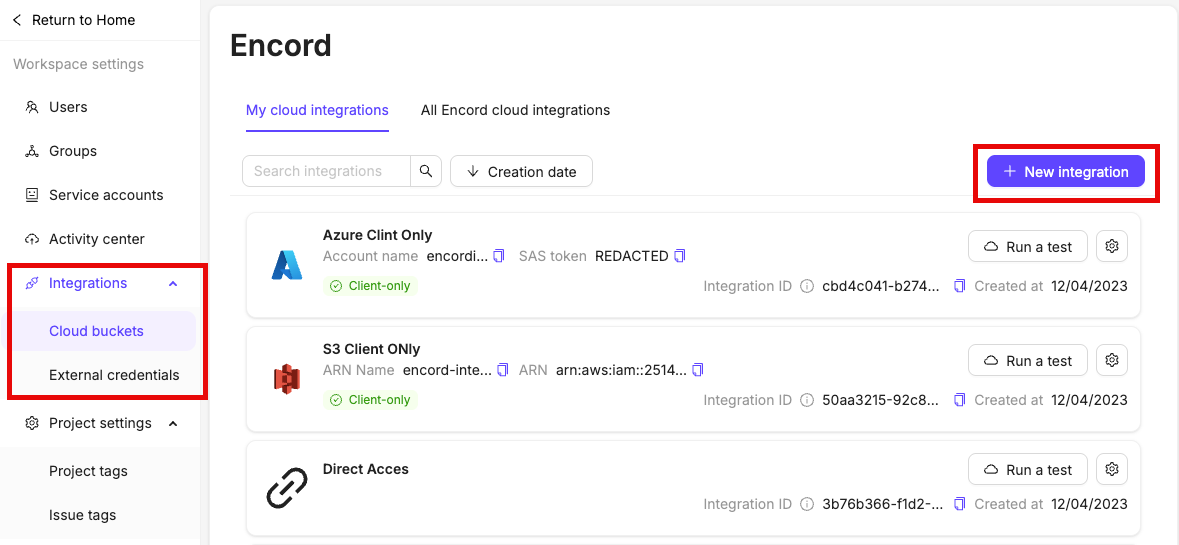
2. Select **Direct Access** from the list of possible integration types.
3. Click **Create**.
### Set Up CORS
You must configure CORS on your storage bucket using your cloud provider’s console. For example:
* [CORS configuration for AWS S3](/platform-documentation/General/annotate-data-integrations/annotate-aws-integration#3-allow-cross-origin-resource-sharing-cors)
* [CORS configuration for Azure](/platform-documentation/General/annotate-data-integrations/annotate-azure-blob-integration#3-creating-a-cors-configuration-in-azure)
* [CORS configuration for GCP Storage](/platform-documentation/General/annotate-data-integrations/annotate-gcp-integration#creating-a-cors-configuration)
* [CORS configuration for OTC](/platform-documentation/General/annotate-data-integrations/annotate-otc-integration#3-optional-configuring-cors)
## Upload Direct Access Data
[Create a Direct Access integration](/platform-documentation/General/annotate-data-integrations/annotate-direct-access-integration#creating-a-direct-access-integration).
Create a JSON file to specify the files you want to register with Encord. The `objectURL`s in the JSON file must be pre-signed.
When a Direct Access integration is used with *Strict client-only access*, the JSON file must include metadata that specifies file information for each URL. If [audioMetadata](/platform-documentation/General/annotate-data-integrations#audio-metadata), [imageMetadata](/platform-documentation/General/annotate-data-integrations#image-metadata), or [videoMetadata](/platform-documentation/General/annotate-data-integrations#video-metadata) flags are present in the JSON file, the system relies solely on the provided metadata without additional validation and does not store the file on our servers. **Ensuring the accuracy of the provided metadata is essential.**.
```json Images theme={"dark"}
{
"images": [
{
"objectUrl": "https://encord-integration.s3.eu-west-2.amazonaws.com/images/image_file_001.jpg",
"title": "my-custom-image-file-001.jpg",
"imageMetadata": {
"mimeType": "image/jpg",
"fileSize": 124,
"width": 640,
"height": 480
},
},
{
"objectUrl": "https://encord-integration.s3.eu-west-2.amazonaws.com/images/image_file_002.jpg",
"title": "my-custom-image-file-002.jpg",
"imageMetadata": {
"mimeType": "image/jpg",
"fileSize": 124,
"width": 640,
"height": 480
},
},
],
"skip_duplicate_urls": true
}
```
```json Audio theme={"dark"}
{
"audio": [
{
"objectUrl": "https://encord-integration.s3.eu-west-2.amazonaws.com/videos/audio_file_001.mp3",
"title": "my-custom-audio-file-001.mp3",
"audioMetadata": {
"duration": 23.02,
"file_size": 2900000,
"mime_type": "audio/mp3",
"sample_rate": 44100,
"bit_depth": 24,
"codec": "mp3",
"num_channels": 2
},
},
{
"objectUrl": "https://encord-integration.s3.eu-west-2.amazonaws.com/videos/audio_file_002.mp3",
"title": "my-custom-audio-file-002.mp3",
"audioMetadata": {
"duration": 21.99,
"file_size": 2900000,
"mime_type": "audio/mp3",
"sample_rate": 44100,
"bit_depth": 24,
"codec": "mp3",
"num_channels": 2
},
}
],
"skip_duplicate_urls": true
}
```
```json Videos theme={"dark"}
{
"videos": [
{
"objectUrl": "https://encord-integration.s3.eu-west-2.amazonaws.com/videos/video_file_001.mp4",
"title": "my-custom-video-file-001.mp4",
"videoMetadata": {
"fps": 23.98,
"duration": 29.09,
"width": 1280,
"height": 720,
"file_size": 5468354,
"mime_type": "video/mp4"
},
},
{
"objectUrl": "https://encord-integration.s3.eu-west-2.amazonaws.com/videos/video_file_002.mp4",
"title": "my-custom-video-file-002.mp4",
"videoMetadata": {
"fps": 23.98,
"duration": 29.09,
"width": 1280,
"height": 720,
"file_size": 5468354,
"mime_type": "video/mp4"
},
},
],
"skip_duplicate_urls": true
}
```
```json Text theme={"dark"}
{
"text": [
{
"objectUrl": "https://encord-integration.s3.eu-west-2.amazonaws.com/text-files/text_file_004.txt",
"title": "my-custom-text-004.txt",
"textMetadata": {
"fileSize": 200,
"mime_type": "application/xml"
}
},
],
"skip_duplicate_urls": true
}
```
```json PDF theme={"dark"}
{
"pdfs": [
{
"objectUrl": "https://encord-integration.s3.eu-west-2.amazonaws.com/doc-files/beowulf.pdf",
"pdfMetadata": {
"fileSize": 900,
"numPages": 42
}
},
],
"skip_duplicate_urls": true
}
```
To ensure smoother uploads and faster completion times, and avoid hitting absolute file limits, we recommend adding smaller batches of data. Limit uploads to 100 videos or up to 1,000 images at a time. You can also create multiple Datasets, all of which can be linked to a single Project. Familiarize yourself with our [limits and best practices for data import/registration](/platform-documentation/General/best-practices#import-into-encord) before adding data to Encord.
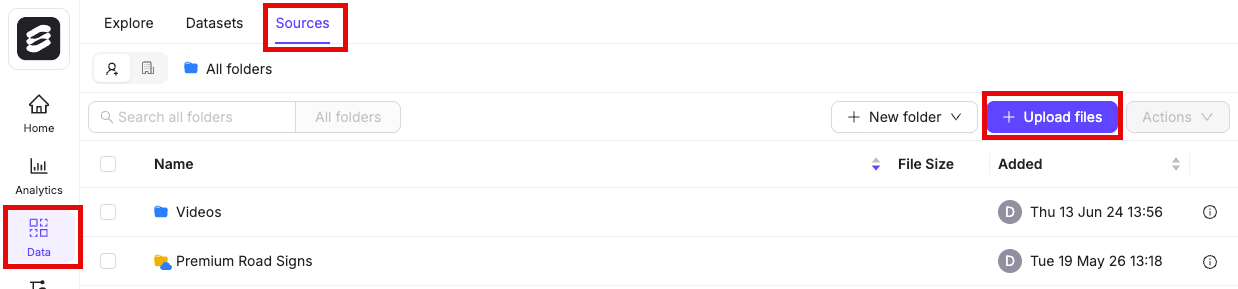
1. Navigate to **Data** > **Files & Folders** in the Encord platform.
2. Click into a Folder.
3. Click **+ Upload files**.
A dialog appears.
4. Click **Import from cloud data**.
We recommend turning on the **Ignore individual file errors** feature. This ensures that individual file errors do not lead to the whole upload process being aborted.
6. Click **Add JSON or CSV files** to add a [JSON](/platform-documentation/Curate/add-files/index-register-cloud-data#json-format) or [CSV](/platform-documentation/Curate/add-files/index-register-cloud-data#csv-format) file specifying cloud data that is to be added.
To use your data in Encord, it must be uploaded to the Encord **Files & Folders** storage. Once uploaded, your data can be reused across multiple Projects and contain no labels or annotations themselves. **Files & Folders** stores your data, while *Projects* store your labels. The following script creates a folder in **Files & Folders** and uses your AWS integration to register data in that folder.
The following script creates a new folder in **Files & Folders** and initiates uploads from AWS. It works for all file types.
If `Upload is still in progress, try again later!` is returned, use the
[script to check the upload status](/sdk-documentation/getting-started-sdk/sdk-register-data-aws#step-5-check-data-upload) to see whether the upload has finished.
Ensure that you:
* Replace `` with the path to your private key.
* Replace `` with the title of the integration you want to use.
* Replace `` with the folder name. The scripts assume that the specified folder name is unique.
* Replace `path/to/json/file.json` with the path to a [JSON file specifying which cloud storage files should be uploaded](/platform-documentation/Curate/add-files/index-register-cloud-data#json-format).
* Replace `A folder to store my files` with a meaningful description for your folder.
* Replace `"my": "folder_metadata"` with any metadata you want to add to the folder.
The script has several possible outputs:
* "Upload is still in progress, try again later!": The registration has not finished. Run this script again later to check if the data registration has finished.
* "Upload completed": The registration completed. If any files failed to upload, the URLs are listed.
* "Upload failed": The entire registration failed, and not just individual files. Ensure your [JSON file](/platform-documentation/Curate/add-files/index-register-cloud-data#json-format) is formatted correctly.
```python Create folder and register cloud data theme={"dark"}
# Import dependencies
from encord import EncordUserClient
from encord.orm.dataset import LongPollingStatus # Ensure correct import path
# Instantiate user client. Replace with the path to your private key
user_client = EncordUserClient.create_with_ssh_private_key(
ssh_private_key_path=""
)
# Specify the integration you want to use
integrations = user_client.get_cloud_integrations()
integration_idx = [i.title for i in integrations].index("")
integration = integrations[integration_idx].id
# Create a storage folder
folder_name = ""
folder_description = "A folder to store my files"
folder_metadata = {"my": "folder_metadata"}
storage_folder = user_client.create_storage_folder(
folder_name, folder_description, client_metadata=folder_metadata
)
# Initiate cloud data registration
upload_job_id = storage_folder.add_private_data_to_folder_start(
integration_id=integration, private_files="path/to/json/file.json", ignore_errors=True
)
# Check upload status
res = storage_folder.add_private_data_to_folder_get_result(upload_job_id, timeout_seconds=5)
print(f"Execution result: {res}")
if res.status == LongPollingStatus.PENDING:
print("Upload is still in progress, try again later!")
elif res.status == LongPollingStatus.DONE:
print("Upload completed")
if res.unit_errors:
print("The following URLs failed to upload:")
for e in res.unit_errors:
print(e.object_urls)
else:
print(f"Upload failed: {res.errors}")
```
```Example output theme={"dark"}
add_private_data_to_dataset job started with upload_job_id=c4026edb-4fw2-40a0-8f05-a1af7f465727.
SDK process can be terminated, this will not affect successful job execution.
You can follow the progress in the web app via notifications.
add_private_data_to_dataset job completed with upload_job_id=c4026edb-4fw2-40a0-8f05-a1af7f465727.
```
## Direct Access with Unsigned URLs
You can configure secure data access with unsigned URLs using a Terraform setup **In GCP**.
The following section is intended for users who are familiar with Terraform.
1. Connect to a static IP (for example a VPN).
2. In the terraform code, sett all the following variables.
* ``
* ``
* ``
* ``
* ``
3. In the terraform code, add the IP addresses that should be allowed to access your data.
4. Optionally, if you want to use an existing bucket rather create a new one you must adjust the terraform code.
5. Apply the Terraform configuration.
6. Ensure your [upload JSON](#upload-direct-access-data) uses the `DNS_MAPPING_DOMAIN_NAME` defined in your terraform code instead of the public URL (`https://storage.googleapis.com`).
If you update your Cloud Armor configuration — such as adding or removing allowed IP addresses — you must invalidate the CDN cache for the changes to take effect immediately. Otherwise, the updates only apply once the existing cache expires (currently set to 1 hour).
You can learn how to invalidate cached content in the [Google Cloud documentation](https://docs.cloud.google.com/cdn/docs/invalidating-cached-content)
```edge Boilerplate theme={"dark"}
locals {
domain = "" # replace with your domain name
managed_zone = "" # replace with your managed DNS - this is only required if you want to create a DNS record.
bucket_name = "" # replace with your desired bucket name (new bucket is created)
project_id = "" # replace with your GCP project ID
bucket_region = "" # replace with your bucket's region. Used to create multi-region bucket.
# List of allowed IPs to access the bucket via the load balancer
allowed_ips = [
"22.22.22.22/32", # Replace with the IPs you want to grant access
#"11.11.11.11/32",
#"xxx.xx.xx.xx/32",
]
}
terraform {
required_providers {
google = {
source = "hashicorp/google"
version = "7.11.0"
}
}
}
provider "google" {
project = local.project_id
}
# Private GCS bucket
resource "google_storage_bucket" "cdn_bucket" {
name = local.bucket_name
location = local.bucket_region
storage_class = "MULTI_REGIONAL"
force_destroy = false
uniform_bucket_level_access = true
public_access_prevention = "enforced"
versioning {
enabled = false
}
}
# IP and certificate (will take minutes to hours to provision)
resource "google_compute_global_address" "cdn_ip" {
name = "cdn-ip"
ip_version = "IPV4"
address_type = "EXTERNAL"
}
resource "google_dns_record_set" "cdn_dns_record" {
name = "${local.domain}."
managed_zone = local.managed_zone
rrdatas = [
google_compute_global_address.cdn_ip.address
]
ttl = 300
type = "A"
}
resource "google_compute_managed_ssl_certificate" "cdn_certificate" {
name = "cdn-certificate"
managed {
domains = [
local.domain,
]
}
}
# Cloud Armor Security Policy
resource "google_compute_security_policy" "cdn_security_policy" {
name = "cdn-security-policy"
description = "Security policy to restrict access to specific IPs"
# Default rule - deny all
rule {
action = "deny(403)"
priority = "2147483647"
match {
versioned_expr = "SRC_IPS_V1"
config {
src_ip_ranges = ["*"]
}
}
description = "Default deny all rule"
}
# Allow specific IPs
rule {
action = "allow"
priority = "1000"
match {
versioned_expr = "SRC_IPS_V1"
config {
src_ip_ranges = local.allowed_ips
}
}
description = "Allow traffic from specific IPs"
}
}
# Load Balancer
resource "google_compute_global_network_endpoint_group" "cdn_network_endpoint_group" {
name = "cdn-network-endpoint-group"
network_endpoint_type = "INTERNET_FQDN_PORT"
default_port = 443
}
resource "google_compute_global_network_endpoint" "cdn_network_endpoint" {
global_network_endpoint_group = google_compute_global_network_endpoint_group.cdn_network_endpoint_group.id
fqdn = "${google_storage_bucket.cdn_bucket.name}.storage.googleapis.com"
port = google_compute_global_network_endpoint_group.cdn_network_endpoint_group.default_port
}
resource "google_compute_backend_service" "cdn_backend_service" {
name = "cdn-backend-service"
description = "Backend service for Google Cloud CDN"
load_balancing_scheme = "EXTERNAL_MANAGED"
compression_mode = "AUTOMATIC"
protocol = "HTTPS"
enable_cdn = true
security_policy = google_compute_security_policy.cdn_security_policy.id
backend {
group = google_compute_global_network_endpoint_group.cdn_network_endpoint_group.id
}
custom_request_headers = [
"Host:${google_storage_bucket.cdn_bucket.name}.storage.googleapis.com",
"Cookie:", # unset cookies to avoid HMAC authentication failure
]
custom_response_headers = [
"X-Cache-Hit:{cdn_cache_status}"
]
cdn_policy {
cache_mode = "FORCE_CACHE_ALL"
negative_caching = false
cache_key_policy {
include_host = true
include_query_string = true
}
bypass_cache_on_request_headers {
header_name = "X-Bypass-Cache"
}
}
security_settings {
aws_v4_authentication {
access_key_id = google_storage_hmac_key.cdn_hmac_key.access_id
access_key = google_storage_hmac_key.cdn_hmac_key.secret
origin_region = "europe-west1"
}
}
}
resource "google_compute_url_map" "cdn_lb" {
name = "cdn-lb"
description = "Load Balancer to redirect requests to bucket backend"
default_service = google_compute_backend_service.cdn_backend_service.id
}
resource "google_compute_target_https_proxy" "cdn_https_proxy" {
name = "cdn-https-proxy"
url_map = google_compute_url_map.cdn_lb.self_link
ssl_certificates = [google_compute_managed_ssl_certificate.cdn_certificate.self_link]
}
resource "google_compute_global_forwarding_rule" "cdn_https_forwarding_rule" {
name = "cdn-https-forwarding-rule"
target = google_compute_target_https_proxy.cdn_https_proxy.self_link
ip_address = google_compute_global_address.cdn_ip.address
load_balancing_scheme = "EXTERNAL_MANAGED"
port_range = "443"
}
# Partial load balancer for https redirects
resource "google_compute_url_map" "cdn_lb_https_redirect" {
name = "cdn-lb-https-redirect"
description = "Partial Load Balancer for HTTPS Redirects"
default_url_redirect {
https_redirect = true
strip_query = false
}
}
resource "google_compute_target_http_proxy" "cdn_http_proxy" {
name = "cdn-http-proxy"
url_map = google_compute_url_map.cdn_lb_https_redirect.id
}
resource "google_compute_global_forwarding_rule" "cdn_http_forwarding_rule" {
name = "cdn-http-forwarding-rule"
target = google_compute_target_http_proxy.cdn_http_proxy.id
ip_address = google_compute_global_address.cdn_ip.id
load_balancing_scheme = "EXTERNAL_MANAGED"
port_range = "80"
}
# Service Account
resource "google_service_account" "cdn_bucket_service_account" {
account_id = "cdn-service-account"
display_name = "CDN Service Account"
}
resource "google_storage_bucket_iam_member" "cdn_bucket_object_reader" {
bucket = google_storage_bucket.cdn_bucket.name
role = "roles/storage.legacyObjectReader"
member = "serviceAccount:${google_service_account.cdn_bucket_service_account.email}"
}
resource "google_storage_hmac_key" "cdn_hmac_key" {
service_account_email = google_service_account.cdn_bucket_service_account.email
}
```
```edge Example Values theme={"dark"}
locals {
domain = "encord-directaccess.acme.com"
managed_zone = "acme.com"
bucket_name = "encord-data"
project_id = "my-gcp-project"
bucket_region = "EU"
# List of allowed IPs to access the bucket via the load balancer
allowed_ips = [
"39.42.20.11/32",
"130.192.120.23/32",
]
}
```
The following is an example JSON to upload a PDF file, using an example `DNS_MAPPING_DOMAIN_NAME`
```json PDF theme={"dark"}
{
"pdfs": [
{
"objectUrl": "https://encord-directaccess.acme.com/doc-files/beowulf.pdf",
"pdfMetadata": {
"fileSize": 900,
"numPages": 42
}
},
],
"skip_duplicate_urls": true
}
```