> ## Documentation Index
> Fetch the complete documentation index at: https://docs.encord.com/llms.txt
> Use this file to discover all available pages before exploring further.
# Multimodal (Data Groups) in Index
"Data Grouping" (Data Groups) allows you to allocate individual files to groups so that they are more easily annotated and reviewed. This allows you to unlock multi-tile and multi-modal functionality.
Basically, Data Groups are like image groups in Encord, except that Data Groups can include any data type (images, videos, audio files, text files, PDFs) AND that data groups support default and custom layouts for annotation and review.
You can use Data Groups in non-Consensus Projects and Consensus Projects with Review & Refine nodes. Determine Consensus nodes are not yet supported.
For an end-to-end example of how you can use Data Groups, go [here](/end-to-end/Features/e2e-data-groups).
## Data Group Layouts
The order of data units in a Data Group determines how they are arranged in the Label Editor. Encord supports the following:
* Grid (default)
* Carousel
* Custom Layouts
```pgsql theme={"dark"}
+------------------+------------------------+
| data unit 1 | data unit 2 |
+------------------+------------------------+
| data unit 3 | data unit 4 |
+------------------+------------------------+
```
In the carousel layout, a scrollable panel on the left shows all data units, while the selected one appears in the main editor view.
 ```pgsql theme={"dark"}
+-------------------------------------------+
| text file |
+------------------+------------------------+
| data unit 1 | data unit 2 |
+------------------+------------------------+
| data unit 3 | data unit 4 |
+------------------+------------------------+
```
## Create Data Groups
At scale, we recommend [using the SDK to create your Data Groups](/sdk-documentation/index-sdk/sdk-data-groups), specify the layout for your Data Groups, and add Data Groups to Datasets and Projects.
All layouts (grid, carousel, custom) are limited to 50 data units. Attempting to create a data group with more than 50 data units results in an error.
### Manually Create Data Groups
1. Go to **Files** > **\[select a Folder]**.
2. Select the files you want to add to a Data Group.
3. Right click your selection.
4. Hover over **Data group**.
5. Select the [Data Group layout](#data-group-layouts) you want the group to have.
Hover over each Data Group type to see a preview of how the Data Group displays to Annotator and Reviewers.
* Encord automatically names Data Groups.
* Data Groups appear in the same folder as its component files.
* Click the **View details** icon, to see a preview of how the Data Group appears to Annotators and Reviewers.
## Auto Data Groups
Auto Data Groups automatically organize files into groups, based on grouping keys you define. Any files sharing the same key are combined into a single data group, so there's no need to manually predefine or maintain groups.
The Auto Data Group feature runs automatically as new data is added to a Cloud-synced Folder. Only new data is grouped. Existing groups remain as they are.
**Create Auto Data Groups**:
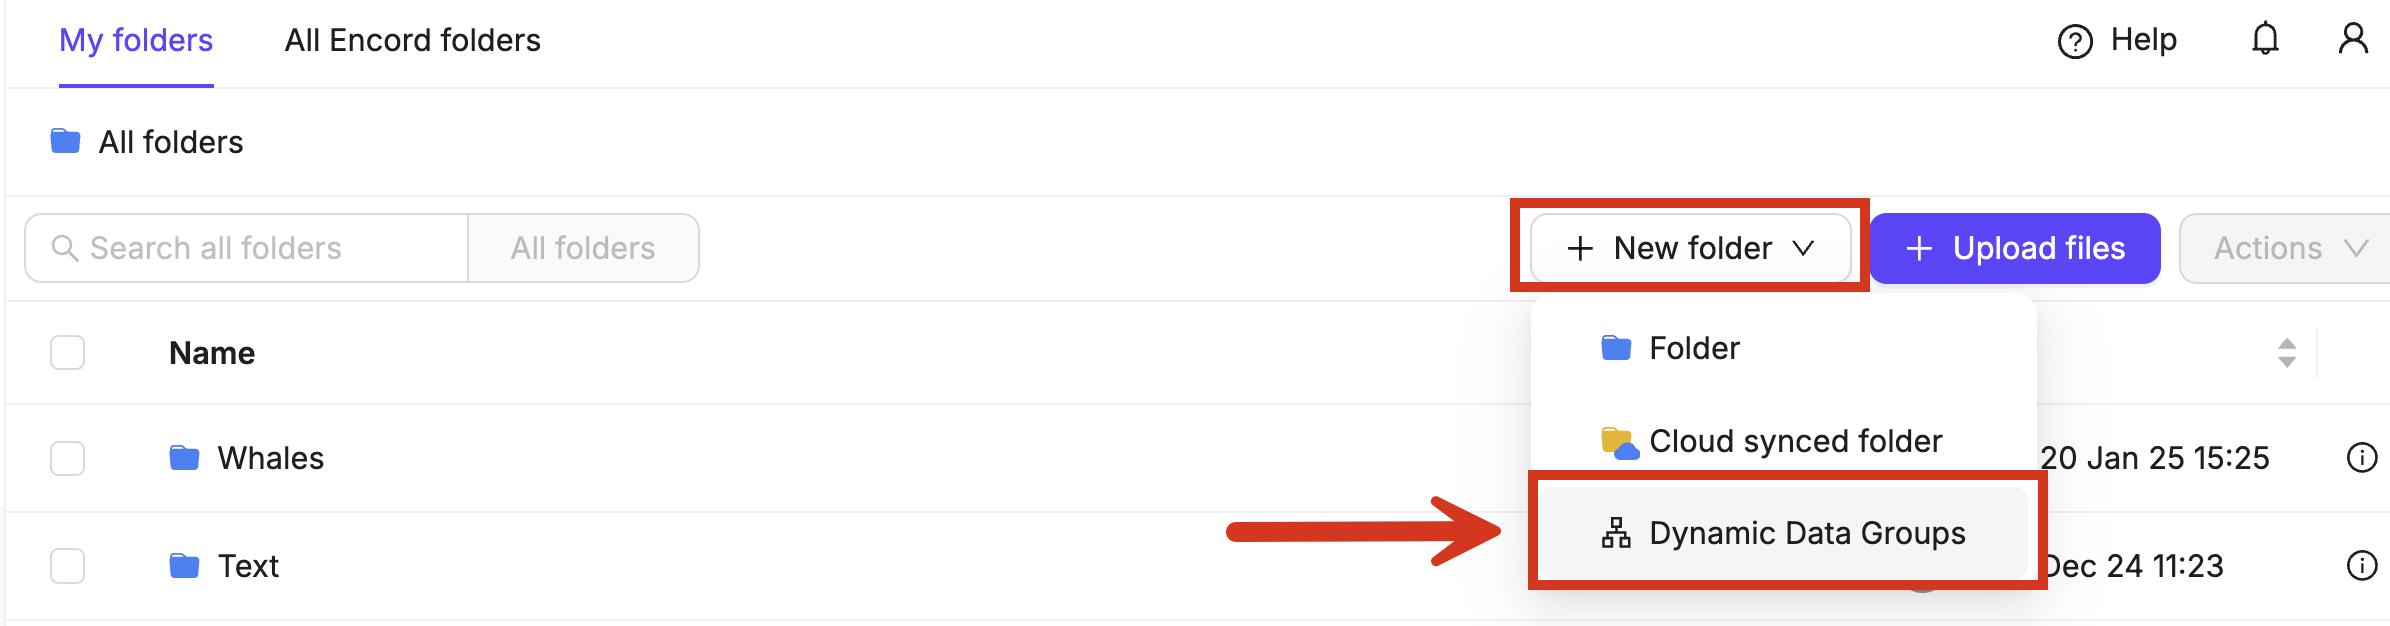
1. Navigate to **Index** > **Files**.
2. Click **+ New folder**.
3. Select **Auto Data Groups**.
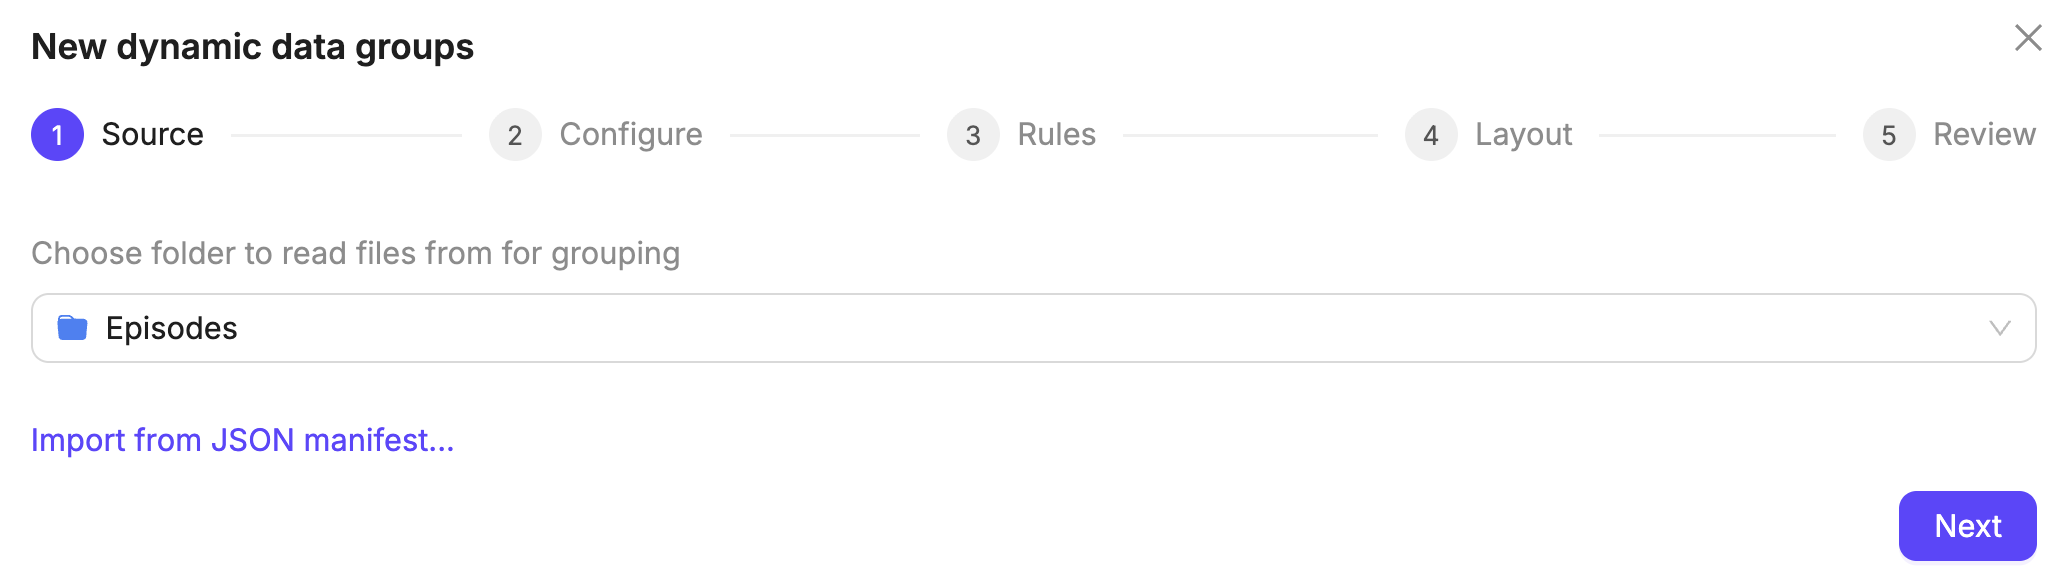
4. Select a source folder whose files you want to organize into Data Groups. Each folder supports only one grouping configuration. If the selected folder already has one, it is loaded for you to review and edit.
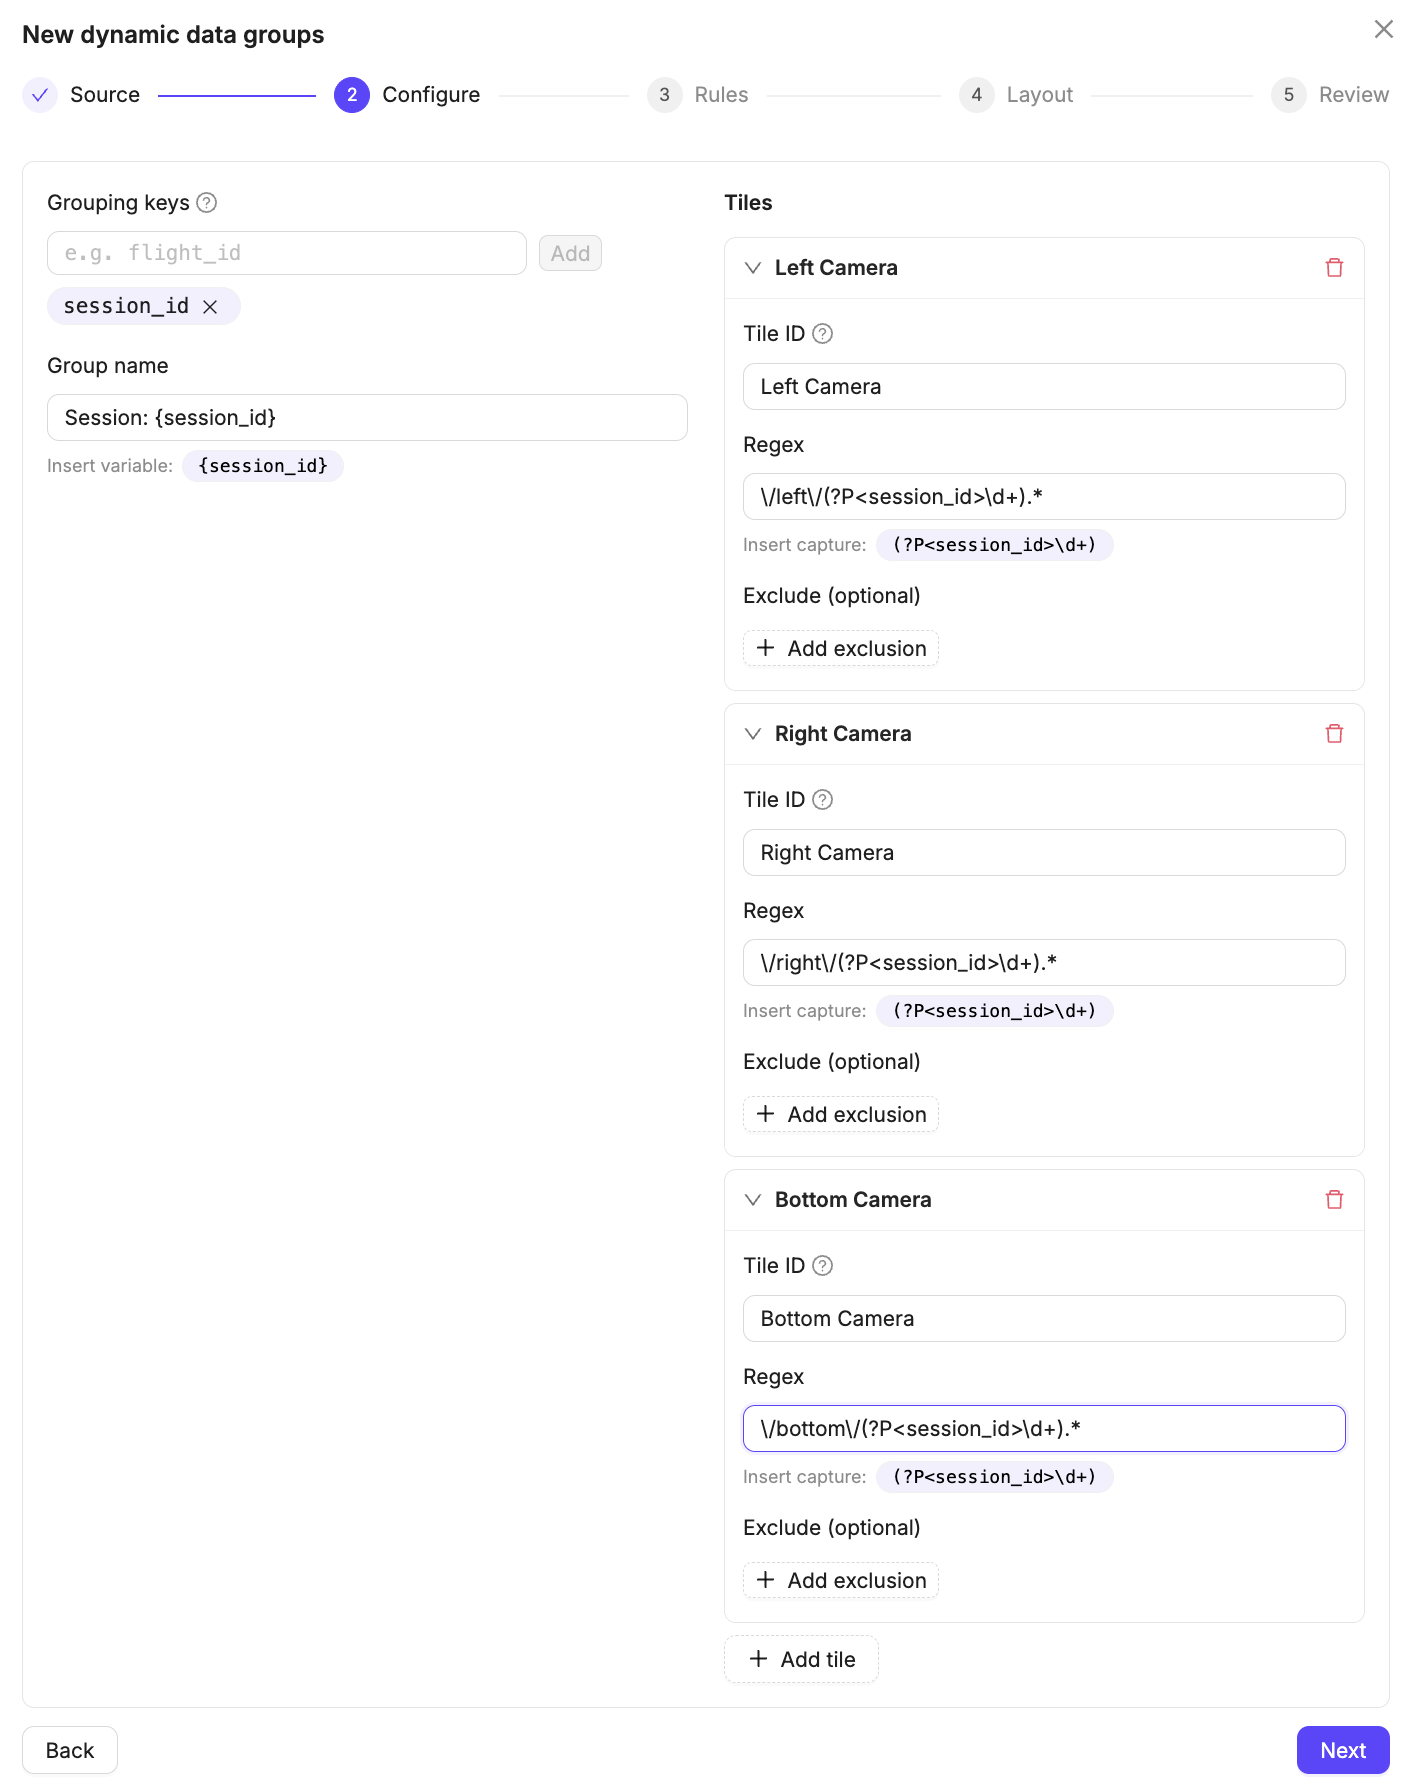
5. Encord suggests a configuration based on your file naming patterns. You can adjust it by entering:
* **Grouping keys**: Part of the filename used to identify which files belong together. For example, if you have files named `session-0878-camera-left.mp4` and `session-0878-camera-right.mp4` the grouping key would be `session-0878`.
* **Group name**: The name of each Data Group. Grouping keys can be referenced as part of the name.
* **Tiles**: The contents of each tile in the Data Group. Defined using a Regex pattern that matches the filenames you want to include in each tile position. The pattern must include a capture group that matches the grouping key you defined — for example, `(session-\d+)-camera-left\.mp4` where `(session-\d+)` captures the grouping key.
* **Exclude rules** (optional): Regex patterns to filter out unwanted files, such as excluding any files containing "thumbnail" in the name.
5. Optionally, preview the configured grouping by clicking **Run preview**.
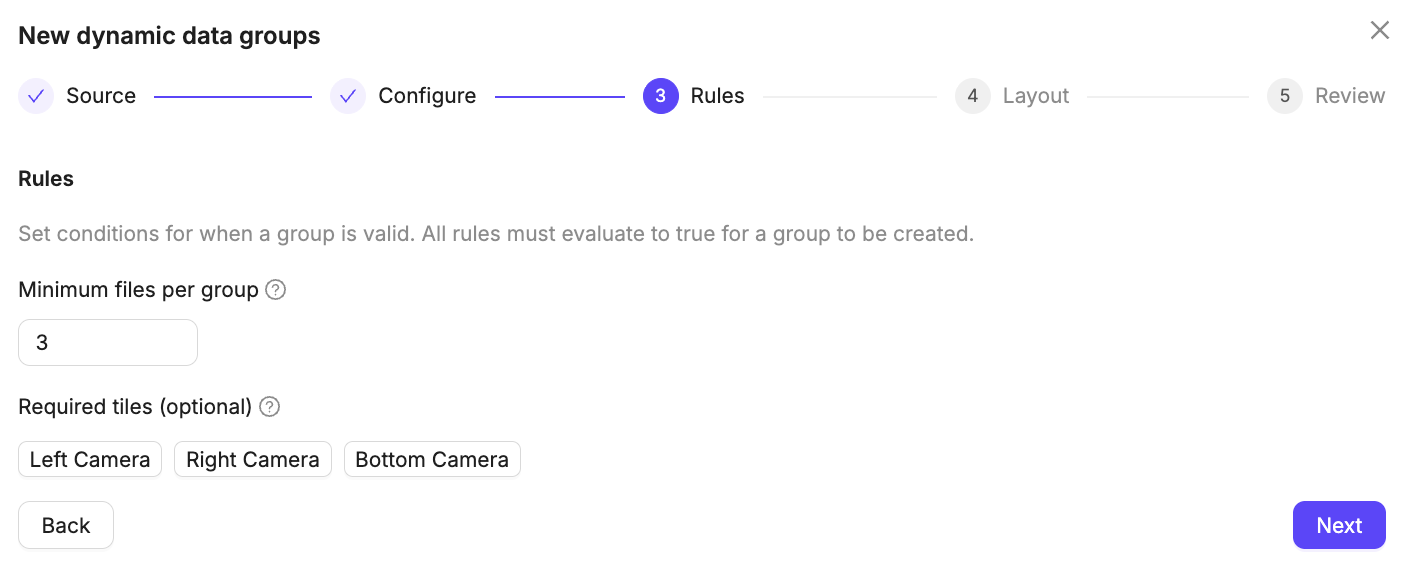
6. Define rules (all rules must be met for a Data Group to be created):
* **Minimum number of files per Data Group**: The minimum number of tiles that must be matched to create a group. For example, if you define 5 tiles but only 3 matching files are found, you can decide whether the group should still be created.
* **Required tiles**: Specific tiles that must always be present, regardless of whether the minimum threshold is met. For example, you can mark a particular tile as required, ensuring groups are only created when that tile exists.
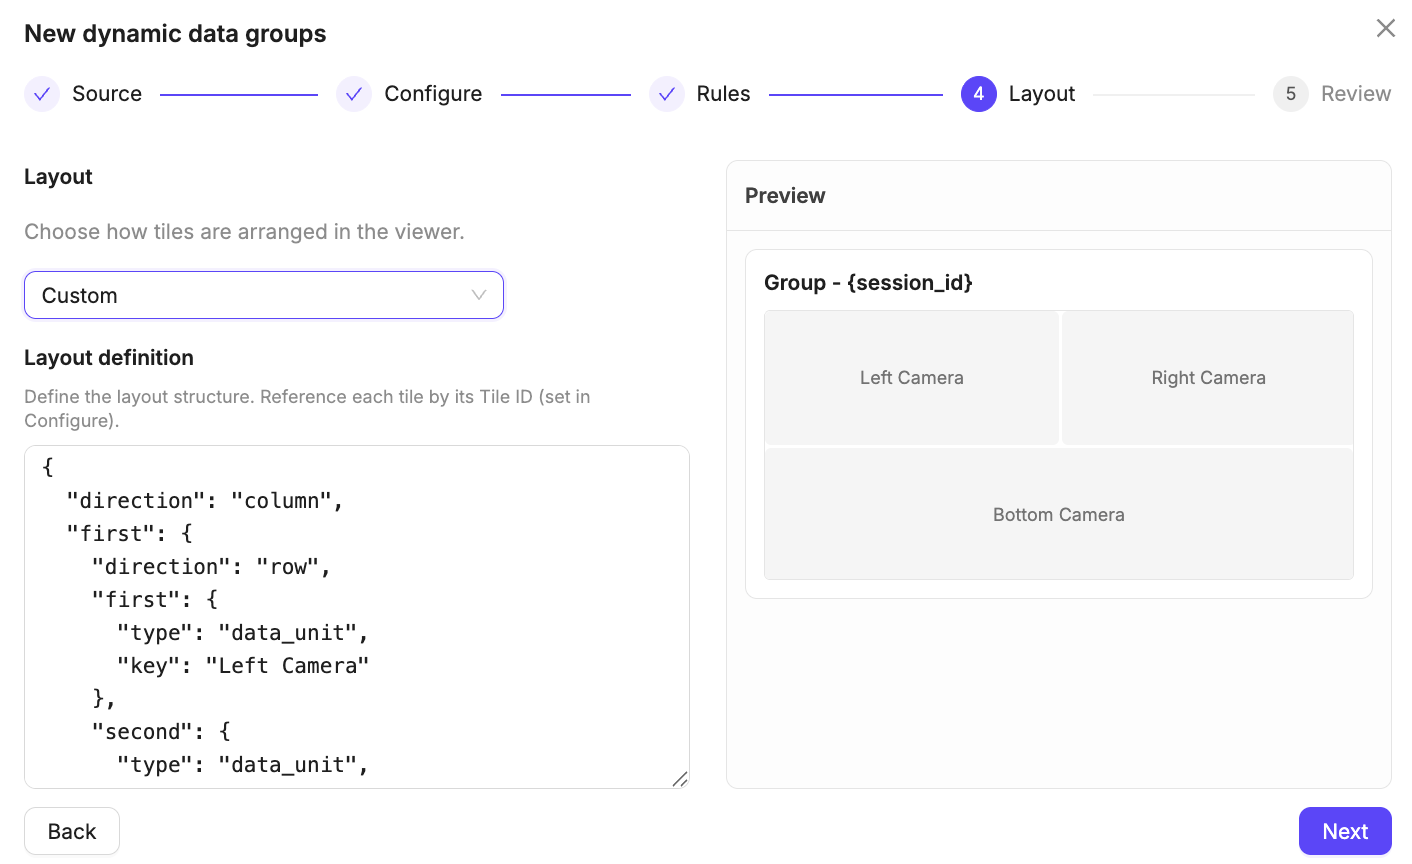
7. Define the Data Group layout. Select one of the following:
* Grid
* List
* Custom
8. Click **Create**.
A new folder with the same name as your source folder plus the suffix `_grouped` (e.g., `my-folder_grouped`) is created.
## Share Data Groups with Frame Information
When working with Data Groups that contain video files, you can share links that include specific frame information for each tile. This allows team members to view the exact frames you were working on when you shared the link.
Frame-specific sharing is only available for Data Groups containing video files. For other data types, the standard sharing functionality applies.
**To share a Data Group with frame information**:
1. Open the Data Group in the Label Editor.
2. Navigate to the specific frames you want to share across the different tiles.
3. Click the **Share** button in the editor header.
4. Ensure **Include current frame in link** is checked.
5. Click **Copy link**.
```pgsql theme={"dark"}
+-------------------------------------------+
| text file |
+------------------+------------------------+
| data unit 1 | data unit 2 |
+------------------+------------------------+
| data unit 3 | data unit 4 |
+------------------+------------------------+
```
## Create Data Groups
At scale, we recommend [using the SDK to create your Data Groups](/sdk-documentation/index-sdk/sdk-data-groups), specify the layout for your Data Groups, and add Data Groups to Datasets and Projects.
All layouts (grid, carousel, custom) are limited to 50 data units. Attempting to create a data group with more than 50 data units results in an error.
### Manually Create Data Groups
1. Go to **Files** > **\[select a Folder]**.
2. Select the files you want to add to a Data Group.
3. Right click your selection.
4. Hover over **Data group**.
5. Select the [Data Group layout](#data-group-layouts) you want the group to have.
Hover over each Data Group type to see a preview of how the Data Group displays to Annotator and Reviewers.
* Encord automatically names Data Groups.
* Data Groups appear in the same folder as its component files.
* Click the **View details** icon, to see a preview of how the Data Group appears to Annotators and Reviewers.
## Auto Data Groups
Auto Data Groups automatically organize files into groups, based on grouping keys you define. Any files sharing the same key are combined into a single data group, so there's no need to manually predefine or maintain groups.
The Auto Data Group feature runs automatically as new data is added to a Cloud-synced Folder. Only new data is grouped. Existing groups remain as they are.
**Create Auto Data Groups**:
1. Navigate to **Index** > **Files**.
2. Click **+ New folder**.
3. Select **Auto Data Groups**.
4. Select a source folder whose files you want to organize into Data Groups. Each folder supports only one grouping configuration. If the selected folder already has one, it is loaded for you to review and edit.
5. Encord suggests a configuration based on your file naming patterns. You can adjust it by entering:
* **Grouping keys**: Part of the filename used to identify which files belong together. For example, if you have files named `session-0878-camera-left.mp4` and `session-0878-camera-right.mp4` the grouping key would be `session-0878`.
* **Group name**: The name of each Data Group. Grouping keys can be referenced as part of the name.
* **Tiles**: The contents of each tile in the Data Group. Defined using a Regex pattern that matches the filenames you want to include in each tile position. The pattern must include a capture group that matches the grouping key you defined — for example, `(session-\d+)-camera-left\.mp4` where `(session-\d+)` captures the grouping key.
* **Exclude rules** (optional): Regex patterns to filter out unwanted files, such as excluding any files containing "thumbnail" in the name.
5. Optionally, preview the configured grouping by clicking **Run preview**.
6. Define rules (all rules must be met for a Data Group to be created):
* **Minimum number of files per Data Group**: The minimum number of tiles that must be matched to create a group. For example, if you define 5 tiles but only 3 matching files are found, you can decide whether the group should still be created.
* **Required tiles**: Specific tiles that must always be present, regardless of whether the minimum threshold is met. For example, you can mark a particular tile as required, ensuring groups are only created when that tile exists.
7. Define the Data Group layout. Select one of the following:
* Grid
* List
* Custom
8. Click **Create**.
A new folder with the same name as your source folder plus the suffix `_grouped` (e.g., `my-folder_grouped`) is created.
## Share Data Groups with Frame Information
When working with Data Groups that contain video files, you can share links that include specific frame information for each tile. This allows team members to view the exact frames you were working on when you shared the link.
Frame-specific sharing is only available for Data Groups containing video files. For other data types, the standard sharing functionality applies.
**To share a Data Group with frame information**:
1. Open the Data Group in the Label Editor.
2. Navigate to the specific frames you want to share across the different tiles.
3. Click the **Share** button in the editor header.
4. Ensure **Include current frame in link** is checked.
5. Click **Copy link**.