> ## Documentation Index
> Fetch the complete documentation index at: https://docs.encord.com/llms.txt
> Use this file to discover all available pages before exploring further.
# Custom Agents
Custom agents let you plug your own HTTPS endpoints into Encord and trigger them in the Label Editor, or as part of your Workflow.
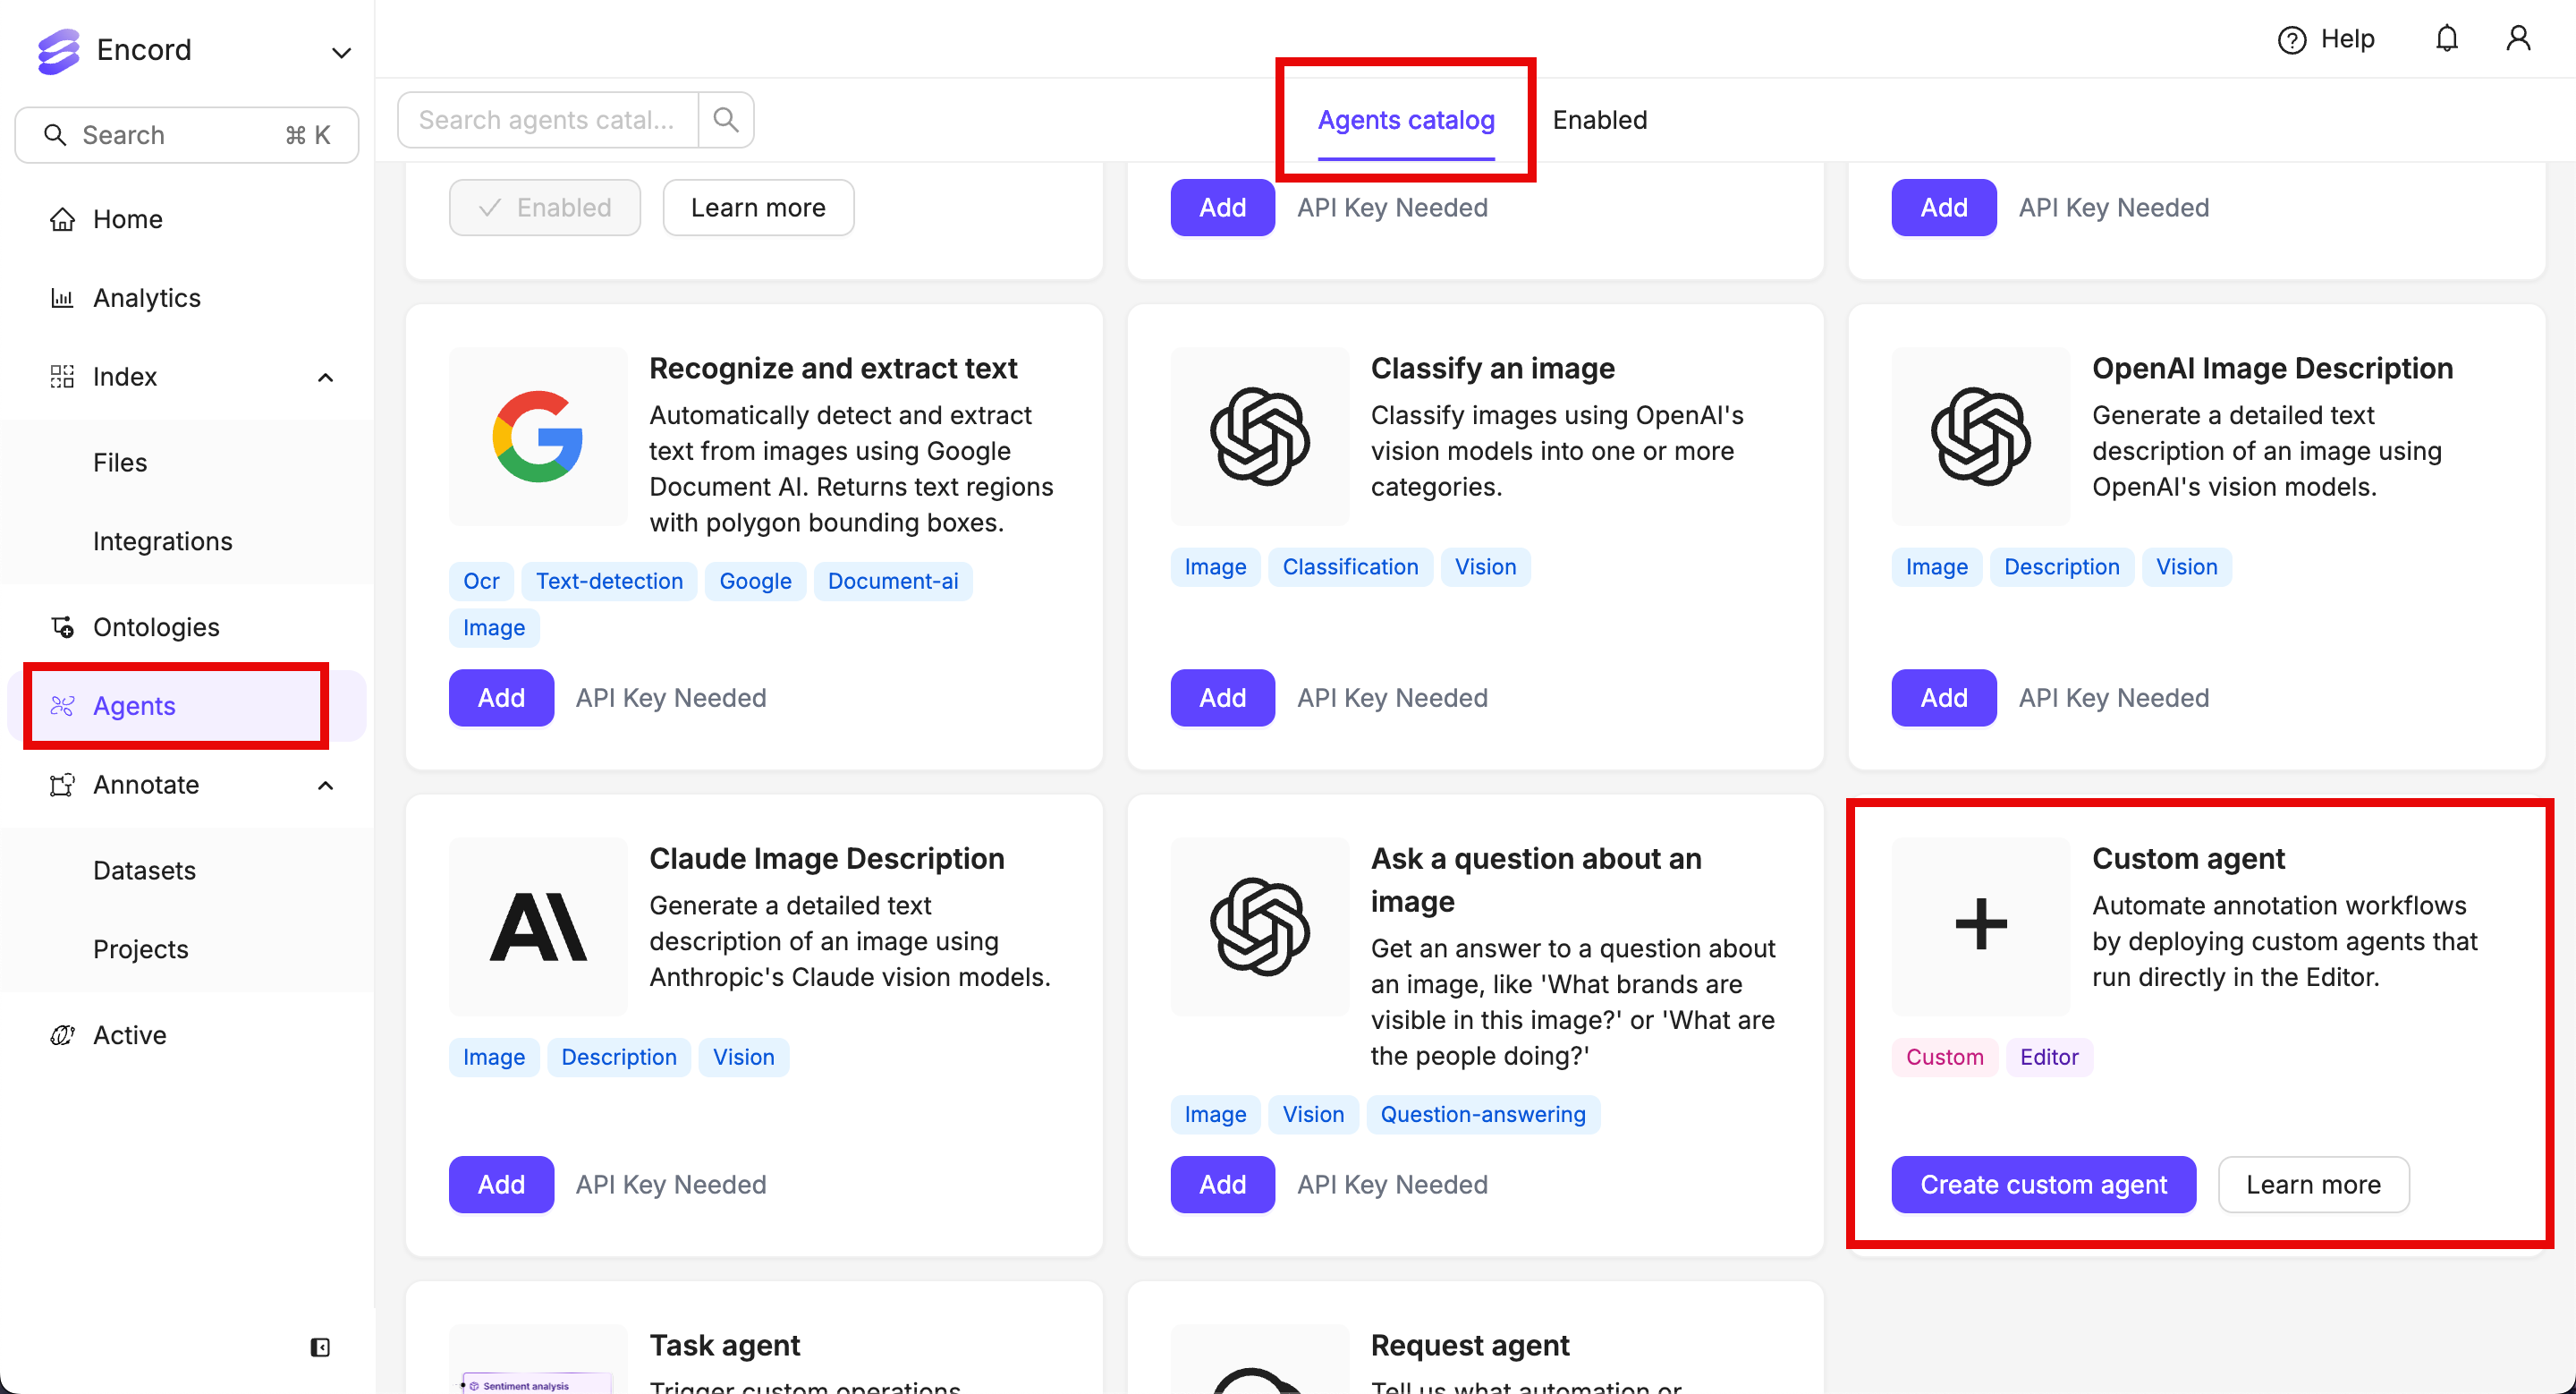
## Custom Agents in the Agents Catalog
Only HTTPS endpoints are supported for Custom Agents.
**To register a Custom Agent using the Agents Catalog:**
1. Go to **Agents** in the left-hand navigation.
2. In the **Agents catalog** tab, select the **Custom agent** tile.
3. Fill in the form:
* Give the agent a clear name and description.
* Provide the public HTTPS endpoint that Encord should call.
* Enter possible decisions that the agent can return (for example, "approve" or "reject"). These decisions are represented as pathways in the Workflow. If your agent does not return decisions, you can leave this field blank.
4. Save the configuration to register the Custom Agent.
## Setting Up Custom Agents
For end-to-end examples (including example payloads and code), visit our [Agents documentation here](/agents-documentation/Basics/Installation).
Before you can register a Custom Agent, you must create and host the HTTPS endpoint that acts as your agent.
At a high level, your backend should:
* Accept a JSON payload from Encord describing the current project, data item, and frame.
* Use the Encord SDK or API (and any external models you choose) to perform work.
* Write results back to Encord (for example, updating labels or classifications).
* Return a successful HTTP status code so the editor knows the request completed.
Once saved, the agent appears in the **Enabled** tab of the Agents section.
## Testing Custom Agent Endpoints
You can test your custom agent endpoint directly from the Encord platform to verify it's working correctly before using it in production.
After registering your Custom Agent, you can test its endpoint:
1. Navigate to your agent in the **Enabled** tab.
2. Click the **Test** tab in the agent details page.
3. Configure the test payload with sample data (project hash, data hash, and frame number).
4. Click **Test agent** to send a request to your endpoint.
The test sends requests directly from your browser to your endpoint. Your agent must allow CORS requests from the Encord domain (e.g., [https://app.encord.com](https://app.encord.com)) for testing to work. If your agent restricts access by source IP, you must allow your current IP address for testing.
A successful test from your browser does not guarantee that Encord's servers can reach your endpoint. Ensure your endpoint is accessible from Encord's infrastructure for production use.
## Using Custom Agents
The Agent is triggered:
* **In the Label Editor**: On demand by the Tasker while annotating or reviewing a task. [See here](/platform-documentation/Annotate/automated-labeling/annotate-agents-usage#in-the-label-editor) for more information.
* **From your Workflow**: On tasks that pass through the Workflow node. Custom agents are triggered in the same way as other Agents. [Click here to learn more](/platform-documentation/Annotate/automated-labeling/annotate-agents-usage).
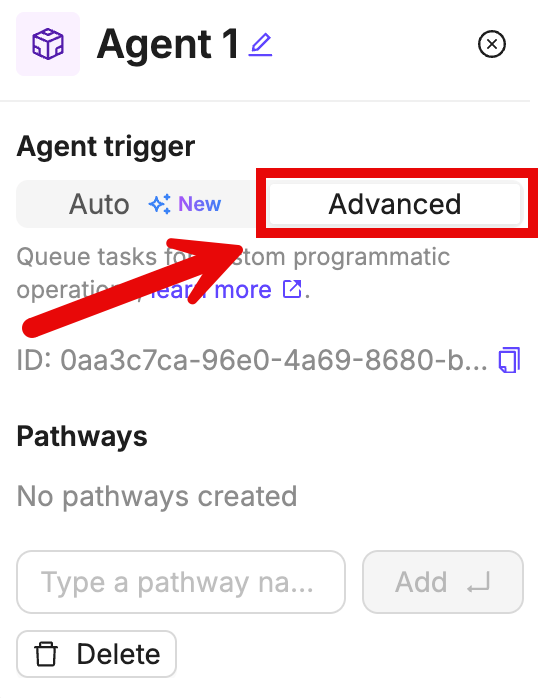
## Custom Workflow Agents - Advanced
If your custom Agent uses custom pathways, open the **Advanced** tab in the Agent node configuration to set them up.
When setting up an agent as "advanced", you do not directly assign a custom agent. Instead, you are hosting a service that picks up tasks from the Workflow stage, performs an action, and then progresses the task to the next stage.
### Examples
Use the Encord SDK to configure your Advanced Custom Agent. The Agent executes the configured SDK script for all tasks that are routed through the Agent stage in your Workflow.
The General Example script shows how to configure a Workflow Agent with the name `Agent 1` and with a pathway called `continue to Review`.
Agent nodes can be used in conjunction with bundles to [efficiently handle bulk actions](/sdk-documentation/general-sdk/sdk-bulk-action-best-practices)
Ensure that you:
* Replace `` with the path to your private key.
* Replace `` with the hash of your Project.
* Insert your custom logic where the comment instructs you to do so.
```python General Example theme={"dark"}
# Import dependencies
from encord.user_client import EncordUserClient
from encord.workflow import AgentStage
# Authenticate using the path to your private key
user_client = EncordUserClient.create_with_ssh_private_key(
ssh_private_key_path=""
)
# Specify the Project that contains the agent. Replace with the hash of your Project
project = user_client.get_project()
# Specify the Agent
agent_stage = project.workflow.get_stage(name="Agent 1", type_=AgentStage)
for task in agent_stage.get_tasks():
# Now you have the agent task containing the data hash
# Insert you custom logic here
# When the custom logic is completed, the task can be moved forward to the selected pathway
task.proceed(pathway_name="continue to Review")
```
```mermaid theme={"dark"}
sequenceDiagram
participant AWS as AWS (Image Storage)
participant Encord as Encord (Project)
participant Agent as Agent Node (In Encord)
participant Server as Your Server
participant OpenAI as OpenAI
AWS->>Encord: Send Signed Image URLs
Encord->>Agent: Add Signed Image URL to Agent node
Agent->>Server: Send Signed Image URL
Server->>OpenAI: Send Image Data + Prompt
OpenAI-->>Server: Return Classification
Server->>Server: Transform Classification to Encord label structure
Server->>Agent: Save Labels to Encord
Agent->>Encord: Classification Saved to Label Row
Encord->>Encord: Task Moved to Annotation Stage
```
See our [end-to-end guide](/agents-documentation/Task-Agents/GPT4PreClassificationImages) for Pre-Classification using GPT 4o for more detailed information.
The Pre-Classification script uses GPT 4o mini to route images to different annotation stages depending on what it is contained in the image. The Pre-Classification script applies to the following Workflow.
Agent nodes can be used in conjunction with bundles to [efficiently handle bulk actions](/sdk-documentation/general-sdk/sdk-bulk-action-best-practices)
In the following script:
* Replace `` with the hash of your private key.
* Replace `` with the hash of your Project.
* Replace `Agent 1` with the name of your Agent stage.
```python Pre-Classification for Images Example theme={"dark"}
# Import dependencies
from encord.user_client import EncordUserClient
from encord.workflow import AgentStage
import openai
import base64
import requests
import json
# Initialize your OpenAI client
openai.api_key = ""
def get_classification_from_the_model(media_content):
"""
Example function that passes media to OpenAI's ChatGPT API along with the prompt
and parses the result.
"""
prompt = """
You are an image analysis expert. You're working on a project that includes annotation of different pets images.
Your task is to assign one of the following tags to the image: "cat", "dog", "other".
Reply in JSON format of the following structure: { "classification": cat|dog|other }
"""
completion = openai.ChatCompletion.create(
model="gpt-4o-mini",
messages=[
ChatCompletionSystemMessageParam(role="system", content=prompt),
ChatCompletionUserMessageParam(
role="user",
content=[
ChatCompletionContentPartImageParam(
image_url=ImageURL(url=f"data:image/jpeg;base64,{media_content}", detail="auto"),
type="image_url",
)
]
),
],
response_format=ResponseFormat(type="json_object"),
max_tokens=1000,
)
raw_text_completion = completion.choices[0].message.content
try:
parsed_result = json.loads(raw_text_completion)
return parsed_result["classification"].lower()
except Exception as e:
print(f"Failed to process the model response: {e}")
return None
# Authenticate using the path to your private key
user_client = EncordUserClient.create_with_ssh_private_key(
ssh_private_key_path=""
)
# Specify the Project that contains the agent. Replace with the hash of your Project
project = user_client.get_project("")
radio_classification = project.ontology_structure.get_child_by_title(
title="Animal",
type_=Classification,
)
cat_option = radio_ontology_classification.get_child_by_title(
title="Cat", type_=Option
)
dog_option = radio_ontology_classification.get_child_by_title(
title="Dog", type_=Option
)
# Specify the Agent
agent_stage = project.workflow.get_stage(name="Agent 1", type_=AgentStage)
for task in agent_stage.get_tasks():
# Got a task for the following data unit
print(f"{task.data_hash} -> {task.data_title}")
# Getting a label row for the data unit
label_row = project.list_label_rows_v2(data_hashes=[task.data_hash])[0]
label_row.initialise_labels(include_signed_url=True)
# Downloading the media:
media_response = requests.get(label_row.data_link)
media_content = base64.b64encode(media_response.content).decode("utf-8")
# Now we can send the media to OpenAI:
model_response = get_classification_from_the_model(media_content)
# And interpret the result:
match model_response:
case "cat":
# Create a classification instance
classification_instance = (
radio_ontology_classification.create_instance()
)
radio_classification_instance.set_answer(
answer=cat_option
)
label_row.add_classification_instance(radio_classification_instance)
label_row.save()
task.proceed(pathway_name="Cat")
case "dog":
# Create & save classification instance
classification_instance = (
radio_ontology_classification.create_instance()
)
radio_classification_instance.set_answer(
answer=dog_option
)
label_row.add_classification_instance(radio_classification_instance)
label_row.save()
task.proceed(pathway_name="Dog")
case _:
task.proceed(pathway_name="Other")
```
This guide makes the following assumptions:
* You have a model that takes video frames as an input and provides bounding box coordinates and confidence scores as an output.
* You have installed the `encord-agents` library using the following command:
```
python -m pip install encord-agents
```
The Pre-Labeling Script selects a random class from the Ontology, generates random bounding box labels, and applies random confidence scores for video frames before advancing the videos to the annotation stage (`Annotate 1`). Below is an example of a Workflow where the Pre-Labeling agent can be effectively utilized.
To authenticate, you must set either of following environment variables in the environment that you plan to run your agents.
* ENCORD\_SSH\_KEY: Containing the raw private key file content
* ENCORD\_SSH\_KEY\_FILE: Containing the absolute path to the private key file
In the following script:
* Replace `` with the hash of your Project.
* Replace the mock model with your own model, and adapt the rest of the script according to your needs.
* If you choose to give your python file a different name, ensure you replace all references to `prelabel_video.py` with your new file name.
```python prelabel_video.py theme={"dark"}
#Import Dependencies
import random
from dataclasses import dataclass
from typing import Iterable
import numpy as np
from encord.objects.coordinates import BoundingBoxCoordinates
from encord.objects.ontology_labels_impl import LabelRowV2
from encord.project import Project
from encord_agents.core.data_model import Frame
from encord_agents.tasks import Depends, Runner
from encord_agents.tasks.dependencies import dep_video_iterator
from numpy.typing import NDArray
from typing_extensions import Annotated
# Set the Environment variable to authenticate with Encord
ENCORD_SSH_KEY_FILE="/path/to/file/" prelabel_video.py
runner = Runner(project_hash="")
# === BEGIN MOCK MODEL === #
@dataclass
class ModelPrediction:
label: int
coords: BoundingBoxCoordinates
conf: float
def fake_predict(image: NDArray[np.uint8]) -> list[ModelPrediction]:
return [
ModelPrediction(
label=random.choice(range(3)),
coords=BoundingBoxCoordinates(
top_left_x=random.random() * 0.5,
top_left_y=random.random() * 0.5,
width=random.random() * 0.5,
height=random.random() * 0.5,
),
conf=random.random() + 0.5,
)
for _ in range(10)
]
model = fake_predict
# === END MOCK MODEL === #
@runner.stage(stage="Pre-Labeling Agent")
def run_something(
lr: LabelRowV2,
project: Project,
frames: Annotated[Iterable[Frame], Depends(dep_video_iterator)],
) -> str:
ontology = project.ontology_structure
# Create an object instance for each frame in the video and save the labels.
for frame in frames:
outputs = model(frame.content)
for output in outputs:
ins = ontology.objects[output.label].create_instance()
ins.set_for_frames(
frames=frame.frame, coordinates=output.coords, confidence=output.conf
)
lr.add_object_instance(ins)
lr.save()
# Return the name of the stage the task should progress to
return "Annotate 1"
if __name__ == "__main__":
runner.run()
```
## End-to-End Agent Examples
We provide end-to-end examples of custom agent implementation using Jupyter Notebooks [here](/agents-documentation/Task-Agents/Task-Agent-Examples).