> ## Documentation Index
> Fetch the complete documentation index at: https://docs.encord.com/llms.txt
> Use this file to discover all available pages before exploring further.

# Workflows and Templates

Workflows are a powerful tool for designing and building Projects, allowing you to control how tasks move through different stages and how those stages interact.

## Creating Workflows

<Note>Workflows are created when [creating new annotation Projects](/platform-documentation/GettingStarted/gettingstarted-create-project), and when creating [Workflow templates](#templates).</Note>

![Workflow workspace](https://storage.googleapis.com/docs-media.encord.com/static/img/annotate/workflow-workspace.gif)

* **Manage Collaborators** allows you to seamlessly add users to your Workflow as collaborators, which can be added to different stages of the workflow.

* **Add stage** allows you to add more stages to your Workflow.

***

## Workflow Stages

This section contains details for all *Workflow library* components.

<Note>Only ANNOTATE, CONSENSUS, and AGENT nodes can be the first node after the START node in a workflow.</Note>

<Tip>To add library components to the canvas, click the **Add stage** button and then drag-and-drop the components onto the canvas.</Tip>

***

<AccordionGroup>
  <Accordion title="Start">
    #### Start

    <div class="flex justify-center">
      <img src="https://storage.googleapis.com/docs-media.encord.com/static/img/workflows/workflows-start-component.png" width="60" />
    </div>

    **Start** represents the beginning an annotation task through your Workflow, and can therefore only be used once in a Project. It must have a connector linking it to the next stage. It displays the [Datasets](/platform-documentation/Annotate/annotate-datasets/annotate-datasets) connected to the Project, and the selected [Ontology](/platform-documentation/Annotate/annotate-ontologies/annotate-ontologies).
  </Accordion>

  <Accordion title="Annotate">
    #### Annotate

    <div class="flex justify-center">
      <img src="https://storage.googleapis.com/docs-media.encord.com/static/img/workflow-secret-2.png" width="250" />
    </div>

    **Annotate** represents an annotation stage, during which a group of annotators adds labels to tasks assigned to them.

    Click an **Annotate** card on the canvas to edit. Click **x** next to the name to exit edit mode.

    Click the *Edit* icon to edit the name of the annotation stage.

    <Tip>
      Annotation instructions can be added in the Project's *Settings* after the Project is created.
    </Tip>

    <div class="flex justify-center">
      <img src="https://storage.googleapis.com/docs-media.encord.com/static/img/workflows/workflows-annotate-card-2.png" width="200" />
    </div>

    The stage contains all available annotators selected by default. Specific annotators can be selected in the **Selective** tab. Only collaborators that are [added to the Workflow](#managing-collaborators) are available for selection. Click **Add** to confirm the selection.

    <Note>Only collaborators with the *Annotator* or the *Annotator & Reviewer* roles are available for selection. All Admins and Team Managers are part of all annotation stages and therefore cannot be added, or removed.</Note>

    A Webhook can optionally be added to an annotation stage to send out notifications whenever a task is submitted. Click the **Edit** icon next to **Webhook** and add the URL of the server you want to receive notifications on. Once a valid URL is added and the Workflow saves, a **Signing Secret** becomes available that can be used to [verify that incoming notifications are genuinely from Encord](/platform-documentation/Annotate/annotate-webhooks-notifications#verifying-webhook-signatures).

    **Advanced Settings**

    **Allow task reassessment**: When enabled, annotators can see and review the same task again later in the workflow. Default: Disabled.

    **Hide unassigned tasks**: When enabled, users with the *Annotator*, *Reviewer*, or *Annotator & Reviewer* roles can only see tasks assigned to them. Admins and Team Managers can view all tasks, including unassigned ones.
  </Accordion>

  <Accordion title="Routers">
    #### Routers

    A **Router** splits the path that *annotate* and *review* tasks take through the workflow. Two different types of router are available:

    * [Percentage router](#percentage-router).
    * [Collaborator router](#collaborator-router).

    <div
      style={{
height: '0',
paddingBottom: '56.25%',
position: 'relative'
}}
    >
      <iframe
        allowFullScreen
        frameBorder="0"
        mozallowfullscreen=""
        src="https://www.loom.com/embed/fb031c32fb8d41c2ad65ab4d594b226e?sid=86b1fe1a-2bf9-47ef-98ec-8473f8f8b5ad"
        style={{
  height: '100%',
  left: '0',
  position: 'absolute',
  top: '0',
  width: '100%'
}}
        webkitallowfullscreen=""
      />
    </div>

    #### Percentage router

    <div class="flex justify-center">
      <img src="https://storage.googleapis.com/docs-media.encord.com/static/img/workflows/percentage-router-icon.png" width="200" />
    </div>

    Pathways that data units take through the Workflow can be split according to a certain percentage of annotation tasks. For example, 50% of tasks get sent to *review stage A*, while the other 50% of tasks get sent to *review stage B*, splitting the workload between two different groups of reviewers.

    <div class="flex justify-center">
      <img src="https://storage.googleapis.com/docs-media.encord.com/static/img/workflows/workflows-percentage-router.png" width="500" />
    </div>

    Once the router selects a route for a given task, it is routed the same way until the routing percentages are updated. This means that if a task passes through a percentage router and is routed to *review stage A* on its first pass, it is routed to *review stage A* on each consecutive pass.

    <Note>Routing percentages can be changed after Project creation. Changing routing percentages resets the percentage router, and may alter the pathway taken by a given task. </Note>

    #### Collaborator router

    <div class="flex justify-center">
      <img src="https://storage.googleapis.com/docs-media.encord.com/static/img/workflows/collaborator-router-icon.png" width="200" />
    </div>

    Determine the paths that data units take through your workflow based on users. For example, if *user A* completes a task it gets sent to be reviewed by *review stage A*, while a task completed by *user B* gets reviewed in *review stage B*.

    <div class="flex justify-center">
      <img src="https://storage.googleapis.com/docs-media.encord.com/static/img/workflows/workflows-collaborator-router.png" width="500" />
    </div>

    The *Or else* option accounts for all collaborators not explicitly added to the router. In this example they are directed to *review stage C*.

    1. Click **Add pathway** to choose a subset of collaborators that form the pathway. - only collaborators present in the previous stage can be selected. There is no limit on the amount of pathways you can create.

    2. Click **Add** to finish a pathway.

    <Note>Collaborators can only be added to the **Router** after an input is connected.</Note>
  </Accordion>

  <Accordion title="Review">
    #### Review

    <div class="flex justify-center">
      <img src="https://storage.googleapis.com/docs-media.encord.com/static/img/workflows/workflows-review-component.png" width="300" />
    </div>

    **Review** represents a review stage where tasks labeled in an annotation stage are reviewed.

    <Note>To attach the *Rejected* node of the review stage to another review stage, contact [support@encord.com](mailto:support@encord.com)</Note>

    Click a **Review** card that has been added to the canvas to edit. Click **x** next to the name to exit edit mode.

    Click the *Edit* icon to edit the name of the review stage. This is particularly useful when your Project has multiple review stages.

    <div class="flex justify-center">
      <img src="https://storage.googleapis.com/docs-media.encord.com/static/img/workflows/workflow-review-card.png" width="200" />
    </div>

    The stage contains all available reviewers selected by default. Specific reviewers can be selected by clicking the **Review** component, and choosing the **Selective** tab seen above. Only collaborators that have been added to the [Workflow](#managing-collaborators) or the [Project](/platform-documentation/Annotate/annotate-projects/annotate-project-settings#manage-project-collaborators). Click **Add** to confirm the selection.

    <Note>Only collaborators with the *Reviewer* and *Annotator & Reviewer* roles are available for selection. All Admins and Team Managers are part of all review stages and cannot be removed.</Note>

    <div class="flex justify-center">
      <img src="https://storage.googleapis.com/docs-media.encord.com/static/img/workflows/workflows-review-add-users.png" width="300" />
    </div>

    **Advanced Settings**

    **Allow task reassessment**: When enabled, reviewers can review the same task multiple times as it moves through the Workflow. This also allows a user to review tasks they previously annotated. Default: Enabled.

    #### Strict review

    <Note>Strict review is enabled by default, but can be disabled under *Advanced settings*.</Note>

    *Strict review* ensures that crucial details are not overlooked during a review stage. Strict review aids in assuring higher accuracy when reviewing annotations.

    *Strict review* stages do not auto-advance to the next review task after [bulk approving or rejecting](/platform-documentation/Annotate/annotate-label-editor#approve-and-reject-all-in-frame-buttons) labels. Reviewers can make adjustments to their review, and add comments when rejecting tasks with missing annotations.

    <AccordionGroup>
      <Accordion title=" Video Tutorial - Strict review & change review judgment ">
        <div
          style={{
height: '0',
paddingBottom: '56.25%',
position: 'relative'
}}
        >
          <iframe
            allowFullScreen
            frameBorder="0"
            mozallowfullscreen=""
            src="https://www.loom.com/embed/d73f4ca0765b411997658edec2e72ebc?sid=b5e9ab94-a07e-410c-9377-d7b809d83d3f"
            style={{
  height: '100%',
  left: '0',
  position: 'absolute',
  top: '0',
  width: '100%'
}}
            webkitallowfullscreen=""
          />
        </div>
      </Accordion>
    </AccordionGroup>

    <div class="flex justify-center">
      <img src="https://storage.googleapis.com/docs-media.encord.com/static/img/workflows/strict-review-2.png" width="300" />
    </div>

    #### User assignment restriction

    The *User assignment restriction* feature prevents team members working on tasks in the current stage that they have done in previous stages. This can prevent individuals with the *Annotator & Reviewer* role from being assigned their own annotations to review.

    This feature does not apply to users with the *Admin* or *Team Manager* roles, since they are added to each stage by default and cannot be removed.

    <div class="flex justify-center">
      <img src="https://storage.googleapis.com/docs-media.encord.com/static/img/annotate/annotate-user-restriction.png" width="200" />
    </div>

    Enable the toggle to implement *User assignment restriction*.
  </Accordion>

  <Accordion title="Agent">
    #### Agent

    <div class="flex justify-center">
      <img src="https://storage.googleapis.com/docs-media.encord.com/static/img/agentnode-2.png" width="300" />
    </div>

    The **Agent** component represents an Agent. It triggers a custom operation each time a task passes through the Agent stage. The exact operation being triggered is configured using the Encord SDK.

    To fully connect an Agent to other Workflow components you must add pathways that allow you to create connections from the Agent stage to other components. To add a pathway, click **+** next to *Add pathway* and give the pathway a meaningful name. Repeat this step for each additional pathway you want to add.

    <Tip>Learn more about Agents in our  [Agent section](/platform-documentation/Annotate/automated-labeling/annotate-agents-overview)</Tip>
  </Accordion>

  <Accordion title="Export">
    #### Export

    <div class="flex justify-center">
      <img src="https://storage.googleapis.com/docs-media.encord.com/static/img/export-stage.png" width="250" />
    </div>

    **Export** represents a stage in a Project's Workflow that automatically syncs labels to your cloud storage as tasks pass through it.

    Every task that passes through the Export stage is synced to your chosen storage destination. Once the sync completes, tasks automatically continue to the next stage in your Workflow. This allows you to build a fully automated labeling pipeline, from task creation through to label delivery, without any manual exports. For more information, see [How to Export Labels](/platform-documentation/Annotate/annotate-export/annotate-how-to-export-labels).
  </Accordion>

  <Accordion title="Complete">
    #### Complete

    <div class="flex justify-center">
      <img src="https://storage.googleapis.com/docs-media.encord.com/static/img/workflows/workflow-secret.png" width="250" />
    </div>

    **Complete** represents the stage of a Project at which a task is marked as complete, and can therefore only be used once per project.

    Having passed though your Workflow, it was deemed to be acceptable data for the training of machine learning algorithms. Complete tasks can still be accessed by admins.

    Optionally, add a [Webhook](/platform-documentation/Annotate/annotate-webhooks-notifications) to this stage to receive notifications whenever a task arrives at the **Complete** stage. Adding a valid Webhook URL and saving the Workflow generates a **Signing Secret** that can be used to [verify that incoming notifications are genuinely](/platform-documentation/Annotate/annotate-webhooks-notifications#verifying-webhook-signatures) from Encord.

    <Warning>In Consensus Projects, tasks in the COMPLETE and ARCHIVE blocks CANNOT be reopened.</Warning>
  </Accordion>

  <Accordion title="Parallelization">
    #### Parallelization

    Parallelization splits a single annotation task into independent branches, where each branch is responsible for a specific subset of Ontology classes. Different annotators can work on different branches simultaneously, allowing specialized teams to handle different parts of the same task in parallel.
    For example, in an autonomous driving project you might create three branches, one for vehicles, one for pedestrians, and one for cyclists, and assign each to a different team. All three teams work on the same underlying data concurrently, rather than a single annotator handling everything sequentially.

    <Note>
      **Parallelization vs Consensus**

      * Parallelization assigns different classes to different annotators in parallel.

      * Consensus assigns the same task to multiple annotators independently and compares their results. Use Parallelization to split work by class. Use Consensus to measure agreement.
    </Note>

    **Configure branches**

    Each branch represents one parallel stream of work. You can have up to 10 branches per Parallelization node.

    To add a branch:

    1. Click **Add branch** in the settings panel. A new branch appears with a default name.
    2. Click a branch to expand its settings.
    3. Specify a Branch name. Give the branch a descriptive name, such as the class group or team responsible for it (example: "Vehicles", "Pedestrians").
    4. Specify the *Classes*. Select the ontology classes that annotators in this branch will label. A class can only belong to one branch. If a class is already assigned to another branch, it is disabled in the selector and a conflict warning is shown.

    <Note>
      * Required classes are marked with a red indicator in the class selector.

      * You cannot modify branches while tasks are actively in progress on the node. Complete or reassign active tasks before making changes.
    </Note>

    5. Assign annotators to a branch. Each branch has an independent Annotate sub-node that controls who can work on it.

    6. Add a review stage to a branch. Each branch can optionally include its own review step. Branches can have review enabled or disabled independently.

    When a reviewer approves a task, it returns to the Parallelization node. When a reviewer rejects a task, it is sent back to the annotation step within the same branch.
    To remove a review stage from a branch, click the remove icon next to the review sub-node in the branch settings.

    **How tasks flow through a Parallelization node**

    1. A task enters the Parallelization node from the upstream node.
    2. The node creates one sub-task per branch.
    3. Each sub-task is assigned to the annotators configured for that branch.
    4. Annotators in each branch see only the classes assigned to their branch.
    5. If a branch has review enabled, the sub-task moves to the review step after annotation.

    <Note>
      Once all branches are `Complete`, the task exits the Parallelization node and continues through the Workflow.
    </Note>

    **Constraints and limits**

    * Maximum 10 branches per Parallelization node.
    * Each ontology class can be assigned to only one branch. Assigning the same class to multiple branches is not allowed.
    * Branch configuration cannot be changed while tasks are active in the node.
    * At least one branch is required. A Parallelization node with no branches is invalid.

    **Tips**

    * Organize branches around annotator specialisms. Teams with domain expertise in specific object types will label faster and more accurately when scoped to those classes.
    * Add review to high-priority or high-complexity branches only, rather than all branches, to keep overall cycle time down.
    * Use descriptive branch names. Branches appear in the task queue and admin views, making it easier to monitor progress per class group.
    * If all branches cover the same classes, consider using a Router node instead to distribute tasks by percentage or priority rather than by class.
  </Accordion>
</AccordionGroup>

***

### Managing collaborators

<div
  style={{
height: '0',
paddingBottom: '56.25%',
position: 'relative'
}}
>
  <iframe
    allowFullScreen
    frameBorder="0"
    mozallowfullscreen=""
    src="https://www.loom.com/embed/72ce166e6ab04353bb029a37bd28a551?sid=4812f248-9fe6-4b6a-a61e-0211192859ea"
    style={{
  height: '100%',
  left: '0',
  position: 'absolute',
  top: '0',
  width: '100%'
}}
    webkitallowfullscreen=""
  />
</div>

***

#### User permissions

| Permission                     | Admin | Team Manager | Reviewer    | Annotator     | Annotator & Reviewer |
| ------------------------------ | ----- | ------------ | ----------- | ------------- | -------------------- |
| Attach / Detach datasets       | ✅     | ❌            | ❌           | ❌             | ❌                    |
| Attach / Switch ontology       | ✅     | ❌            | ❌           | ❌             | ❌                    |
| Delete                         | ✅     | ❌            | ❌           | ❌             | ❌                    |
| Invite team members            | ✅     | ✅            | ❌           | ❌             | ❌                    |
| Manage team permissions        | ✅     | ✅            | ❌           | ❌             | ❌                    |
| Manage admins                  | ✅     | ❌            | ❌           | ❌             | ❌                    |
| Annotate & review tasks        | ✅     | ✅            | Review only | Annotate only | ✅                    |
| Confirm annotations            | ✅     | ✅            | ❌           | ❌             | ❌                    |
| Control assignments and status | ✅     | ✅            | ❌           | ❌             | ❌                    |

#### Workflow stage level collaborators

Collaborators can be added to a workflow stage by clicking **+** on a card that has been added to the workflow canvas.

<div class="flex justify-center">
  <img src="https://storage.googleapis.com/docs-media.encord.com/static/img/workflows/add-annotator-workflows.png" width="200" />
</div>

Learn how to add collaborators to different stages of a Project by visiting the relevant sections in this document:

* [**Annotate**](#annotate) collaborators.
* [**Review**](#review) collaborators.
* Collaborator type [**Router**](#routers).

If no collaborators are specified at a given stage, all users with permissions are added by default.

For example, if no collaborators are specified at an **Annotate** stage then all collaborators with the following roles are added by default:

* Annotator
* Annotator & Reviewer
* Team Manager
* Admin

***

## Templates

Workflow templates allow you to save and reuse your most common workflows. You can then use these templates to create new annotation Projects, ensuring consistency and efficiency.

### Create Templates

New Workflow templates can be created each time a new Workflow is created.

1. Navigate to the **Projects** section of the Encord platform.
2. Navigate to the **Templates** tab.
3. Click **Create template**.

<div class="flex justify-center">
  <img src="https://storage.googleapis.com/docs-media.encord.com/static/img/create-new-template.png" width="700" />
</div>

4. Create your Workflow. Ensure your Workflow has a title.
5. Click the **Create workflow template** button.
   The template is saved in the custom templates section.

<div class="flex justify-center">
  <img src="https://storage.googleapis.com/docs-media.encord.com/static/img/create-new-template-2.png" width="700" />
</div>

### Edit Templates

You can edit Workflow templates after they have been created.

1. Navigate to the **Projects** section of the Encord platform.
2. Navigate to the **Templates** tab.
3. Select the template you want to Edit.
4. Click the **Edit** button in the top-right.
5. Edit the template.
6. Click **Save changes**.

<Note>You can not edit the start node.</Note>

### Template Collaborators

Template collaborators are annotators and reviewers that can be assigned to Workflow stages.

<AccordionGroup>
  <Accordion title="Invite Collaborators">
    1. Click the **Collaborators** button.

    <div class="flex justify-center">
      <img src="https://storage.googleapis.com/docs-media.encord.com/static/img/template-collabs-labeled.png" width="600" />
    </div>

    2. Select a role. You can assign the following roles to collaborators:

    * **Annotator**: Labels tasks in the Project.
    * **Reviewer**: Reviews and validates labeled tasks.
    * **Annotator & Reviewer**: Performs both annotation and review tasks.
    * **Team Manager**: Assigns tasks to users and manages Project collaborators.
    * **Admin**: Grants full administrative control over the Project. This action is irreversible.

    3. Type the email address of the user you want to add and select the user from the list.

    4. Click the **Add** button to add the user with the specified role.

    <div class="flex justify-center">
      <img src="https://storage.googleapis.com/docs-media.encord.com/static/img/workflow-collabs.png" width="450" />
    </div>
  </Accordion>

  <Accordion title="Manage Users">
    1. Click the **Collaborators** button.

    <div class="flex justify-center">
      <img src="https://storage.googleapis.com/docs-media.encord.com/static/img/template-collabs-labeled.png" width="600" />
    </div>

    2. Click the **Manage** tab.

    * **Change collaborator role**: Click the dropdown and select a new role.
    * **Remove collaborator**: Click the red *Remove* icon in the remove column.

    <div class="flex justify-center">
      <img src="https://storage.googleapis.com/docs-media.encord.com/static/img/manage-template-collabs-del.png" width="500" />
    </div>
  </Accordion>
</AccordionGroup>

### Manage Template Access

Template Access determines which users can edit, share, and delete the template.

<AccordionGroup>
  <Accordion title="Invite Users">
    1. Click the **Manage template access** button.

    <div class="flex justify-center">
      <img src="https://storage.googleapis.com/docs-media.encord.com/static/img/template-access-button.png" width="550" />
    </div>

    2. Search for the collaborator or the [group](/platform-documentation/General/general-workspace-settings#user-groups) you want to add. Multiple collaborators and groups can be added at once.

    <Note>
      Only group members are added when a group is assigned to a Project. Group managers are not included.
    </Note>

    3. Select a role. You can assign the following roles to collaborators:
       * **User**: Can view the template.
       * **Admin**: Grants full administrative control over the template. This action is irreversible.

    4. Click **Add**.
  </Accordion>

  <Accordion title="Edit User Role">
    <Note>
      Only template admins can modify collaborator roles. Admin roles cannot be changed, not even by other admins.
    </Note>

    1. Click the **Manage template access** button.

    <div class="flex justify-center">
      <img src="https://storage.googleapis.com/docs-media.encord.com/static/img/template-access-button.png" width="550" />
    </div>

    2. Click the user role in the *Role* column
    3. Select a new role from the dropdown.

    <div class="flex justify-center">
      <img src="https://storage.googleapis.com/docs-media.encord.com/static/img/change-template-access-role.png" width="500" />
    </div>
  </Accordion>

  <Accordion title="Remove User">
    1. Click the **Manage template access** button.

    <div class="flex justify-center">
      <img src="https://storage.googleapis.com/docs-media.encord.com/static/img/template-access-button.png" width="550" />
    </div>

    2. Click the red *Remove* icon in the remove column.
  </Accordion>
</AccordionGroup>

### Delete Templates

To delete a template, click the red *Delete* icon next to the template.

<div class="flex justify-center">
  <img src="https://storage.googleapis.com/docs-media.encord.com/static/img/delete-template.png" width="300" />
</div>

## Editing Workflows

<Note>Only ANNOTATE, CONSENSUS, and AGENT nodes can be the first node after the START node in a workflow.</Note>

<table>
  <thead>
    <tr>
      <th>Workflow Editing</th>
      <th>Description</th>
    </tr>
  </thead>

  <tbody>
    <tr>
      <td>Add new stages</td>

      <td>
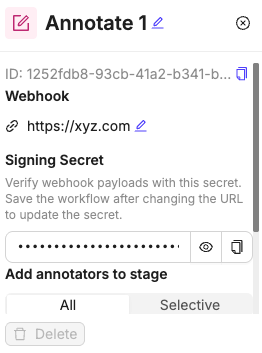
        * Annotate stages: Add manual annotation steps
        * Review stages: Insert quality control layers
        * Consensus stages: Add agreement-based validation
        * Agent stages: Integrate AI model predictions
        * Router stages: Add task routing/distribution logic
      </td>
    </tr>

    <tr>
      <td>Delete stages</td>

      <td>
        * Remove empty stages: Delete stages with zero tasks
        * System validation: Automatic checking prevents problematic deletions

        <Note>
          Any stage containing tasks cannot be deleted. Move tasks to a different stage before deleting a stage.
        </Note>
      </td>
    </tr>

    <tr>
      <td>Modify workflow connections</td>

      <td>
        * Change edge directions: Alter task flow paths
        * Expand router pathways: Add new routing options
        * Adjust percentage routing: Modify router distribution percentages
      </td>
    </tr>

    <tr>
      <td>Workflow management</td>

      <td>
        * Save changes: Persist workflow modifications
        * Re-name: Change the name of stages
        * Pause project: Stop task flow during Workflow modifications
        * Track last edited: See modification history and who made changes.

        <Note>
          - Encord tracks all edits so if we need to investigate / roll back we are capable of doing so. Not all logs are exposed to customers.
        </Note>
      </td>
    </tr>
  </tbody>
</table>

Edit Workflows from the **Annotate > Projects > \[select a Project] > Workflow** page.

<Warning>
  * You CANNOT delete stages that contain tasks. If you want to delete a stage that has tasks, first move the tasks to a different stage and then delete the stage.
  * You CANNOT delete COMPLETE stages.
</Warning>

**Edit standard Workflows**

<iframe width="560" height="315" src="https://www.loom.com/embed/407fc953879749628b54aee9fa507099?sid=b0fb11ea-e448-4d12-914f-629ad7b1f360" title="Loom Video" frameborder="0" allow="accelerometer; autoplay; clipboard-write; encrypted-media; gyroscope; picture-in-picture" allowfullscreen autoplay />

**Edit Consensus Workflows**

<iframe width="560" height="315" src="https://www.loom.com/embed/dc69cf5c1b9d43ae8beb61f66621b15e?sid=764d4bf3-15a7-4034-9cb3-ee33411904cc" title="Loom Video" frameborder="0" allow="accelerometer; autoplay; clipboard-write; encrypted-media; gyroscope; picture-in-picture" allowfullscreen autoplay />

### Limitations

Editing Workflows has the following limitations:

* Cannot change an Annotate stage to a Review stage. You must delete the stage and add a different stage.
* Cannot change fundamental stage configurations for Consensus stages.
* Cannot modify completed tasks. Historical task data remains unchanged
* Cannot delete labels/annotations. Existing annotation data is protected by blocking deleting stages that have tasks.
