> ## Documentation Index
> Fetch the complete documentation index at: https://docs.encord.com/llms.txt
> Use this file to discover all available pages before exploring further.
# Editor Settings & Shortcuts
## Editor Settings
All users can configure the Label Editor, and configure the Label Editor to their specific needs. This includes changing the way elements display, drawing settings, and settings related to automated labeling.
A user's settings persist and do not reset at the end of a session.
Editor settings are divided into several sections which can be filtered using the search bar:
* *Data details*: Details relating to the file currently open in the Label Editor.
* [*General*](#general-settings): General interactions with the Label Editor.
* [*Label display*](#label-display-settings): Toggle elements to show or hide those elements within the Label Editor.
* [*Drawing*](#drawing-settings): Control how labels are drawn.
Use the search bar at the top of the *Editor settings* to search for specific settings, or keywords.
### Data Details
The *Data details* section displays information about the asset currently open for annotation, or review. This information is gotten from the data itself, and is not available for direct manipulation. We use this section to provide you with valuable information about the data you are working on, including if we may have detected any possible issues with the data encoding.
| **Setting** | **Description** |
| ----------------------------------------------------------------------------------------------------- | ---------------------------------------------------------------------------------------------------------------------------------------------------------------------------------------------------------------------------------------------------------------------------------------------------------------------------------------------------------------------------------------------------------------------------------------------------------------------------------------------------------------- |
| Data title | The title of the file currently open in the Label Editor. |
| Data type | The type of data unit currently open in the Label Editor. |
| Dimensions | The size of the image or frame currently open in the Label Editor. |
| Frames per second | frequently abbreviated *FPS*, this is the number of frames, or images, per second in a video. Higher FPS means smoother playback. This value is only valid for videos. |
| [Browser compatibility](/platform-documentation/Annotate/annotate-label-editor#browser-compatibility) | Some videos may have FPS or video encoding issues synchronizing drawn labels with frames in modern browsers. You can read more about supported videos [here](/platform-documentation/General/general-supported-data#supported-file-formats), and learn more about frame synchronization issues here and in our documentation [here](/platform-documentation/General/general-supported-data#frame-synchronization-issues). |
***
### General Settings
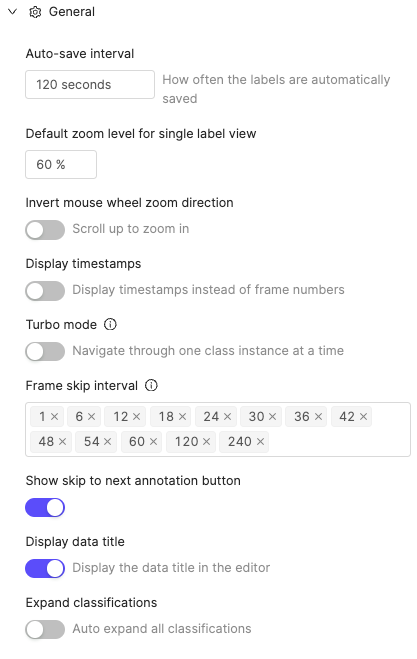 The *General* section of the *Label editor settings* contains the following components:
| Feature | Description |
| ------------------------------------------------------------------------------------------------------------------ | ---------------------------------------------------------------------------------------------------------------------------------------------------------------------------------------------------------------------------------- |
| **Auto-save interval** | Controls how often labels are auto-saved (min: 15s, max: 600s, default: 120s). |
| **Display bulk Approve/Reject buttons** | Toggles buttons to approve or reject all instances in a frame. |
| **Invert mouse wheel zoom direction** | Reverses the default zoom behavior for scrolling up/down. |
| **Display timestamps** | Shows timestamps instead of frame numbers for object instances, attributes, and consensus review. |
| **[Turbo mode](/platform-documentation/Annotate/annotate-label-editor/annotate-label-editor-annotate#turbo-mode)** | Speeds up annotation by allowing rapid assignment/confirmation of attributes with auto-zooming. |
| **Frame skip interval** | Sets the number of frames skipped when using frame-skip buttons. |
| **Enable 'Jump to annotation' buttons in video player** | Adds controls to navigate directly between frames containing annotations. |
| **Enable 'Jump to classification' buttons in video player** | Adds controls to navigate directly between frames containing classifications. |
| **Display data title** | Toggles visibility of the data unit title in the Label Editor. The title appears in the top-right corner of the editor. |
| **Expand classifications in classes list** | Auto-expands all top-level classifications, making hotkeys visible for quicker annotation. |
| **Expand all nested classifications** | Auto-expands all nested classifications, making hotkeys visible for quicker annotation. This feature is off by default for better readability with deeply nested Ontologies. Enabling it might not work for very large Ontologies. |
| **Show next empty classification on timeline** | Groups classifications by their base name and progressively reveals only the next unfilled one. Filled classifications remain visible. This setting is only available for Video and Data Groups projects. |
***
### Label Display Settings
The *Label display* section of the *Label editor settings* contains the following components:
| Feature | Description |
| ---------------------------------- | ---------------------------------------------------------------------------------------------------------------------------------------- |
| **Display object names** | Toggles visibility of annotation object names in the Label Editor. |
| **Display object hash** | Toggles visibility of the label hash (ID) for annotation objects. |
| **Display object classifications** | Toggles visibility of object attributes in the Label Editor. |
| **Object label font size** | Sets the font size (in px) for all label display settings. |
| **Blue tile outline** | Controls the display of blue outlines around content tiles. This outline appears only for data groups, not for individual content items. |
***
### Drawing Settings
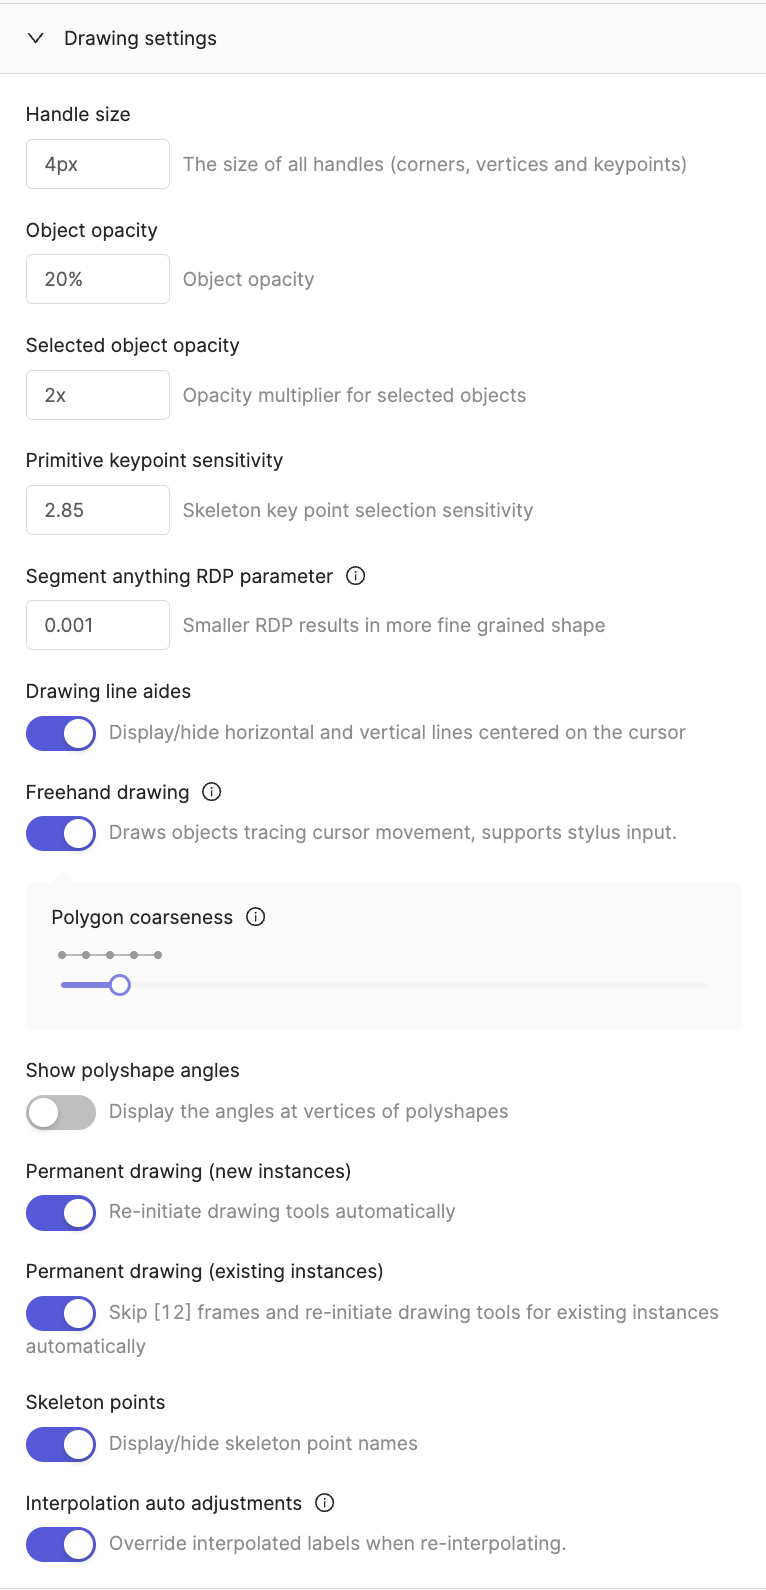
The *Drawing settings* section of the *Label editor settings* contains the following components:
| Feature | Description |
| ------------------------------------------ | ----------------------------------------------------------------------------------------------------------------------------------------------------------------------------------- |
| **Handle size** | Adjusts the size of vertices and keypoints (1-10 px). |
| **Object opacity** | Controls label opacity (1% - 100%) for better visibility. |
| **Selected object opacity** | Adjusts opacity multiplier (1x - 10x) for selected objects. |
| **Primitive keypoint sensitivity** | Sets precision for selecting/moving keypoints (1.00 - 10.00). |
| **Segment anything RDP parameter** | Sets [RDP parameter](https://en.wikipedia.org/wiki/Ramer%E2%80%93Douglas%E2%80%93Peucker_algorithm) for (SAM). |
| **SAM3 IOU match threshold** | Defines the minimum overlap required for SAM3 to classify multiple masks as a single tracked object. |
| **Drawing line aides** | Adds crosshairs to improve label accuracy. |
| **Freehand drawing & Polygon coarseness** | Enables freehand drawing with adjustable coarseness. |
| **Show polyshape angles** | Displays angles on polygons and polylines. |
| **Permanent drawing (new instances)** | Allows continuous drawing of new instances without re-selecting the tool. |
| **Permanent drawing (existing instances)** | Automatically moves forward and prompts labeling of the same instance on the next frame. |
| **Skeleton points** | Toggles visibility of individual [object primitive](/platform-documentation/Annotate/annotate-ontologies/annotate-working-with-ontologies#object-primitives) keypoint names. |
| **Interpolation auto adjustments** | Keeps manually labeled frames intact while adjusting [interpolations](/platform-documentation/Annotate/automated-labeling/annotate-interpolation) with confidence scores below 99%. |
| **Ruler around cursor** | Displays the source pixel size, allowing you to gauge object dimensions before adding or adjusting labels. |
***
### Object Tracking
**Number of frames to predict**
Specify how many subsequent frames that SAM 2 should continue from the current frame. For example, if you start on frame 50, and set *Number of frames to predict* to 50, the tracker attempts to predict labels on frames up to and including frame 100.
**Advanced tracking**
This toggle enables the advanced SAM 2 tracking algorithm, which improves accuracy but runs at a slower speed. It is enabled by default.
***
### Scene
This section of the Editor settings is specific to PCD Projects and does not appear for other modalities.
Scene settings now persist across sessions. Your preferences for point cloud size, opacity, and helper visibility are automatically saved and restored when you reload the annotation editor.
**Input Device**
Specify using a `mouse` or `trackpad` to rotate or pan in the workspace.
We **STRONGLY** recommend using a mouse to rotate or pan in the workspace.
**Pre-load data**
Pre-load data in the background for smoother navigation. Enabling this setting can improve performance when annotating or reviewing point cloud data.
***
**Face**
Shows/Hides the "face" of cuboids in the PCD workspace.
*Setting the front face:*
You can designate any face of a cuboid as its front face using `Alt`+click. This works whether the cuboid is currently selected or unselected — you do not need to deselect the cuboid first.
When you hold `Alt`, the drag-handle controls are hidden and the cuboid body becomes the click target, making face selection unambiguous. Click any visible face while holding `Alt` to set it as the front face.
When working with multi-frame cuboid tracks, setting the front face only modifies keyframes. Interpolated frames are rotated in place without being promoted to keyframes, so your keyframe structure remains intact.
Use `Alt`+click to quickly reassign the front face mid-annotation without interrupting your workflow — no need to deselect the cuboid first.
**Orientation**
Shows/Hides the orientation of cuboids in the PCD workspace.
**Ground**
Shows/Hides the "ground" plane as a grid in the PCD workspace.
**Axis**
Shows/Hides the axis of the point of origin in the PCD workspace.
**Cameras**
Shows/Hides camera helper lines to aid in annotating PCD.
**Background**
Shows/Hides the background in the PCD workspace.
**Color settings**
You can change the color of point cloud data in the PCD workspace. Here are the options:
* **Solid**: Displays points with a single uniform color.
* **Origin**: Displays points in colors based on the distance from the world origin point.
* **Camera**: Displays points in colors based on the distance from the camera position.
* **Height**: Displays points in colors based on the distance from the "ground" plane.
You can adjust the "ground" plane using the [ground height]() feature on the Editor toolbar.
* **Provided**: Displays points in colors based on how they were originally captured and recorded.
* **Image**: Displays points in colors by projecting camera image data onto the points.
* **Sensor**: Displays points colored by the sensor that captured them, making it easy to visually identify which sensor contributed which points in a multi-sensor setup.
- When you enable **Color by sensor** mode, points from different sensors are automatically assigned distinct colors from a fixed palette of 20 maximally distinct colors.
- Sensor colors are assigned consistently based on the sensor's stream ID, so the same sensor is always use the same color across different frames and sessions.
**PCD display settings**
You can change the display settings of point cloud data in the PCD workspace. Here are the options:
* Show: Displays point cloud data in the PCD workspace.
* Merge: Displays all point cloud data across time in the PCD workspace.
* Uniform size: Displays all point cloud data in a uniform size in the PCD workspace.
* Hide segmented: Hides all point cloud data that is behind segmented objects in the PCD workspace.
Only segmented objects that are set to be hidden hide all point cloud data behind them.
Specify the size of cloud data points in the PCD workspace.
Specifies the opacity of PCD in 2D views.
The default value is 0. PCD does not display in 2D views with a value of 0.
Specifies the opacity of data points that fade into the background. For example, all data points outside of a Scene slice.
Controls whether points that fall inside cuboids are highlighted with special coloring to make them more visible. This setting overrides the normal point coloring mode for points contained within cuboid annotations.
| Option | Description |
| ----------------- | -------------------------------------------------------------------- |
| **All cuboids** | Highlights points inside every cuboid annotation (default behavior). |
| **Selected only** | Only highlights points inside the currently selected cuboid. |
| **None** | Disables cuboid point highlighting entirely. |
Use "Selected only" mode when working with many overlapping cuboids to focus on the cuboid you're currently editing.
Controls how 3D labels are colored during workflow review and consensus review tasks. This setting applies to all 3D label types: cuboids, spheres, polylines, and keypoints/points.
This setting only takes effect when you are in a workflow review stage or consensus review stage. It has no effect outside of review tasks.
**By review status**
When you set **Label color mode (review)** to **By review status**, all 3D labels in the point cloud viewport are recolored according to their current review state:
| Review state | Color |
| ------------ | ------ |
| Pending | Orange |
| Approved | Green |
| Rejected | Red |
Labels you action (approve or reject) during the current review session fade to the opacity configured in **Reviewed label opacity**, reducing visual clutter as you work through the scene.
The opacity fade applies only to filled shapes — cuboids and spheres. Polylines and keypoints/points are recolored by review status but do not fade.
Selected 3D labels retain their review-status fill color when selected. Only the selection outline switches to the selection highlight color, matching the behavior in 2D review tasks.
Specifies the opacity applied to 3D labels that you have actioned (approved or rejected) during the current review session. Reducing this value fades reviewed labels into the background, making it easier to focus on labels that still require review.
The opacity fade applies only to filled shapes — cuboids and spheres. Polylines and keypoints/points are recolored by review status but are not affected by this opacity setting.
This setting only takes effect when **Label color mode (review)** is set to **By review status** and you are in a workflow review stage or consensus review stage.
#### Branch Overlay
This feature is ONLY available to Workspace and Project Admins, and Team Managers:
* Point cloud data (PCD) Projects
* In the REVIEW and COMPLETE workflow stages
* On PCD data types. Any other data types in a Scene do not display labels.
The branch overlay feature allows you to view read-only labels from different branches alongside your current working branch in the Label Editor. This is useful for comparing annotation work across different branches or reviewing labels from previous workflow stages.
### Access Branch Overlay
The **Branches** button appears in the Label Editor header when:
* You have Admin or Team Manager permissions
* You are working on a point cloud project
* You are in a Review or Complete workflow stage
* Other label branches exist for the current data unit
For other label branches to exist on a Scene, you must import a prediction branch to the data unit. Use `branch_name` to create a prediction branch in `label_rows_v2` for a data unit.
* `branch_name` supports alphanumeric characters (a-z, A-Z, 0-9) and is case sensitive
* `branch_name` supports the following special characters: hyphens (-), underscores (\_), and periods (.)
Click the **Branches** button to open the branch overlay panel, where you can select which branches to display as overlays.
### Using Branch Overlays
**To overlay labels from other branches:**
1. Click the **Branches** button in the Label Editor header.
The branch overlay panel opens.
2. Select the checkboxes for the branches you want to overlay.
Each branch displays with a unique color indicator.
3. Click outside the panel to close it.
The selected branch labels now appear as read-only overlays in the 3D scene.
**Branch overlay features:**
* **Color-coded display**: Each branch uses a distinct color to differentiate overlay labels from your working branch
* **Read-only overlays**: Overlay labels cannot be edited or modified
* **Multiple branch support**: You can overlay labels from multiple branches simultaneously
* **Visual distinction**: Overlay labels appear as wireframe outlines to clearly distinguish them from editable labels
* **Object identification**: Overlay labels display object hash IDs for reference
Use branch overlays to compare your current annotations with previous work or to ensure consistency across different annotation stages.
***
## Metadata Panel
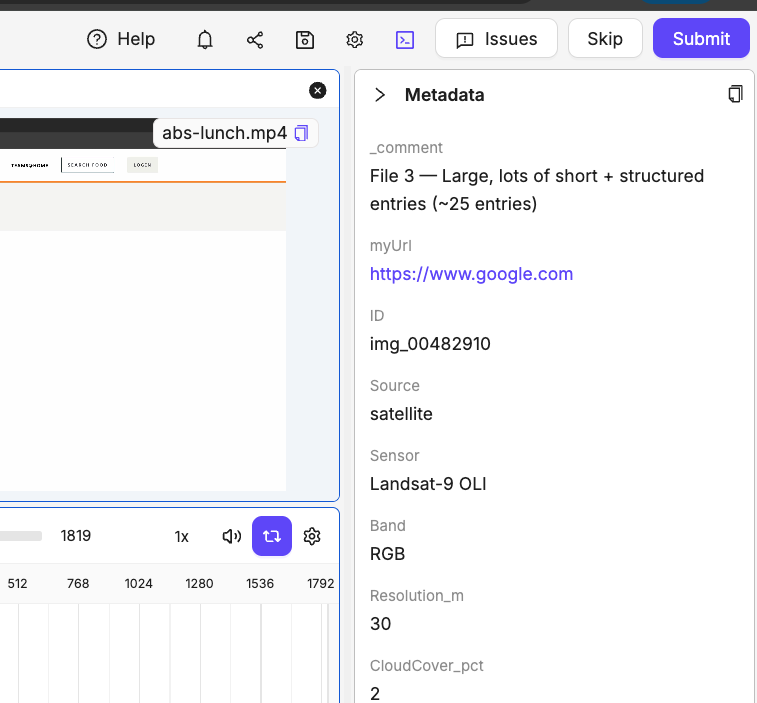
The metadata panel displays item metadata for the currently open data unit in the Label Editor. Access the metadata panel using the **Metadata** button (code icon) in the editor header.
This feature can be enabled or disabled per account. Admins may wish to disable it if task metadata contains sensitive information that should not be visible to Taskers.
The metadata panel only appears when metadata is available for the current data unit
**Metadata panel features**:
The metadata panel provides the following capabilities:
* **Field-by-field display**: Each metadata field appears with its key and value clearly separated
* **Copy functionality**: Click any field to copy its value to your clipboard, or use the copy button in the header to copy all metadata as JSON
* **URL detection**: URLs in metadata values automatically become clickable links
* **JSON formatting**: Complex nested objects display as formatted JSON for better readability
* **Large metadata handling**: Very large metadata files show a message directing you to use the copy function
* **Embedding field filtering**: Fields containing "embedding" in their names are automatically hidden from display to improve readability. Hidden fields are listed in a "Hidden fields" section at the bottom of the panel.
Use the copy button in the metadata panel header to copy all metadata as formatted JSON for use in external tools.
Embedding-related metadata fields are automatically filtered out of the display but remain accessible through the copy function. The panel shows which fields were hidden in a "Hidden fields" section.
***
## Trackpad Support
Encord's Label Editor supports trackpad gestures for improved navigation and annotation workflows. This feature works alongside traditional mouse controls to provide a more intuitive experience when using laptops or external trackpads.
### Trackpad Gestures
The Label Editor recognizes the following trackpad gestures:
* **Pinch-to-zoom**: Use two fingers to pinch in or out for precise zoom control. Pinch out (fingers apart) to zoom in, pinch in (fingers together) to zoom out.
* **Two-finger scroll**: Use two fingers to pan around the canvas. The content follows your finger movement naturally.
Trackpad support is automatically enabled when you set your input device to "trackpad" in the Scene settings. For non-scene projects, trackpad gestures work automatically when detected by your browser.
### Input Device Configuration
For point cloud data (PCD) Projects, you can specify your preferred input device in the Scene settings:
1. Open the **Editor settings** panel
2. Navigate to the **Scene** section
3. Under **General settings**, select your **Input Device**:
* **Mouse**: Optimized for traditional mouse interactions
* **Trackpad**: Enables trackpad gesture recognition and optimized sensitivity
We strongly recommend using a mouse for point cloud annotation, but trackpad support is available for users who prefer or require trackpad navigation.
### Gesture Behavior
**Zoom behavior**:
* Trackpad pinch-zoom provides smooth, proportional zooming based on your gesture speed
* Zoom centers on your cursor position for precise control
* The **Invert mouse wheel zoom direction** setting also affects trackpad pinch direction
**Pan behavior**:
* Two-finger scroll moves the content in the direction of your fingers
* Panning disables auto-centering, preserving your chosen view across frame changes
* Pan sensitivity is optimized for trackpad input
When using trackpad mode, two-finger scroll is dedicated to panning. Frame navigation using scroll gestures is disabled to prevent conflicts with pan gestures.
***
## Keyboard Shortcuts
Encord supports customizing keyboard shortcuts to suit your needs. Contact us at [support@encord.com](mailto:support@encord.com) for more information.
The words 'keyboard shortcuts' and 'hotkeys' are used interchangeably and refer to the same concept.
A full list of keyboard shortcuts can be found in the Label Editor. Use Control + Shift + K to open the full list of shortcuts.
Windows and Mac may have different keyboard shortcuts. Use Control + Shift + K to open the full list of shortcuts
Use the following hotkeys to speed up common or useful operations.
### Actions Menu
The Actions menu provides quick access to all available Label Editor functions through a searchable interface. Access it using Ctrl + K (Windows) or Cmd + K (Mac).
The Actions menu includes:
* All keyboard shortcuts with their hotkey combinations
* Editor settings and configuration options
* Navigation and tool selection commands
* Automated labeling functions
* All Ontology classes for annotation creation, including those without assigned hotkeys
Use the search bar in the actions menu to quickly find specific functions by typing keywords or partial command names.
In large Ontologies where not all classes have assigned hotkeys, the Actions menu displays all available annotation classes, making it easy to create labels for any object type in your Ontology.
### Review Mode
| Action | Shortcut | Configurable? |
| ------------------------------------ | --------------------------------------------- | ------------- |
| Approve selected label | N | Yes |
| Reject selected label | B | Yes |
| Approve all labels | No default hotkey. Must be configured. | Yes |
| Reject all labels | No default hotkey. Must be configured. | Yes |
| Toggle review edit mode | Ctrl + E | No |
| Turbo attribute mode | Ctrl + ⇧ + T | No |
| Toggle auto zoom (Turbo review mode) | Ctrl + ⇧ + Y | No |
| Review mode | Ctrl + ⇧ + R | No |
**Single label review:**
Single label review can be enabled using the hotkey CTRL+SHIFT+T
| **Action** | **Hotkey** | **Configurable?** |
| -------------------- | ------------ | ----------------- |
| Go to next label | ↑ | Yes |
| Go to previous label | ↓ | Yes |
| Previous | ↓ | No |
| Next | ↑ | No |
| **Action** | **Windows** | **Mac** | **Description** |
| ------------------------------- | ------------------------------------------------------------------ | ------------------------------------------------- | ------------------------------------------------------------------------- |
| Toggle single label review mode | Ctrl + Alt + Shift + T | Ctrl + Shift + T | Enables single label review mode for focused review of individual labels. |
***
### General
| Action | Shortcut |
| -------------------------------------- | -------------------------------- |
| Save | Ctrl + S |
| Submit task | ⇧ + Enter |
| Shortcuts menu | Ctrl + ⇧ + K |
| Next | ↑ |
| Previous | ↓ |
| Approve | N |
| Reject | B |
| Next frame | → |
| Previous frame | ← |
| Play / Pause | Space |
| Copy (Mac) | ⌘ + C |
| Copy (Windows) | Ctrl + C |
| Paste (Mac) | ⌘ + V |
| Paste (Windows) | Ctrl + V |
| Special paste (Mac) | ⌘ + ⇧ + V |
| Special paste (Windows) | Ctrl + ⇧ + V |
| Delete | Backspace |
| Delete selected object from frame | ⇧ + D |
| Select all (Mac) | Ctrl + A |
| Select all (Windows) | Alt + Ctrl + A |
| Complete | Enter |
| Cancel | Esc |
| Change class type | C |
| Track selected object from frame | ⇧ + T |
| Interpolate selected object from frame | ⇧ + I |
| Undo (Mac) | ⌘ + Z |
| Undo (Windows) | Ctrl + Z |
| Redo (Mac) | ⌘ + ⇧ + Z |
| Redo (Windows) | Ctrl + ⇧ + Z |
| Drag image (Windows) | Ctrl + Click and drag |
| Drag image (Mac) | ⌘ + Click and drag |
| Hide All Labels | Shift + H |
| Display object name in label title | Shift + N |
| Switch Tile (Data Groups & DICOM) | Option + S |
**Keyframes:**
| Action | Shortcut |
| ----------------- | ---------------- |
| Add keyframe | ⇧ + A |
| Delete keyframe | ⇧ + D |
| Previous keyframe | ⇧ + ← |
| Next keyframe | ⇧ + → |
***
### Annotate Mode
**Common Actions:**
| Action | Shortcut |
| ------------------------------------------------------------------------------------ | --------------------------------------------------- |
| Permanent drawing | Ctrl + ⇧ + P |
| Freehand drawing | D |
| [SAM](/platform-documentation/Annotate/automated-labeling/annotate-sam) segmentation | *Ontology hotkey* + Shift + A |
| Pan | Middle Mouse Button |
**Classification Ranges:**
| Action | Shortcut |
| ------------------------ | ------------ |
| Add range | N |
| Save range | M |
| Set to this frame | X |
| Set to this frame & save | Z |
| Set start to this frame | C |
| Set end to this frame | V |
**Draw Polygon Mode:**
| Action | Shortcut |
| ------------------- | ---------------- |
| Cancel | Esc |
| Complete | Enter |
| Select brush tool | G |
| Select eraser | H |
| Increase brush size | \[ |
| Decrease brush size | ] |
| Add vertex | A |
| Remove vertex | S |
| Edit vertex | F |
| Brush tool | G |
**Draw Bitmask Mode:**
| Action | Shortcut |
| ----------------------------------------------------- | ---------------- |
| Cancel | Esc |
| Complete | Enter |
| Select brush | F |
| Increase brush size | ] |
| Decrease brush size | \[ |
| Select eraser | H |
| Select polygon tool | G |
| Toggle threshold mode | J |
| Select eye-drop tool (Once thresholding is turned on) | K |
***DICOM specific operations:***
| **Action** | **Hotkey** |
| ---------------------- | --------------------------------------------------------------------------- |
| Windowing modification | Alt + W / Option + W |
| Measurement tool | Alt + M / Option + M |
**Bulk 3D Scene Editor Copy/Paste keyboard shortcuts**
| Action | Windows | Mac |
| --------------------------------- | ---------------------------------------------- | ------------------------------------------------- |
| Select all cuboids | Ctrl + A | Command + A |
| Copy selected cuboids | Ctrl + C | Command + C |
| Place copied group | Shift + Click | Shift + Click |
| Yaw-rotate group before placement | R | R |
| Undo bulk paste | Ctrl + Z | Command + Z |
| Clear clipboard | Ctrl + Shift + C (nothing selected) | Command + Shift + C (nothing selected) |
## Label Editor Settings Templates
Workspace and Project Admins can configure Label Editor templates to provide a consistent and optimized experience for their annotators and reviewers on a Project.
Annotators and reviewers can make the choice of using the Label Editor settings or customizing the Label Editor settings.
### Configure Label Editor Settings templates
Only Workspace and Project Admins can create Label Editor templates.
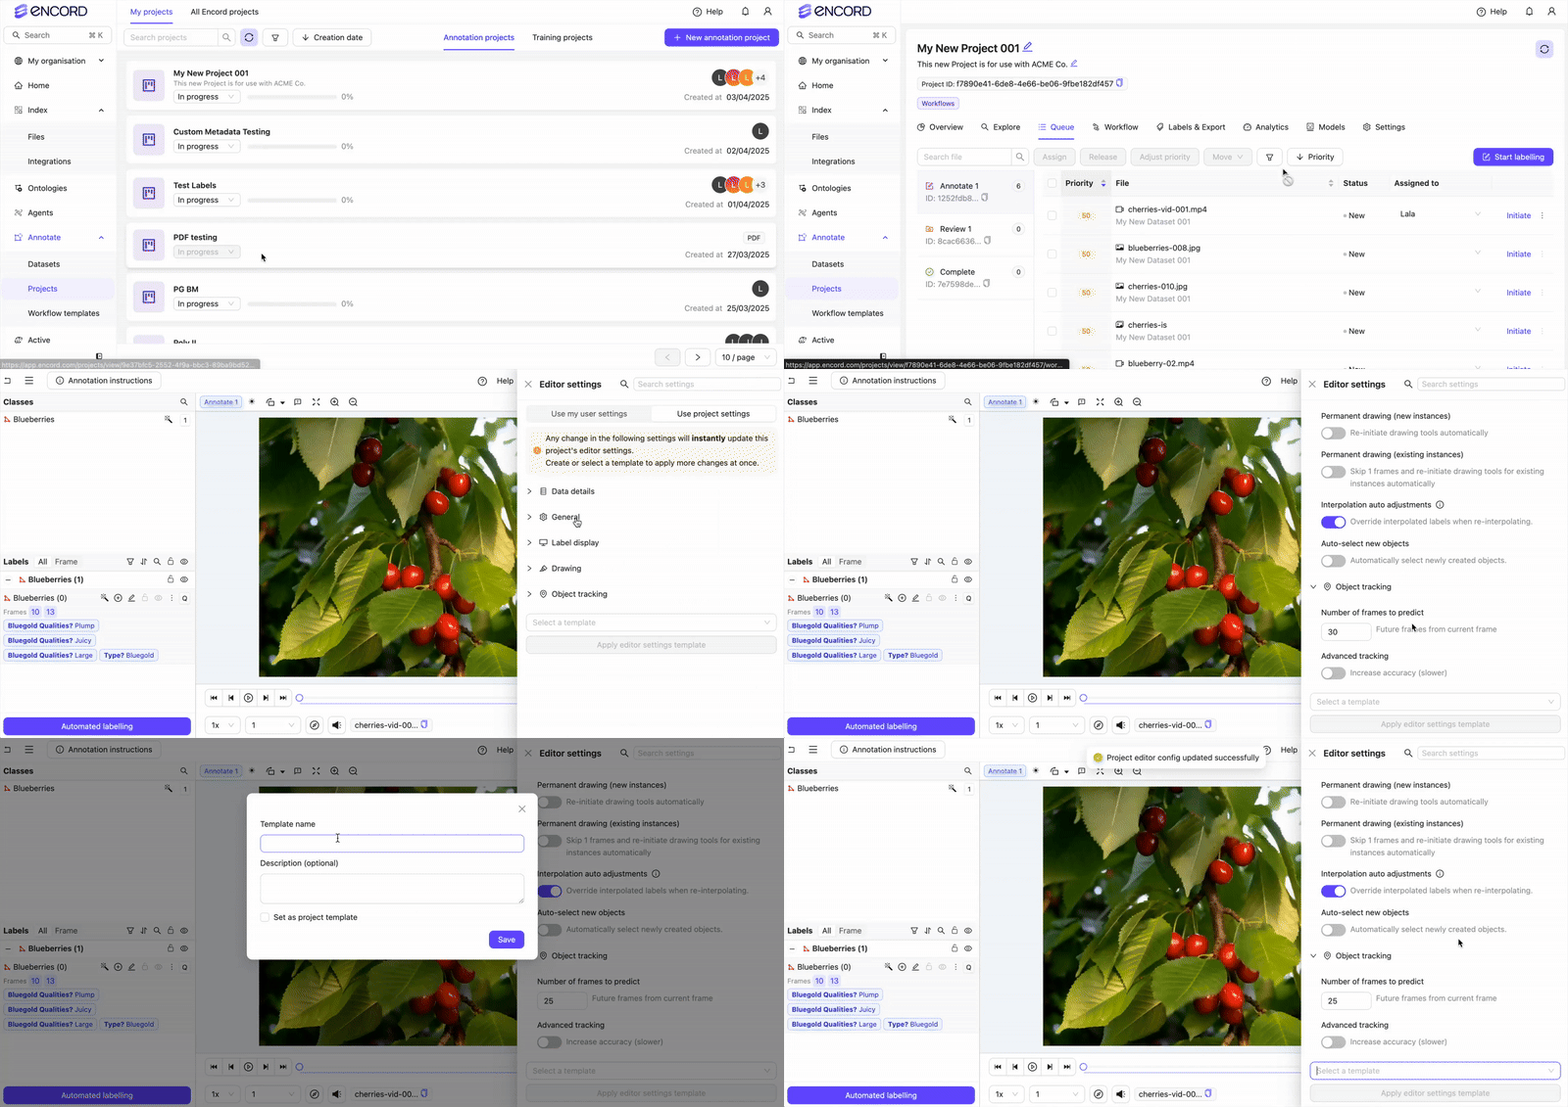
**To create a Label Editor Settings Template:**
1. Go to **Annotate > Projects > \[select a Project]**.
The *Project* page appears.
2. Click **Queue**.
The *Task Queue* appears.
3. Click **Initiate** for a data unit in the queue.
4. Click the **Editor settings** icon.
The *Editor settings* panel appears.
5. Click **Use Project settings**.
The *Use Project settings* panel appears.
6. Specify the Label Editor settings you want your annotators and reviewers to use in the Project.
7. Click **Select a template**.
8. Click **Save current settings as template**.
A dialog box appears.
9. Provide a meaningful name and description for the template.
10. Click **Set as template** to use the template in the current Project.
11. Click **Save**.
### Apply a Label Editor Settings Template
Only Workspace and Project Admins can apply Label Editor templates to Projects.
[Apply Label Editor Settings Template](https://storage.googleapis.com/docs-media.encord.com/static/img/annotate/label_editor/annotate-label-editor-settings-template-select.gif)
**To apply a Label Editor Settings Template to a Project:**
1. Go to **Annotate > Projects > \[select a Project]**.
The *Project* page appears.
2. Click **Queue**.
The *Task Queue* appears.
3. Click **Initiate** for a data unit in the queue.
4. Click the **Editor settings** icon.
The *Editor settings* panel appears.
5. Click **Use Project settings**.
The *Use Project settings* panel appears.
6. Click **Select a template**.
7. Select the template you want to use.
### Use Your Own Label Editor Settings
Annotators and reviewers can use their own settings instead of the Label Editor Setting template settings.
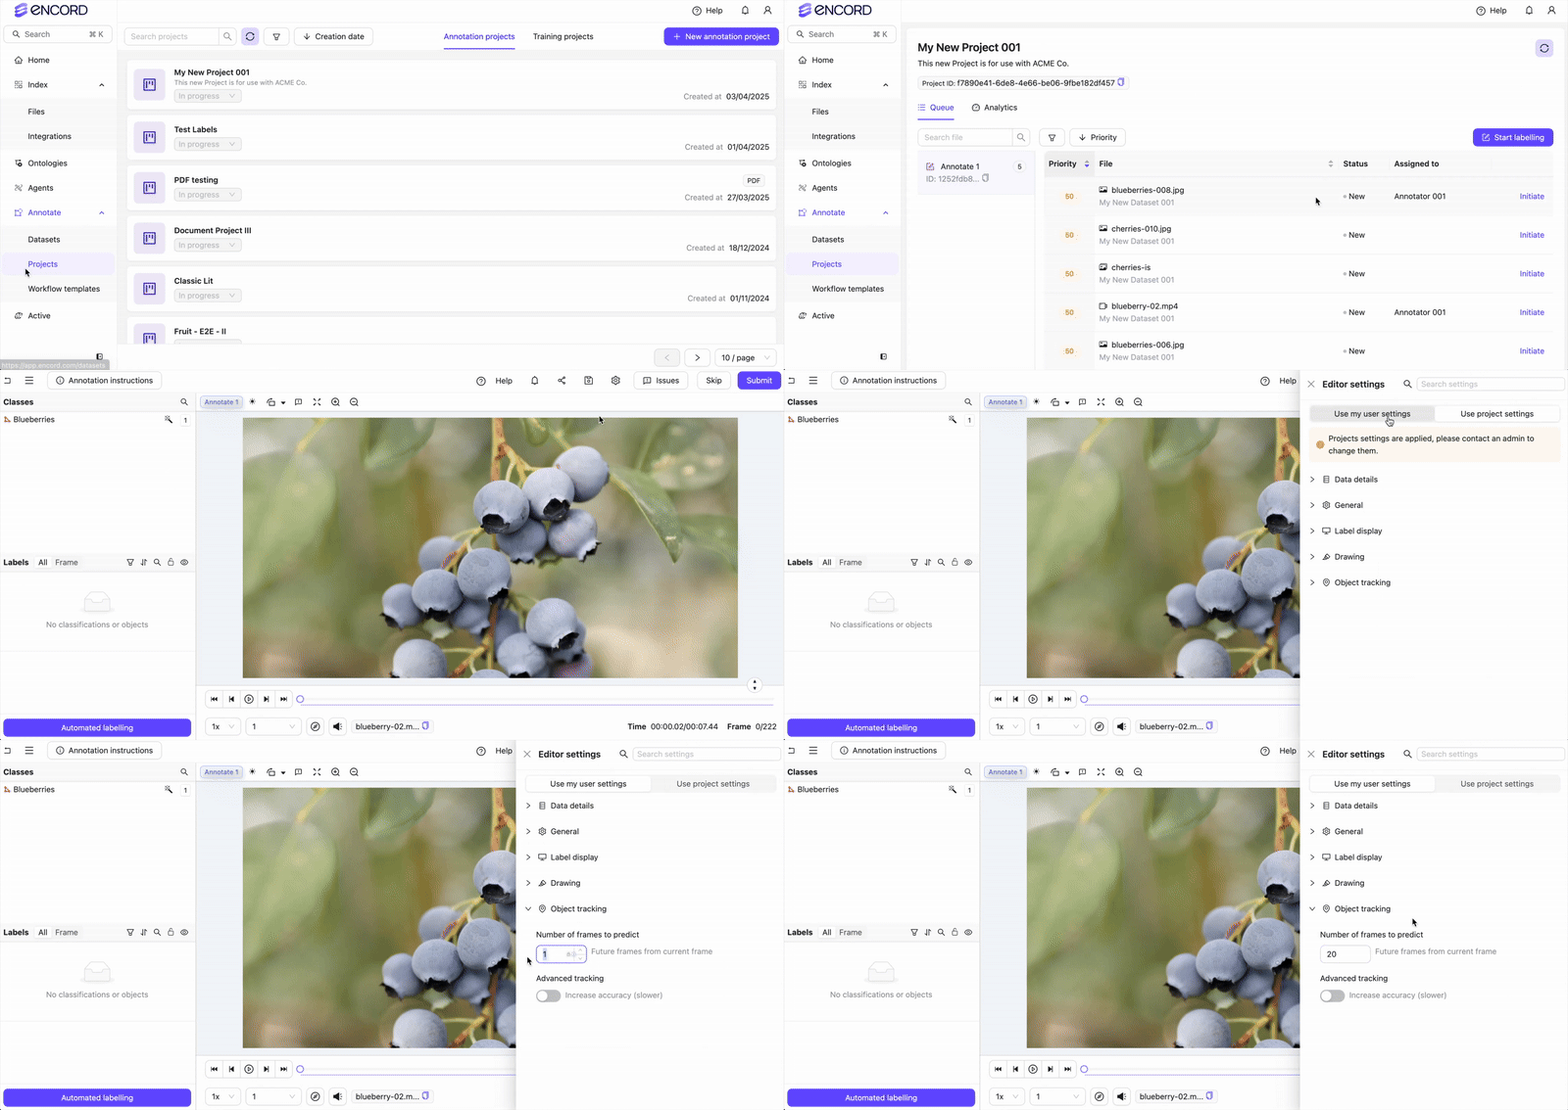
**To use your own settings instead of the Label Editor Template settings:**
1. Go to **Annotate > Projects > \[select a Project]**.
The *Project* page appears.
2. Click **Queue**.
The *Task Queue* appears.
3. Click **Initiate** for a data unit in the queue.
4. Click the **Editor settings** icon.
The *Editor settings* panel appears.
5. Click **Use my user settings**.
The *General* section of the *Label editor settings* contains the following components:
| Feature | Description |
| ------------------------------------------------------------------------------------------------------------------ | ---------------------------------------------------------------------------------------------------------------------------------------------------------------------------------------------------------------------------------- |
| **Auto-save interval** | Controls how often labels are auto-saved (min: 15s, max: 600s, default: 120s). |
| **Display bulk Approve/Reject buttons** | Toggles buttons to approve or reject all instances in a frame. |
| **Invert mouse wheel zoom direction** | Reverses the default zoom behavior for scrolling up/down. |
| **Display timestamps** | Shows timestamps instead of frame numbers for object instances, attributes, and consensus review. |
| **[Turbo mode](/platform-documentation/Annotate/annotate-label-editor/annotate-label-editor-annotate#turbo-mode)** | Speeds up annotation by allowing rapid assignment/confirmation of attributes with auto-zooming. |
| **Frame skip interval** | Sets the number of frames skipped when using frame-skip buttons. |
| **Enable 'Jump to annotation' buttons in video player** | Adds controls to navigate directly between frames containing annotations. |
| **Enable 'Jump to classification' buttons in video player** | Adds controls to navigate directly between frames containing classifications. |
| **Display data title** | Toggles visibility of the data unit title in the Label Editor. The title appears in the top-right corner of the editor. |
| **Expand classifications in classes list** | Auto-expands all top-level classifications, making hotkeys visible for quicker annotation. |
| **Expand all nested classifications** | Auto-expands all nested classifications, making hotkeys visible for quicker annotation. This feature is off by default for better readability with deeply nested Ontologies. Enabling it might not work for very large Ontologies. |
| **Show next empty classification on timeline** | Groups classifications by their base name and progressively reveals only the next unfilled one. Filled classifications remain visible. This setting is only available for Video and Data Groups projects. |
***
### Label Display Settings
The *Label display* section of the *Label editor settings* contains the following components:
| Feature | Description |
| ---------------------------------- | ---------------------------------------------------------------------------------------------------------------------------------------- |
| **Display object names** | Toggles visibility of annotation object names in the Label Editor. |
| **Display object hash** | Toggles visibility of the label hash (ID) for annotation objects. |
| **Display object classifications** | Toggles visibility of object attributes in the Label Editor. |
| **Object label font size** | Sets the font size (in px) for all label display settings. |
| **Blue tile outline** | Controls the display of blue outlines around content tiles. This outline appears only for data groups, not for individual content items. |
***
### Drawing Settings
The *Drawing settings* section of the *Label editor settings* contains the following components:
| Feature | Description |
| ------------------------------------------ | ----------------------------------------------------------------------------------------------------------------------------------------------------------------------------------- |
| **Handle size** | Adjusts the size of vertices and keypoints (1-10 px). |
| **Object opacity** | Controls label opacity (1% - 100%) for better visibility. |
| **Selected object opacity** | Adjusts opacity multiplier (1x - 10x) for selected objects. |
| **Primitive keypoint sensitivity** | Sets precision for selecting/moving keypoints (1.00 - 10.00). |
| **Segment anything RDP parameter** | Sets [RDP parameter](https://en.wikipedia.org/wiki/Ramer%E2%80%93Douglas%E2%80%93Peucker_algorithm) for (SAM). |
| **SAM3 IOU match threshold** | Defines the minimum overlap required for SAM3 to classify multiple masks as a single tracked object. |
| **Drawing line aides** | Adds crosshairs to improve label accuracy. |
| **Freehand drawing & Polygon coarseness** | Enables freehand drawing with adjustable coarseness. |
| **Show polyshape angles** | Displays angles on polygons and polylines. |
| **Permanent drawing (new instances)** | Allows continuous drawing of new instances without re-selecting the tool. |
| **Permanent drawing (existing instances)** | Automatically moves forward and prompts labeling of the same instance on the next frame. |
| **Skeleton points** | Toggles visibility of individual [object primitive](/platform-documentation/Annotate/annotate-ontologies/annotate-working-with-ontologies#object-primitives) keypoint names. |
| **Interpolation auto adjustments** | Keeps manually labeled frames intact while adjusting [interpolations](/platform-documentation/Annotate/automated-labeling/annotate-interpolation) with confidence scores below 99%. |
| **Ruler around cursor** | Displays the source pixel size, allowing you to gauge object dimensions before adding or adjusting labels. |
***
### Object Tracking
**Number of frames to predict**
Specify how many subsequent frames that SAM 2 should continue from the current frame. For example, if you start on frame 50, and set *Number of frames to predict* to 50, the tracker attempts to predict labels on frames up to and including frame 100.
**Advanced tracking**
This toggle enables the advanced SAM 2 tracking algorithm, which improves accuracy but runs at a slower speed. It is enabled by default.
***
### Scene
This section of the Editor settings is specific to PCD Projects and does not appear for other modalities.
Scene settings now persist across sessions. Your preferences for point cloud size, opacity, and helper visibility are automatically saved and restored when you reload the annotation editor.
**Input Device**
Specify using a `mouse` or `trackpad` to rotate or pan in the workspace.
We **STRONGLY** recommend using a mouse to rotate or pan in the workspace.
**Pre-load data**
Pre-load data in the background for smoother navigation. Enabling this setting can improve performance when annotating or reviewing point cloud data.
***
**Face**
Shows/Hides the "face" of cuboids in the PCD workspace.
*Setting the front face:*
You can designate any face of a cuboid as its front face using `Alt`+click. This works whether the cuboid is currently selected or unselected — you do not need to deselect the cuboid first.
When you hold `Alt`, the drag-handle controls are hidden and the cuboid body becomes the click target, making face selection unambiguous. Click any visible face while holding `Alt` to set it as the front face.
When working with multi-frame cuboid tracks, setting the front face only modifies keyframes. Interpolated frames are rotated in place without being promoted to keyframes, so your keyframe structure remains intact.
Use `Alt`+click to quickly reassign the front face mid-annotation without interrupting your workflow — no need to deselect the cuboid first.
**Orientation**
Shows/Hides the orientation of cuboids in the PCD workspace.
**Ground**
Shows/Hides the "ground" plane as a grid in the PCD workspace.
**Axis**
Shows/Hides the axis of the point of origin in the PCD workspace.
**Cameras**
Shows/Hides camera helper lines to aid in annotating PCD.
**Background**
Shows/Hides the background in the PCD workspace.
**Color settings**
You can change the color of point cloud data in the PCD workspace. Here are the options:
* **Solid**: Displays points with a single uniform color.
* **Origin**: Displays points in colors based on the distance from the world origin point.
* **Camera**: Displays points in colors based on the distance from the camera position.
* **Height**: Displays points in colors based on the distance from the "ground" plane.
You can adjust the "ground" plane using the [ground height]() feature on the Editor toolbar.
* **Provided**: Displays points in colors based on how they were originally captured and recorded.
* **Image**: Displays points in colors by projecting camera image data onto the points.
* **Sensor**: Displays points colored by the sensor that captured them, making it easy to visually identify which sensor contributed which points in a multi-sensor setup.
- When you enable **Color by sensor** mode, points from different sensors are automatically assigned distinct colors from a fixed palette of 20 maximally distinct colors.
- Sensor colors are assigned consistently based on the sensor's stream ID, so the same sensor is always use the same color across different frames and sessions.
**PCD display settings**
You can change the display settings of point cloud data in the PCD workspace. Here are the options:
* Show: Displays point cloud data in the PCD workspace.
* Merge: Displays all point cloud data across time in the PCD workspace.
* Uniform size: Displays all point cloud data in a uniform size in the PCD workspace.
* Hide segmented: Hides all point cloud data that is behind segmented objects in the PCD workspace.
Only segmented objects that are set to be hidden hide all point cloud data behind them.
Specify the size of cloud data points in the PCD workspace.
Specifies the opacity of PCD in 2D views.
The default value is 0. PCD does not display in 2D views with a value of 0.
Specifies the opacity of data points that fade into the background. For example, all data points outside of a Scene slice.
Controls whether points that fall inside cuboids are highlighted with special coloring to make them more visible. This setting overrides the normal point coloring mode for points contained within cuboid annotations.
| Option | Description |
| ----------------- | -------------------------------------------------------------------- |
| **All cuboids** | Highlights points inside every cuboid annotation (default behavior). |
| **Selected only** | Only highlights points inside the currently selected cuboid. |
| **None** | Disables cuboid point highlighting entirely. |
Use "Selected only" mode when working with many overlapping cuboids to focus on the cuboid you're currently editing.
Controls how 3D labels are colored during workflow review and consensus review tasks. This setting applies to all 3D label types: cuboids, spheres, polylines, and keypoints/points.
This setting only takes effect when you are in a workflow review stage or consensus review stage. It has no effect outside of review tasks.
**By review status**
When you set **Label color mode (review)** to **By review status**, all 3D labels in the point cloud viewport are recolored according to their current review state:
| Review state | Color |
| ------------ | ------ |
| Pending | Orange |
| Approved | Green |
| Rejected | Red |
Labels you action (approve or reject) during the current review session fade to the opacity configured in **Reviewed label opacity**, reducing visual clutter as you work through the scene.
The opacity fade applies only to filled shapes — cuboids and spheres. Polylines and keypoints/points are recolored by review status but do not fade.
Selected 3D labels retain their review-status fill color when selected. Only the selection outline switches to the selection highlight color, matching the behavior in 2D review tasks.
Specifies the opacity applied to 3D labels that you have actioned (approved or rejected) during the current review session. Reducing this value fades reviewed labels into the background, making it easier to focus on labels that still require review.
The opacity fade applies only to filled shapes — cuboids and spheres. Polylines and keypoints/points are recolored by review status but are not affected by this opacity setting.
This setting only takes effect when **Label color mode (review)** is set to **By review status** and you are in a workflow review stage or consensus review stage.
#### Branch Overlay
This feature is ONLY available to Workspace and Project Admins, and Team Managers:
* Point cloud data (PCD) Projects
* In the REVIEW and COMPLETE workflow stages
* On PCD data types. Any other data types in a Scene do not display labels.
The branch overlay feature allows you to view read-only labels from different branches alongside your current working branch in the Label Editor. This is useful for comparing annotation work across different branches or reviewing labels from previous workflow stages.
### Access Branch Overlay
The **Branches** button appears in the Label Editor header when:
* You have Admin or Team Manager permissions
* You are working on a point cloud project
* You are in a Review or Complete workflow stage
* Other label branches exist for the current data unit
For other label branches to exist on a Scene, you must import a prediction branch to the data unit. Use `branch_name` to create a prediction branch in `label_rows_v2` for a data unit.
* `branch_name` supports alphanumeric characters (a-z, A-Z, 0-9) and is case sensitive
* `branch_name` supports the following special characters: hyphens (-), underscores (\_), and periods (.)
Click the **Branches** button to open the branch overlay panel, where you can select which branches to display as overlays.
### Using Branch Overlays
**To overlay labels from other branches:**
1. Click the **Branches** button in the Label Editor header.
The branch overlay panel opens.
2. Select the checkboxes for the branches you want to overlay.
Each branch displays with a unique color indicator.
3. Click outside the panel to close it.
The selected branch labels now appear as read-only overlays in the 3D scene.
**Branch overlay features:**
* **Color-coded display**: Each branch uses a distinct color to differentiate overlay labels from your working branch
* **Read-only overlays**: Overlay labels cannot be edited or modified
* **Multiple branch support**: You can overlay labels from multiple branches simultaneously
* **Visual distinction**: Overlay labels appear as wireframe outlines to clearly distinguish them from editable labels
* **Object identification**: Overlay labels display object hash IDs for reference
Use branch overlays to compare your current annotations with previous work or to ensure consistency across different annotation stages.
***
## Metadata Panel
The metadata panel displays item metadata for the currently open data unit in the Label Editor. Access the metadata panel using the **Metadata** button (code icon) in the editor header.
This feature can be enabled or disabled per account. Admins may wish to disable it if task metadata contains sensitive information that should not be visible to Taskers.
The metadata panel only appears when metadata is available for the current data unit
**Metadata panel features**:
The metadata panel provides the following capabilities:
* **Field-by-field display**: Each metadata field appears with its key and value clearly separated
* **Copy functionality**: Click any field to copy its value to your clipboard, or use the copy button in the header to copy all metadata as JSON
* **URL detection**: URLs in metadata values automatically become clickable links
* **JSON formatting**: Complex nested objects display as formatted JSON for better readability
* **Large metadata handling**: Very large metadata files show a message directing you to use the copy function
* **Embedding field filtering**: Fields containing "embedding" in their names are automatically hidden from display to improve readability. Hidden fields are listed in a "Hidden fields" section at the bottom of the panel.
Use the copy button in the metadata panel header to copy all metadata as formatted JSON for use in external tools.
Embedding-related metadata fields are automatically filtered out of the display but remain accessible through the copy function. The panel shows which fields were hidden in a "Hidden fields" section.
***
## Trackpad Support
Encord's Label Editor supports trackpad gestures for improved navigation and annotation workflows. This feature works alongside traditional mouse controls to provide a more intuitive experience when using laptops or external trackpads.
### Trackpad Gestures
The Label Editor recognizes the following trackpad gestures:
* **Pinch-to-zoom**: Use two fingers to pinch in or out for precise zoom control. Pinch out (fingers apart) to zoom in, pinch in (fingers together) to zoom out.
* **Two-finger scroll**: Use two fingers to pan around the canvas. The content follows your finger movement naturally.
Trackpad support is automatically enabled when you set your input device to "trackpad" in the Scene settings. For non-scene projects, trackpad gestures work automatically when detected by your browser.
### Input Device Configuration
For point cloud data (PCD) Projects, you can specify your preferred input device in the Scene settings:
1. Open the **Editor settings** panel
2. Navigate to the **Scene** section
3. Under **General settings**, select your **Input Device**:
* **Mouse**: Optimized for traditional mouse interactions
* **Trackpad**: Enables trackpad gesture recognition and optimized sensitivity
We strongly recommend using a mouse for point cloud annotation, but trackpad support is available for users who prefer or require trackpad navigation.
### Gesture Behavior
**Zoom behavior**:
* Trackpad pinch-zoom provides smooth, proportional zooming based on your gesture speed
* Zoom centers on your cursor position for precise control
* The **Invert mouse wheel zoom direction** setting also affects trackpad pinch direction
**Pan behavior**:
* Two-finger scroll moves the content in the direction of your fingers
* Panning disables auto-centering, preserving your chosen view across frame changes
* Pan sensitivity is optimized for trackpad input
When using trackpad mode, two-finger scroll is dedicated to panning. Frame navigation using scroll gestures is disabled to prevent conflicts with pan gestures.
***
## Keyboard Shortcuts
Encord supports customizing keyboard shortcuts to suit your needs. Contact us at [support@encord.com](mailto:support@encord.com) for more information.
The words 'keyboard shortcuts' and 'hotkeys' are used interchangeably and refer to the same concept.
A full list of keyboard shortcuts can be found in the Label Editor. Use Control + Shift + K to open the full list of shortcuts.
Windows and Mac may have different keyboard shortcuts. Use Control + Shift + K to open the full list of shortcuts
Use the following hotkeys to speed up common or useful operations.
### Actions Menu
The Actions menu provides quick access to all available Label Editor functions through a searchable interface. Access it using Ctrl + K (Windows) or Cmd + K (Mac).
The Actions menu includes:
* All keyboard shortcuts with their hotkey combinations
* Editor settings and configuration options
* Navigation and tool selection commands
* Automated labeling functions
* All Ontology classes for annotation creation, including those without assigned hotkeys
Use the search bar in the actions menu to quickly find specific functions by typing keywords or partial command names.
In large Ontologies where not all classes have assigned hotkeys, the Actions menu displays all available annotation classes, making it easy to create labels for any object type in your Ontology.
### Review Mode
| Action | Shortcut | Configurable? |
| ------------------------------------ | --------------------------------------------- | ------------- |
| Approve selected label | N | Yes |
| Reject selected label | B | Yes |
| Approve all labels | No default hotkey. Must be configured. | Yes |
| Reject all labels | No default hotkey. Must be configured. | Yes |
| Toggle review edit mode | Ctrl + E | No |
| Turbo attribute mode | Ctrl + ⇧ + T | No |
| Toggle auto zoom (Turbo review mode) | Ctrl + ⇧ + Y | No |
| Review mode | Ctrl + ⇧ + R | No |
**Single label review:**
Single label review can be enabled using the hotkey CTRL+SHIFT+T
| **Action** | **Hotkey** | **Configurable?** |
| -------------------- | ------------ | ----------------- |
| Go to next label | ↑ | Yes |
| Go to previous label | ↓ | Yes |
| Previous | ↓ | No |
| Next | ↑ | No |
| **Action** | **Windows** | **Mac** | **Description** |
| ------------------------------- | ------------------------------------------------------------------ | ------------------------------------------------- | ------------------------------------------------------------------------- |
| Toggle single label review mode | Ctrl + Alt + Shift + T | Ctrl + Shift + T | Enables single label review mode for focused review of individual labels. |
***
### General
| Action | Shortcut |
| -------------------------------------- | -------------------------------- |
| Save | Ctrl + S |
| Submit task | ⇧ + Enter |
| Shortcuts menu | Ctrl + ⇧ + K |
| Next | ↑ |
| Previous | ↓ |
| Approve | N |
| Reject | B |
| Next frame | → |
| Previous frame | ← |
| Play / Pause | Space |
| Copy (Mac) | ⌘ + C |
| Copy (Windows) | Ctrl + C |
| Paste (Mac) | ⌘ + V |
| Paste (Windows) | Ctrl + V |
| Special paste (Mac) | ⌘ + ⇧ + V |
| Special paste (Windows) | Ctrl + ⇧ + V |
| Delete | Backspace |
| Delete selected object from frame | ⇧ + D |
| Select all (Mac) | Ctrl + A |
| Select all (Windows) | Alt + Ctrl + A |
| Complete | Enter |
| Cancel | Esc |
| Change class type | C |
| Track selected object from frame | ⇧ + T |
| Interpolate selected object from frame | ⇧ + I |
| Undo (Mac) | ⌘ + Z |
| Undo (Windows) | Ctrl + Z |
| Redo (Mac) | ⌘ + ⇧ + Z |
| Redo (Windows) | Ctrl + ⇧ + Z |
| Drag image (Windows) | Ctrl + Click and drag |
| Drag image (Mac) | ⌘ + Click and drag |
| Hide All Labels | Shift + H |
| Display object name in label title | Shift + N |
| Switch Tile (Data Groups & DICOM) | Option + S |
**Keyframes:**
| Action | Shortcut |
| ----------------- | ---------------- |
| Add keyframe | ⇧ + A |
| Delete keyframe | ⇧ + D |
| Previous keyframe | ⇧ + ← |
| Next keyframe | ⇧ + → |
***
### Annotate Mode
**Common Actions:**
| Action | Shortcut |
| ------------------------------------------------------------------------------------ | --------------------------------------------------- |
| Permanent drawing | Ctrl + ⇧ + P |
| Freehand drawing | D |
| [SAM](/platform-documentation/Annotate/automated-labeling/annotate-sam) segmentation | *Ontology hotkey* + Shift + A |
| Pan | Middle Mouse Button |
**Classification Ranges:**
| Action | Shortcut |
| ------------------------ | ------------ |
| Add range | N |
| Save range | M |
| Set to this frame | X |
| Set to this frame & save | Z |
| Set start to this frame | C |
| Set end to this frame | V |
**Draw Polygon Mode:**
| Action | Shortcut |
| ------------------- | ---------------- |
| Cancel | Esc |
| Complete | Enter |
| Select brush tool | G |
| Select eraser | H |
| Increase brush size | \[ |
| Decrease brush size | ] |
| Add vertex | A |
| Remove vertex | S |
| Edit vertex | F |
| Brush tool | G |
**Draw Bitmask Mode:**
| Action | Shortcut |
| ----------------------------------------------------- | ---------------- |
| Cancel | Esc |
| Complete | Enter |
| Select brush | F |
| Increase brush size | ] |
| Decrease brush size | \[ |
| Select eraser | H |
| Select polygon tool | G |
| Toggle threshold mode | J |
| Select eye-drop tool (Once thresholding is turned on) | K |
***DICOM specific operations:***
| **Action** | **Hotkey** |
| ---------------------- | --------------------------------------------------------------------------- |
| Windowing modification | Alt + W / Option + W |
| Measurement tool | Alt + M / Option + M |
**Bulk 3D Scene Editor Copy/Paste keyboard shortcuts**
| Action | Windows | Mac |
| --------------------------------- | ---------------------------------------------- | ------------------------------------------------- |
| Select all cuboids | Ctrl + A | Command + A |
| Copy selected cuboids | Ctrl + C | Command + C |
| Place copied group | Shift + Click | Shift + Click |
| Yaw-rotate group before placement | R | R |
| Undo bulk paste | Ctrl + Z | Command + Z |
| Clear clipboard | Ctrl + Shift + C (nothing selected) | Command + Shift + C (nothing selected) |
## Label Editor Settings Templates
Workspace and Project Admins can configure Label Editor templates to provide a consistent and optimized experience for their annotators and reviewers on a Project.
Annotators and reviewers can make the choice of using the Label Editor settings or customizing the Label Editor settings.
### Configure Label Editor Settings templates
Only Workspace and Project Admins can create Label Editor templates.

**To create a Label Editor Settings Template:**
1. Go to **Annotate > Projects > \[select a Project]**.
The *Project* page appears.
2. Click **Queue**.
The *Task Queue* appears.
3. Click **Initiate** for a data unit in the queue.
4. Click the **Editor settings** icon.
The *Editor settings* panel appears.
5. Click **Use Project settings**.
The *Use Project settings* panel appears.
6. Specify the Label Editor settings you want your annotators and reviewers to use in the Project.
7. Click **Select a template**.
8. Click **Save current settings as template**.
A dialog box appears.
9. Provide a meaningful name and description for the template.
10. Click **Set as template** to use the template in the current Project.
11. Click **Save**.
### Apply a Label Editor Settings Template
Only Workspace and Project Admins can apply Label Editor templates to Projects.
[Apply Label Editor Settings Template](https://storage.googleapis.com/docs-media.encord.com/static/img/annotate/label_editor/annotate-label-editor-settings-template-select.gif)
**To apply a Label Editor Settings Template to a Project:**
1. Go to **Annotate > Projects > \[select a Project]**.
The *Project* page appears.
2. Click **Queue**.
The *Task Queue* appears.
3. Click **Initiate** for a data unit in the queue.
4. Click the **Editor settings** icon.
The *Editor settings* panel appears.
5. Click **Use Project settings**.
The *Use Project settings* panel appears.
6. Click **Select a template**.
7. Select the template you want to use.
### Use Your Own Label Editor Settings
Annotators and reviewers can use their own settings instead of the Label Editor Setting template settings.

**To use your own settings instead of the Label Editor Template settings:**
1. Go to **Annotate > Projects > \[select a Project]**.
The *Project* page appears.
2. Click **Queue**.
The *Task Queue* appears.
3. Click **Initiate** for a data unit in the queue.
4. Click the **Editor settings** icon.
The *Editor settings* panel appears.
5. Click **Use my user settings**.