> ## Documentation Index
> Fetch the complete documentation index at: https://docs.encord.com/llms.txt
> Use this file to discover all available pages before exploring further.
# How To Export Labels
## Export Labels to Cloud Storage (Recommended)
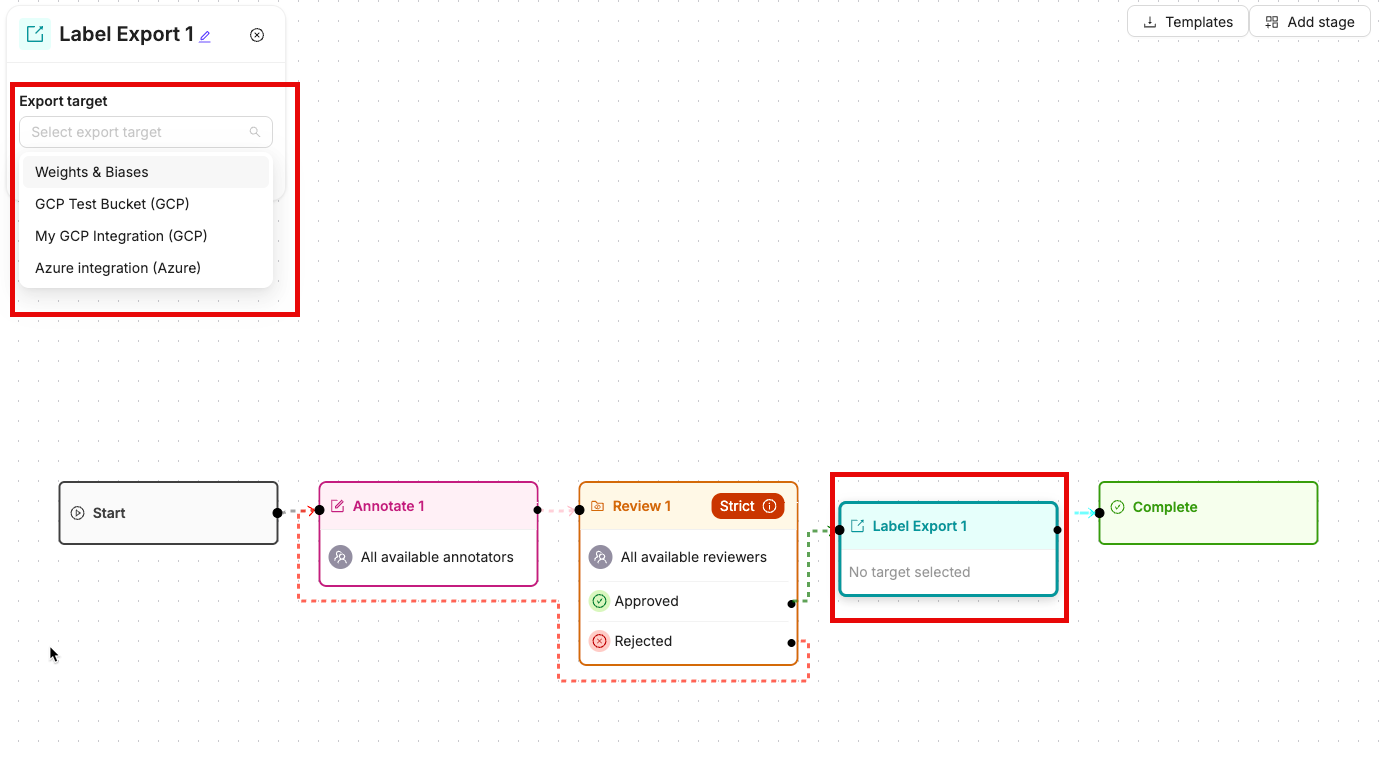
Connect an [**Export** stage](/platform-documentation/Annotate/annotate-projects/annotate-workflows-and-templates#export) to your Workflow to automatically sync labels to your cloud storage as tasks move through it. Every task that passes through the Export stage is synced to your chosen storage destination. Once the sync completes, tasks automatically continue to the next stage in your Workflow.
This allows you to build a fully automated labeling pipeline, from task creation through to label delivery, without any manual exports.
### Prerequisites
1. Automatically exporting labels to cloud storage requires at least one cloud integration to be set up. Learn how to set up cloud integrations [here](/platform-documentation/General/annotate-data-integrations).
2. Your cloud storage integration must have **write permissions** enabled for the export to work. If you have an existing integration, ensure the integration you plan to use for export has write permissions before connecting it to the Export stage.
### Setup
**When editing, or creating a Workflow**:
1. Add and connect an **Export** stage to your Workflow.
2. Click the **Export** stage to open its configuration panel.
3. Select the cloud storage integration you want to export to from the dropdown menu.
4. Add a path to export to within your cloud storage. This is the folder path where labels are be exported to.
5. Select an export **Format**. The default is **Encord JSON**. Select **YOLO** to export labels in YOLO format directly to cloud storage.
### YOLO Format Export
When you select **YOLO** as the export format, an additional **Class mapping** selector appears. This selector lists the ontology external-ID namespaces configured on your Project's Ontology. Encord uses the selected namespace to map Ontology features to YOLO class numbers at export time.
YOLO class numbers are resolved live from the Ontology's external IDs each time a task is exported. YOLO class numbers are not snapshotted when you save the workflow node. If you update your Ontology's external IDs after configuring the node, the next export uses the updated mappings.
You must select a **Class mapping** namespace before you can save the workflow. If YOLO format is selected but no class mapping is chosen, Encord displays the validation error: *"YOLO export requires a class mapping to be selected."*
If no namespaces are configured on your Ontology, the **Class mapping** selector is disabled. You must configure YOLO class IDs on the Ontology before you can use YOLO export. Click **Configure Ontology Mapping** in the node settings panel to open the ontology's external IDs settings page and set up your class mappings.
After you select a namespace, the panel displays a preview of up to five Ontology feature-to-class-number mappings for the selected namespace.
YOLO format export using the cloud label-export workflow node requires the feature to be enabled on your account. Contact your Encord account team if this option is not visible in your workflow editor.
## Export Labels Manually
If using Windows, we recommend using [7-Zip](https://www.7-zip.org/) to unzip the exported labels.
Only Project admins can export labels
Descriptions of all information contained in the export file can be found [in the export file reference](/platform-documentation/Annotate/annotate-export/annotate-export-json).
To export labels for specific tasks:
1. Select the tasks
2. Click **Bulk actions**
3. Select **Export**
1. Click **Export** while in a Project.
The *Export labels* dialog appears.
2. Specify the following:
* **Format:** Specify the format to export the labels (JSON or COCO).
* **Stage:** Specify the Workflow stage to export the labels from.
* **Generate signed URLs:** Specify whether to generate signed URLs for the data units that have labels.
Enabling this option can significantly increase export times.
* **Save as new version:** Specify to version the labels.
* Provide a meaningful name for the label version.
* **Labels to include:** Specify the labels to include. You can export all labels or select specific object or classification labels to export.
3. Click **Export**.
A *Labels export in progress* toast message appears.
### Data Group Label Format Options
When exporting labels, you can choose between two data group label formats:
* **New**: The recommended format that organizes data group labels in the parent row for improved structure and performance.
* **Legacy**: The previous format that places data group labels in children rows. This option is available for backward compatibility.
The **New** format is selected by default and is recommended for all new exports. The **Legacy** format will be removed in a future update.
The Data Group label format option appears in the export configuration dialog alongside other export settings like format type and workflow stage selection.