> ## Documentation Index
> Fetch the complete documentation index at: https://docs.encord.com/llms.txt
> Use this file to discover all available pages before exploring further.
# Datasets
Datasets are subsets of your files that can be attached to one or more Projects for annotation. Datasets are created from files you upload to Encord.
## Creating Datasets
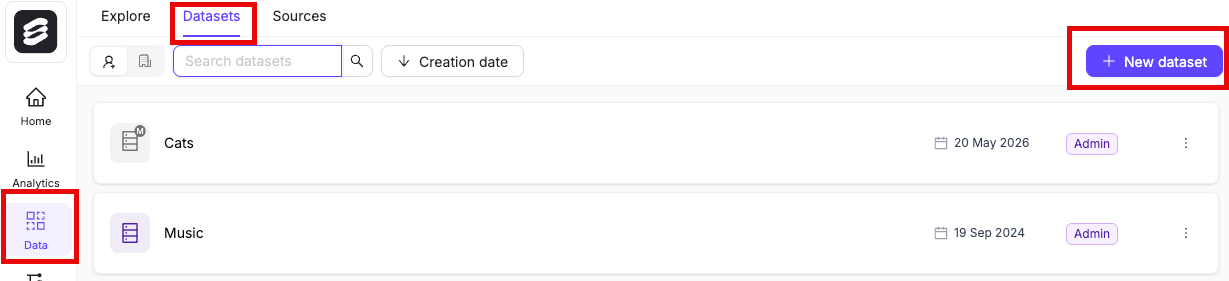
1. Click the **New dataset** button in **Data** > **Datasets**.
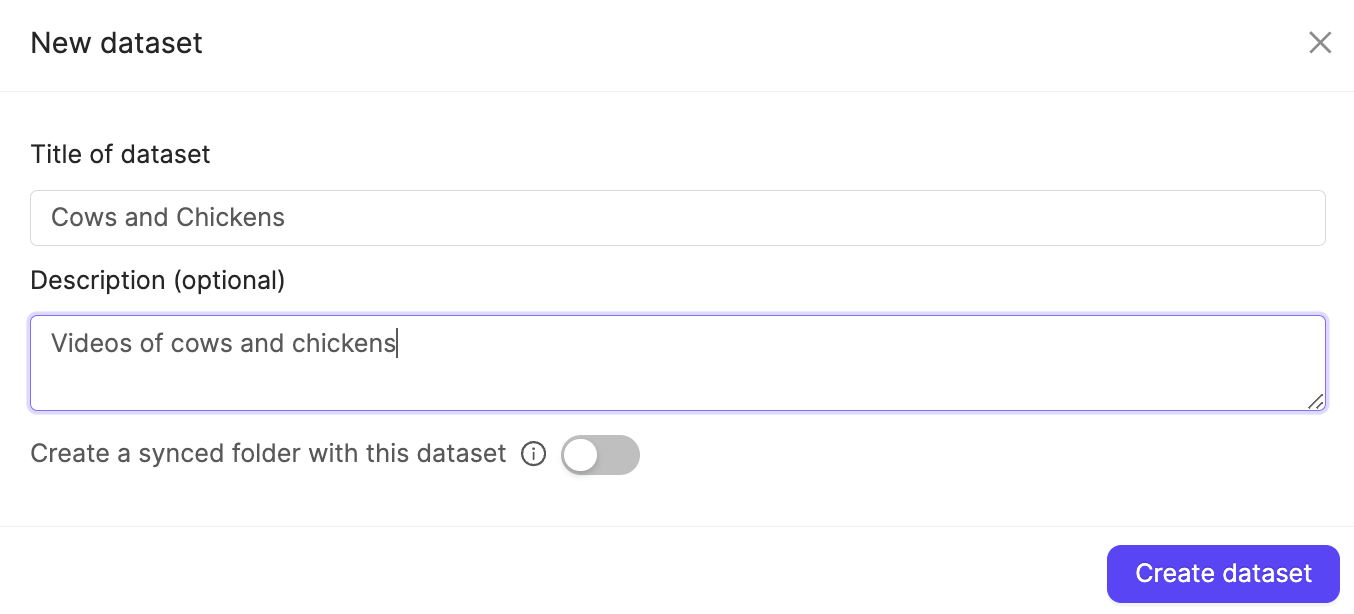
2. Give your Dataset a meaningful title and description. A clear title and description keeps your data organized.
Toggle **Looking to create a mirrored dataset?** to create a [Mirrored Dataset](/platform-documentation/Annotate/annotate-datasets/annotate-datasets#mirrored-datasets).
3. Click **Create dataset** to create the Dataset.
## Attach Data
After a Dataset has been created, you can attach data.
To ensure smoother uploads and faster completion times, and avoid hitting absolute file limits, we recommend adding smaller batches of data. Limit uploads to 100 videos or up to 1,000 images at a time. You can also create multiple Datasets, all of which can be linked to a single Project. Familiarize yourself with our [limits and best practices for data import and registration](/platform-documentation/General/best-practices#import-into-encord) before adding data to Encord.
1. Navigate to **Data** > **Datasets**
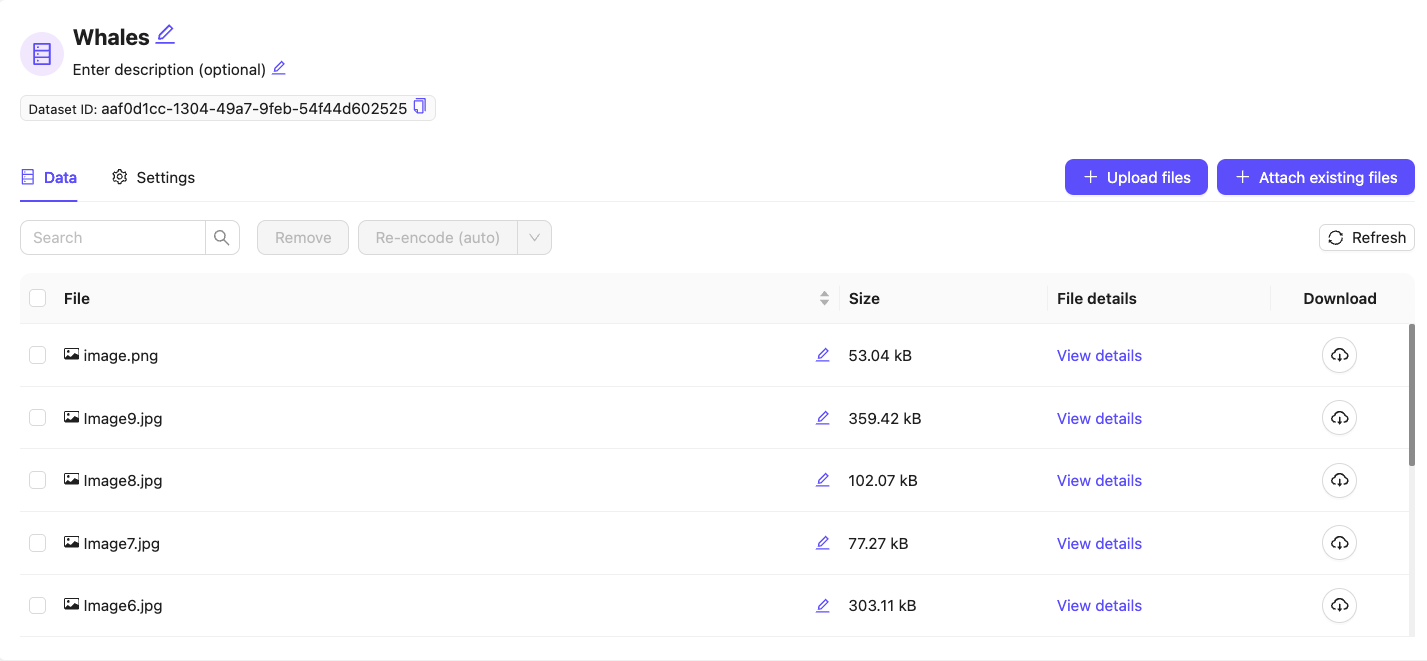
2. Click the Dataset you want to add data to.
3. Click **+Attach existing files**.
4. Select the folders containing the files you want to attach to the Dataset. To select individual files, double-click a folder to see its contents, and select the files you want to add to the Dataset.
5. Click **Attach data** to attach the selected files to the Dataset.
***
## Attach Dataset to Project
You can attach Datasets (mirrored and static) to Projects, you own, directly from the summary page for the Dataset.
Empty Datasets can be added to Projects you own.
1. Navigate to **Annotate** > **Datasets**.
2. Click the Dataset you want to attach to a Project you own.
3. Click the **Attach to project** button.
A list of the Projects you own appears.
4. Search for a Project from the Project list.
5. Click the Project you want to attach the Dataset to.
A popup appears confirming the Dataset attached to the Project.
***
## Register Cloud Data to Datasets
We recommend registering files in batches not exceeding 2GB, to ensure upload does not exceed 3 hours.
1. [Create a Dataset](/platform-documentation/Annotate/annotate-datasets/annotate-datasets#creating-datasets).
2. Select the Dataset you want to add data to.
3. Click **+ Add data**.
4. Select a folder to store the files in, or create a new folder.
5. Select the *Import from private cloud* tab and select the integration you want to use.
6. Click **Add JSON or CSV files** to upload a [JSON](/platform-documentation/Curate/add-files/index-register-cloud-data#json-format) or [CSV](/platform-documentation/Curate/add-files/index-register-cloud-data#csv-format) file specifying the cloud data that is to be added to the Dataset. Turn on the **Ignore individual file errors** toggle to ignore errors caused by files not supported by Encord.
We recommend enabling the **Ignore individual file errors** toggle. This ensures that the entire upload does not fail if only one file cannot be added.
7. Click **Import** to add your cloud data to the Dataset.
The data is fetched from your cloud storage and processed asynchronously. This involves fetching appropriate metadata and other file information to help us render the files appropriately and to check for any framerate inconsistencies. We do not store your files in any way.
***
## Mirrored Datasets
Mirrored datasets simplify setup at the cost of flexibility. If you need more control over your data, use a standard folder and Dataset instead.
A mirrored Dataset is a dataset backed by a folder. The Dataset and its backing folder are kept in sync automatically and changes made to either are reflected in the other. The mirroring is continuous and automatic.
* Files cannot be added to multiple Datasets.
* Every file added to the dataset appears in the backing folder.
* Every file added to the backing folder appears in the Dataset.
* Deletions are mirrored in both directions.
***
## Entity Relationships
The following diagram illustrates how Datasets relate to other entities in Encord.
The following diagram shows how entities in Encord are organized.
```mermaid theme={"dark"}
erDiagram
Project {
string project_hash
}
DataUnit {
string data_hash
string data_title
string client_metadata
}
Dataset {
string dataset_hash
string dataset_title
}
Ontology {
string ontology_hash
string ontology_name
string ontology_description
}
Workflow {
string workflow_hash
}
Collaborator {
string user
}
Project ||--o| Dataset : "attaches"
Project ||--o| Ontology : "attaches"
Project ||--o| Workflow : "follows"
Project ||--o{ Collaborator : "includes"
Dataset ||--o{ DataUnit : "composed of"
```
* Projects bring together Ontologies, Datasets, Workflows, and collaborators.
* A Project can have multiple Datasets attached to it, but only one Ontology.
* One Ontology can be attached to multiple Projects.
***
## Roles and Permissions
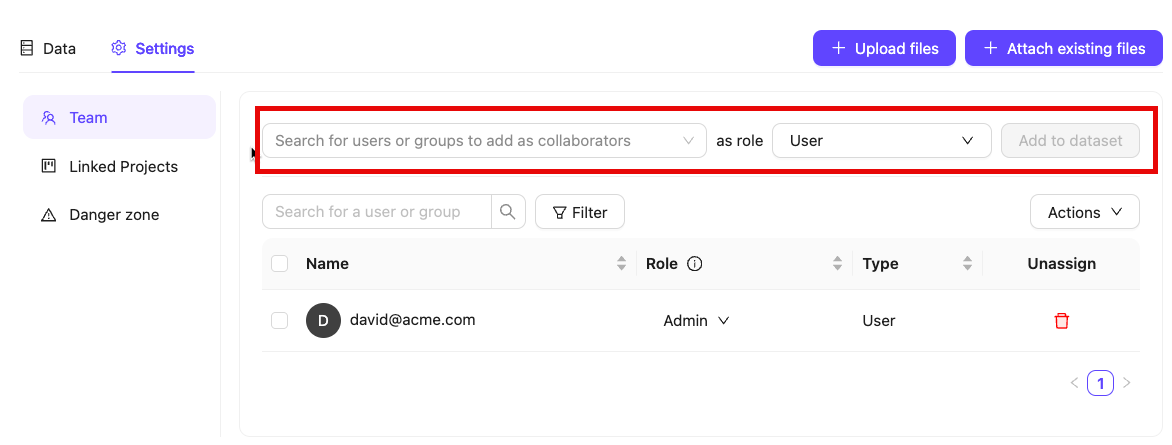
Collaborator permissions can be set in the *Team* section of the Dataset *Settings*.
| Permission | Admin | Viewer |
| --------------- | ----- | ------ |
| View dataset | ✅ | ✅ |
| Add data | ✅ | ❌ |
| Adjust settings | ✅ | ❌ |
***
## Manage Files and Users
To manage a Dataset's files and users, select it from the list.
* The **Data tab** handles file management and displays the exact count of items in your Dataset
* The **Settings tab** is for user management, viewing linked Projects, and deleting the Dataset.
The **Data tab** shows the precise number of items in your Dataset. For example, displaying `1,234 items` instead of `1.2k items`.
**To add collaborators to the Dataset**:
1. Search for the collaborator or the [group](/platform-documentation/General/general-workspace-settings#user-groups) you want to add. Multiple collaborators and groups can be added at once.
Only group members are added when a group is assigned to a Project. Group managers are not included.
2. Select a user role.
* **User**: Can view the Dataset and attach it to Projects.
* **Admin**: Grants full administrative control over the Dataset.
3. Click **Add to dataset**.
* Change a user's role by clicking their role in the *Role* column and selecting a new one.
* Remove users by clicking the *Delete* icon in the *Unassign* column.
***
## Automated Data Flows
Datasets linked to auto sync folders with continuous data flows enabled display a section called "Automated data flow enabled" that show a green "Live" indicator. This helps you quickly identify that the Dataset is receiving automated data processing.
***
## Delete Dataset
Use the *Danger zone* pane in **Settings** to delete Datasets.
 Click the **Delete dataset** button to delete the entire Dataset. You are prompted to type the word 'delete' into the resulting pop-up to delete the Dataset.
Deleting a Dataset cannot be undone. Make sure you want to perform this action before continuing.
***
## Joining Datasets in your Workspace
Workspace Admins can search for and join any Datasets that exist within the Workspace.
1. Navigate to **Data** > **Datasets** in the Encord platform.
2. Select the **All Encord datasets** tab.
3. Find the Dataset you want to join.
4. Click **Join dataset** to join the Dataset.
When a Workspace Admin joins a Dataset, they are automatically assigned the *Admin* [user role for that Dataset](/platform-documentation/Annotate/roles-and-permissions#datasets).
Datasets can be filtered by Dataset owner.
See all Datasets you belong to by clicking the *Filter by* search bar, and selecting *My datasets only*.
Click the **Delete dataset** button to delete the entire Dataset. You are prompted to type the word 'delete' into the resulting pop-up to delete the Dataset.
Deleting a Dataset cannot be undone. Make sure you want to perform this action before continuing.
***
## Joining Datasets in your Workspace
Workspace Admins can search for and join any Datasets that exist within the Workspace.
1. Navigate to **Data** > **Datasets** in the Encord platform.
2. Select the **All Encord datasets** tab.
3. Find the Dataset you want to join.
4. Click **Join dataset** to join the Dataset.
When a Workspace Admin joins a Dataset, they are automatically assigned the *Admin* [user role for that Dataset](/platform-documentation/Annotate/roles-and-permissions#datasets).
Datasets can be filtered by Dataset owner.
See all Datasets you belong to by clicking the *Filter by* search bar, and selecting *My datasets only*.