> ## Documentation Index
> Fetch the complete documentation index at: https://docs.encord.com/llms.txt
> Use this file to discover all available pages before exploring further.
# Audio for Direct Comparison (RLHF)
Encord’s multimodal platform and configurable label editor make it possible to support data curation and annotation workloads on various types of media, and in various annotation configurations. Follow the end to end walkthrough below to learn how to setup an Audio annotation workload where each task allows you to directly compare two audio files. This could be applicable for example when rating two audio files against each other, or in RLHF flows.
## STEP 1: Create Metadata Schema
The schema organizes your custom metadata. Encord supports:
* Scalars: Methods for filtering and specifying data for custom Label Editor layouts.
* Enums: Methods with options for filtering.
* Embeddings: Method for embedding plot visualization, similarity search, and natural language search.
### Custom metadata
Custom metadata can store any information which is not the data itself in a key-value format. Custom metadata is often used to describe information useful in curation and management at scale. Encord also uses metadata to create annotation specific layouts in the editor. You set up both using a metadata schema.
To handle your custom metadata schema across multiple teams within the same Workspace, we recommend using namespacing for metadata keys in the schema. This ensures that different teams can define and manage their own metadata schema without conflicts. For example, team A could use `video.description`, while team B could use `audio.description`. Another example could be `TeamName.MetadataKey`. This approach maintains clarity and avoids key collisions across departments.
### Metadata schema table
Metadata Schema keys support letters (a-z, A-Z), numbers (0-9), and blank spaces ( ), hyphens (-), underscores (\_), and periods (.). Metadata schema keys are case sensitive.
Use `add_scalar` to add a scalar key to your metadata schema.
| Scalar Key | Description | Display Benefits |
| ---------- | ------------------------------------------------------------------------------------------------------------------------------------------------------------------------------------------ | ------------------------------------------------------------------------------------- |
| boolean | Binary data type with values "true" or "false". | Filtering by binary values |
| datetime | ISO 8601 formatted date and time. | Filtering by time and date |
| number | Numeric data type supporting float values. | Filtering by numeric values |
| uuid | UUIDv4 formatted unique identifier for a data unit. | Filtering by customer specified unique identifier |
| varchar | Textual data type. Formally `string`. `string` can be used as an alias for `varchar`, but we STRONGLY RECOMMEND that you use `varchar`. | **Displaying data correctly in custom Label Editor layouts** and filtering by string. |
| text | Text data with unlimited length (example: transcripts for audio). Formally `long_string`. `long_string` can be used as an alias for `text`, but we STRONGLY RECOMMEND that you use `text`. | Storing and filtering large amounts of text. |
Use `add_enum` and `add_enum_options` to add an enum and enum options to your metadata schema.
| Key | Description | Display Benefits |
| ---- | ---------------------------------------------- | ----------------------------------------------------- |
| enum | Enumerated type with predefined set of values. | Facilitates categorical filtering and data validation |
Use `add_embedding` to add an embedding to your metadata schema.
| Key | Description | Display Benefits |
| --------- | ----------------------------------------- | --------------------------------------------------------------------------------------- |
| embedding | 1 to 4096 for Index. 1 to 2000 for Active | Filtering by embeddings, similarity search, 2D scatter plot visualization (Coming Soon) |
Incorrectly specifying a data type in the schema can cause errors when filtering your data in Index or Active. If you encounter errors while filtering, verify your schema is correct. If your schema has errors, correct the errors, re-import the schema, and then re-sync your Active Project.
### Import your metadata schema to Encord
```python Import schema template theme={"dark"}
# Import dependencies
from encord import EncordUserClient
from encord.metadata_schema import MetadataSchema
SSH_PATH = ""
# Authenticate with Encord using the path to your private key
user_client: EncordUserClient = EncordUserClient.create_with_ssh_private_key(
ssh_private_key_path=SSH_PATH
)
# Create the schema
metadata_schema = user_client.metadata_schema()
# Add various metadata fields
metadata_schema.add_scalar("metadata_1", data_type="boolean")
metadata_schema.add_scalar("metadata_2", data_type="datetime")
metadata_schema.add_scalar("metadata_3", data_type="number")
metadata_schema.add_scalar("metadata_4", data_type="uuid")
metadata_schema.add_scalar("metadata_5", data_type="varchar")
metadata_schema.add_scalar("metadata_6", data_type="text")
# Add an enum field
metadata_schema.add_enum("my-enum", values=["enum-value-01", "enum-value-02", "enum-value-03"])
# Add embedding fields
metadata_schema.add_embedding('my-test-active-embedding', size=512)
metadata_schema.add_embedding('my-test-index-embedding', size=)
# Save the schema
metadata_schema.save()
# Print the schema for verification
print(metadata_schema)
```
```python Example theme={"dark"}
# Import dependencies
from encord import EncordUserClient
from encord.metadata_schema import MetadataSchema
SSH_PATH = "/Users/chris-encord/ssh-private-key.txt"
# Authenticate with Encord using the path to your private key
user_client: EncordUserClient = EncordUserClient.create_with_ssh_private_key(
ssh_private_key_path=SSH_PATH
)
# Create the schema
metadata_schema = user_client.metadata_schema()
# Add various metadata fields
metadata_schema.add_scalar("G2G", data_type="boolean")
metadata_schema.add_scalar("Date", data_type="datetime")
metadata_schema.add_scalar("Cost", data_type="number")
metadata_schema.add_scalar("Priority", data_type="number")
metadata_schema.add_scalar("ID-Sys-01", data_type="uuid")
metadata_schema.add_scalar("ID-Sys-02", data_type="uuid")
metadata_schema.add_scalar("Description", data_type="varchar")
metadata_schema.add_scalar("Location", data_type="varchar")
metadata_schema.add_scalar("Translation en-gb", data_type="text")
metadata_schema.add_scalar("Translation en-ca", data_type="text")
metadata_schema.add_scalar("Translation en-us", data_type="text")
metadata_schema.add_scalar("Translation zh-tw", data_type="text")
metadata_schema.add_scalar("Translation zh-hk", data_type="text")
metadata_schema.add_scalar("Translation zh-cn", data_type="text")
# Add an enum field
metadata_schema.add_enum("Ready", values=["ripe", "partially-ripe", "unripe"])
metadata_schema.add_enum("Fruit", values=["Blueberries", "Cherries", "Apples", "Kiwi"])
# Add embedding fields
metadata_schema.add_embedding('active-embedding-01', size=512)
metadata_schema.add_embedding('active-embedding-02', size=512)
metadata_schema.add_embedding('index-embedding-100', size=100)
metadata_schema.add_embedding('index-embedding-1000', size=1000)
# Save the schema
metadata_schema.save()
# Print the schema for verification
print(metadata_schema)
```
***
## STEP 2: Create JSON for Import
For a list of supported file formats for each data type, go [here](/platform-documentation/General/general-supported-data).
Waveform generation for long audio files can cause lag. To avoid this, generate the waveform offline and upload it with the audio file. For more information go [here](/platform-documentation/Curate/index-audio#long-audio-files).
The following is an example JSON file for uploading two audio files to Encord. Both files include `clientMetadata` to ensure they display correctly in custom Label Editor layouts.
* The `"encord-layout-group"` key determines which files are shown together — files with the same `"encord-layout-group"` value are displayed simultaneously. Both files in the example appears in the Label Editor simultaneously since they have the same `"encord-layout-group"` value.
* The `"encord-editor-grid-position"` key, set to either `A` or `B`, specifies the exact position of each file within the label editor.
One audio file includes `audioMetadata` and one does not.
We **strongly recommend** including `audioMetadata` with each audio file when importing your audio files at scale. Including `audioMetadata` significantly improves the import speed of data when importing data at scale. When the `audioMetadata` flag is present in the JSON file, we directly use the supplied metadata without performing any additional validation, and do not store the file on our servers. To guarantee accurate labels, it is crucial that the metadata you provide is accurate.
```json Template theme={"dark"}
{
"audio": [
{
"objectUrl": "
***
## STEP 3: Import your Audio files
You can import your audio data, using the JSON file you created, using the UI or the SDK.
### Import with the UI
To ensure smoother uploads and faster completion times, and avoid hitting absolute file limits, we recommend adding smaller batches of data. Limit uploads to 100 videos or up to 1,000 images at a time. You can also create multiple Datasets, all of which can be linked to a single Project. Familiarize yourself with our [limits and best practices for data import/registration](/platform-documentation/General/best-practices#import-into-encord) before adding data to Encord.
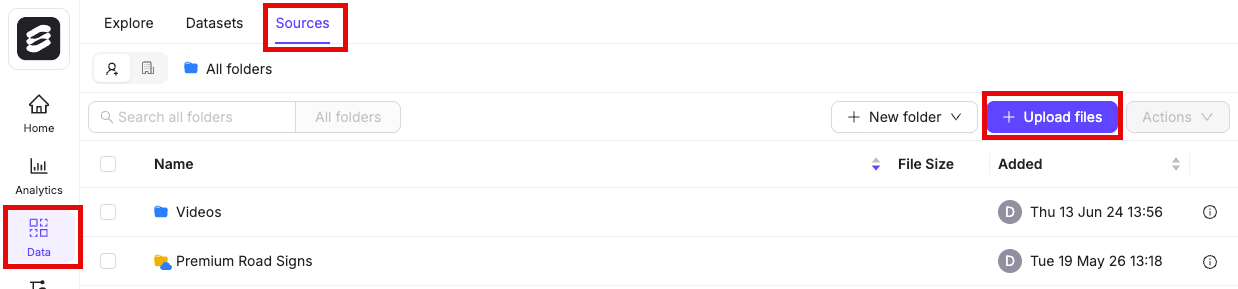
1. Navigate to **Data** > **Files & Folders** in the Encord platform.
2. Click into a Folder.
3. Click **+ Upload files**.
A dialog appears.
4. Click **Import from cloud data**.
We recommend turning on the **Ignore individual file errors** feature. This ensures that individual file errors do not lead to the whole upload process being aborted.
6. Click **Add JSON or CSV files** to add a [JSON](/platform-documentation/Curate/add-files/index-register-cloud-data#json-format) or [CSV](/platform-documentation/Curate/add-files/index-register-cloud-data#csv-format) file specifying cloud data that is to be added.
### Import with the SDK
To use your data in Encord, it must be uploaded to the Encord **Files & Folders** storage. Once uploaded, your data can be reused across multiple Projects and contain no labels or annotations themselves. **Files & Folders** stores your data, while *Projects* store your labels. The following script creates a folder in **Files & Folders** and uses your AWS integration to register data in that folder.
The following script creates a new folder in **Files & Folders** and initiates uploads from AWS. It works for all file types.
If `Upload is still in progress, try again later!` is returned, use the
[script to check the upload status](/sdk-documentation/getting-started-sdk/sdk-register-data-aws#step-5-check-data-upload) to see whether the upload has finished.
Ensure that you:
* Replace `` with the path to your private key.
* Replace `` with the title of the integration you want to use.
* Replace `` with the folder name. The scripts assume that the specified folder name is unique.
* Replace `path/to/json/file.json` with the path to a [JSON file specifying which cloud storage files should be uploaded](/platform-documentation/Curate/add-files/index-register-cloud-data#json-format).
* Replace `A folder to store my files` with a meaningful description for your folder.
* Replace `"my": "folder_metadata"` with any metadata you want to add to the folder.
The script has several possible outputs:
* "Upload is still in progress, try again later!": The registration has not finished. Run this script again later to check if the data registration has finished.
* "Upload completed": The registration completed. If any files failed to upload, the URLs are listed.
* "Upload failed": The entire registration failed, and not just individual files. Ensure your [JSON file](/platform-documentation/Curate/add-files/index-register-cloud-data#json-format) is formatted correctly.
```python Create folder and register cloud data theme={"dark"}
# Import dependencies
from encord import EncordUserClient
from encord.orm.dataset import LongPollingStatus # Ensure correct import path
# Instantiate user client. Replace with the path to your private key
user_client = EncordUserClient.create_with_ssh_private_key(
ssh_private_key_path=""
)
# Specify the integration you want to use
integrations = user_client.get_cloud_integrations()
integration_idx = [i.title for i in integrations].index("")
integration = integrations[integration_idx].id
# Create a storage folder
folder_name = ""
folder_description = "A folder to store my files"
folder_metadata = {"my": "folder_metadata"}
storage_folder = user_client.create_storage_folder(
folder_name, folder_description, client_metadata=folder_metadata
)
# Initiate cloud data registration
upload_job_id = storage_folder.add_private_data_to_folder_start(
integration_id=integration, private_files="path/to/json/file.json", ignore_errors=True
)
# Check upload status
res = storage_folder.add_private_data_to_folder_get_result(upload_job_id, timeout_seconds=5)
print(f"Execution result: {res}")
if res.status == LongPollingStatus.PENDING:
print("Upload is still in progress, try again later!")
elif res.status == LongPollingStatus.DONE:
print("Upload completed")
if res.unit_errors:
print("The following URLs failed to upload:")
for e in res.unit_errors:
print(e.object_urls)
else:
print(f"Upload failed: {res.errors}")
```
```Example output theme={"dark"}
add_private_data_to_dataset job started with upload_job_id=c4026edb-4fw2-40a0-8f05-a1af7f465727.
SDK process can be terminated, this will not affect successful job execution.
You can follow the progress in the web app via notifications.
add_private_data_to_dataset job completed with upload_job_id=c4026edb-4fw2-40a0-8f05-a1af7f465727.
```
***
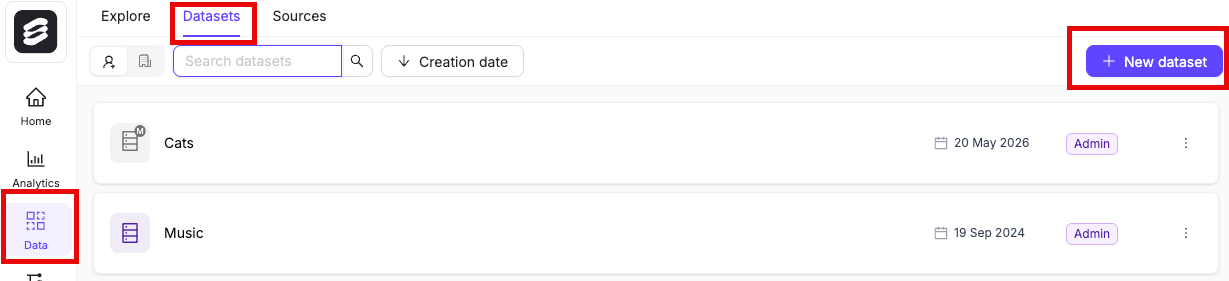
## STEP 4: Create a Dataset
1. Click the **New dataset** button in the *Datasets* section in *Annotate*.
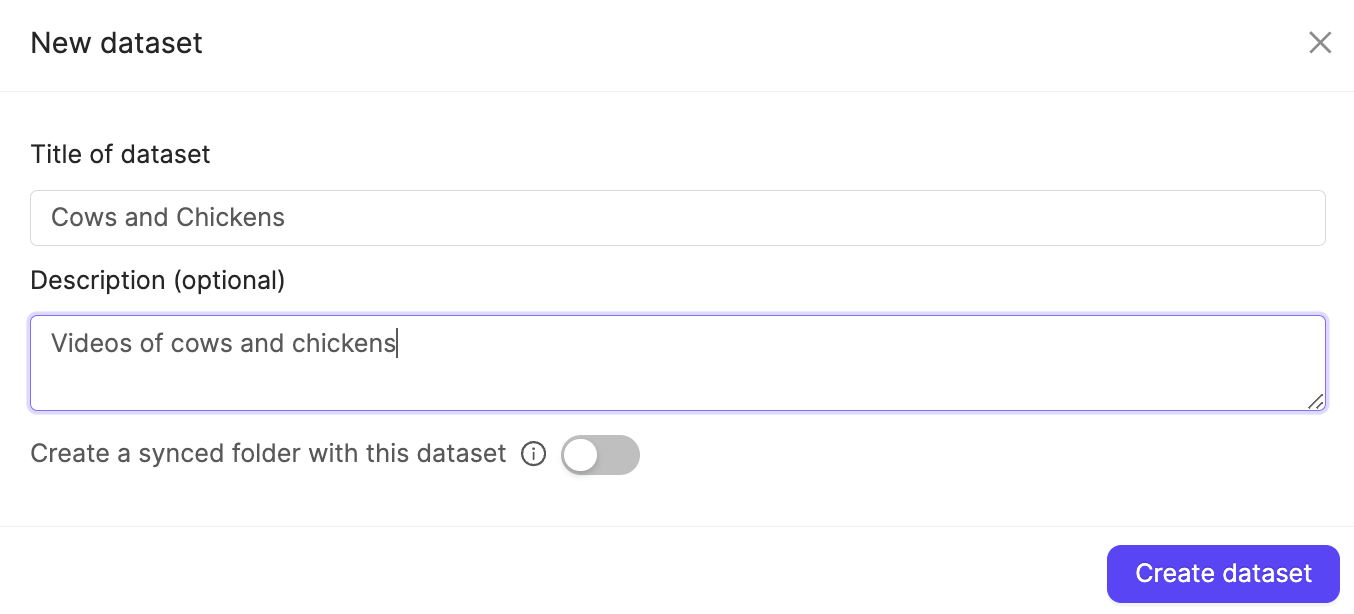
2. Give your Dataset a meaningful title and description. A clear title and description keeps your data organized.
Toggle **Looking to create a mirrored dataset?** to create a [Mirrored Dataset](/platform-documentation/Annotate/annotate-datasets/annotate-datasets#mirrored-datasets).
3. Click **Create dataset** to create the Dataset.
### Attach files
[You can add data to Datasets from the **Files & Folders** or the *Datasets* screens](/platform-documentation/Curate/index-files#add-data-to-datasets).To ensure smoother uploads and faster completion times, and avoid hitting absolute file limits, we recommend adding smaller batches of data. Limit uploads to 100 videos or up to 1,000 images at a time. You can also create multiple Datasets, all of which can be linked to a single Project. Familiarize yourself with our [limits and best practices for data import/registration](/platform-documentation/General/best-practices#import-into-encord) before adding data to Encord.
1. Navigate to the *Datasets* section under the *Annotate* heading.
2. Click the Dataset you want to attach data to.
3. Click **+Attach existing files**.
4. Select the folders containing the files you want to attach to the Dataset. To select individual files, double-click a folder to see its contents, and select the files you want to add to the Dataset.
5. Click **Attach data** to attach the selected files to the Dataset.
## STEP 5: Create an Ontology
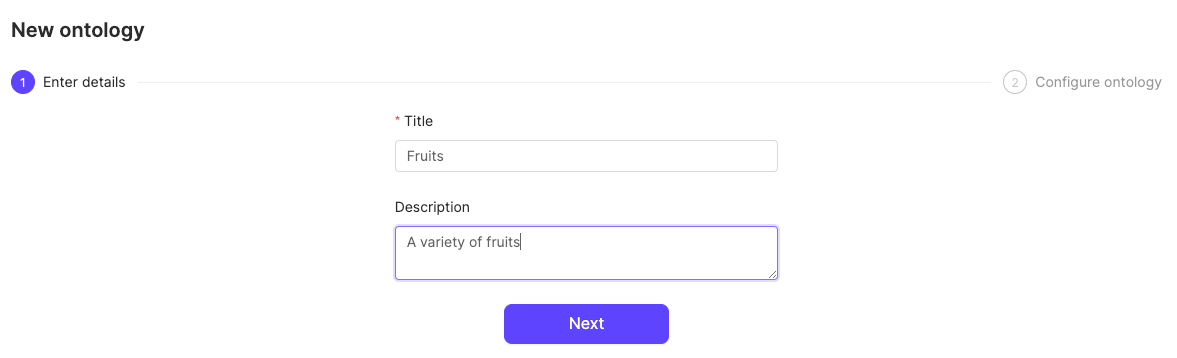
1. Click the **New ontology** button in the *Ontologies* section to create a new Ontology.
2. Give your Ontology a meaningful title and description. A clear title and description keeps your Ontologies organized. Click **Next** to continue.
3. Define your Ontology structure.
* Click **Add classification**
* Type 'Winner?'
* Click on **0 options** to configure options
* Click **Add option**
* Enter the word *Yes* as an option
* Click **Add option**
* Enter the word *No* as an option
* Click **Create ontology**
***
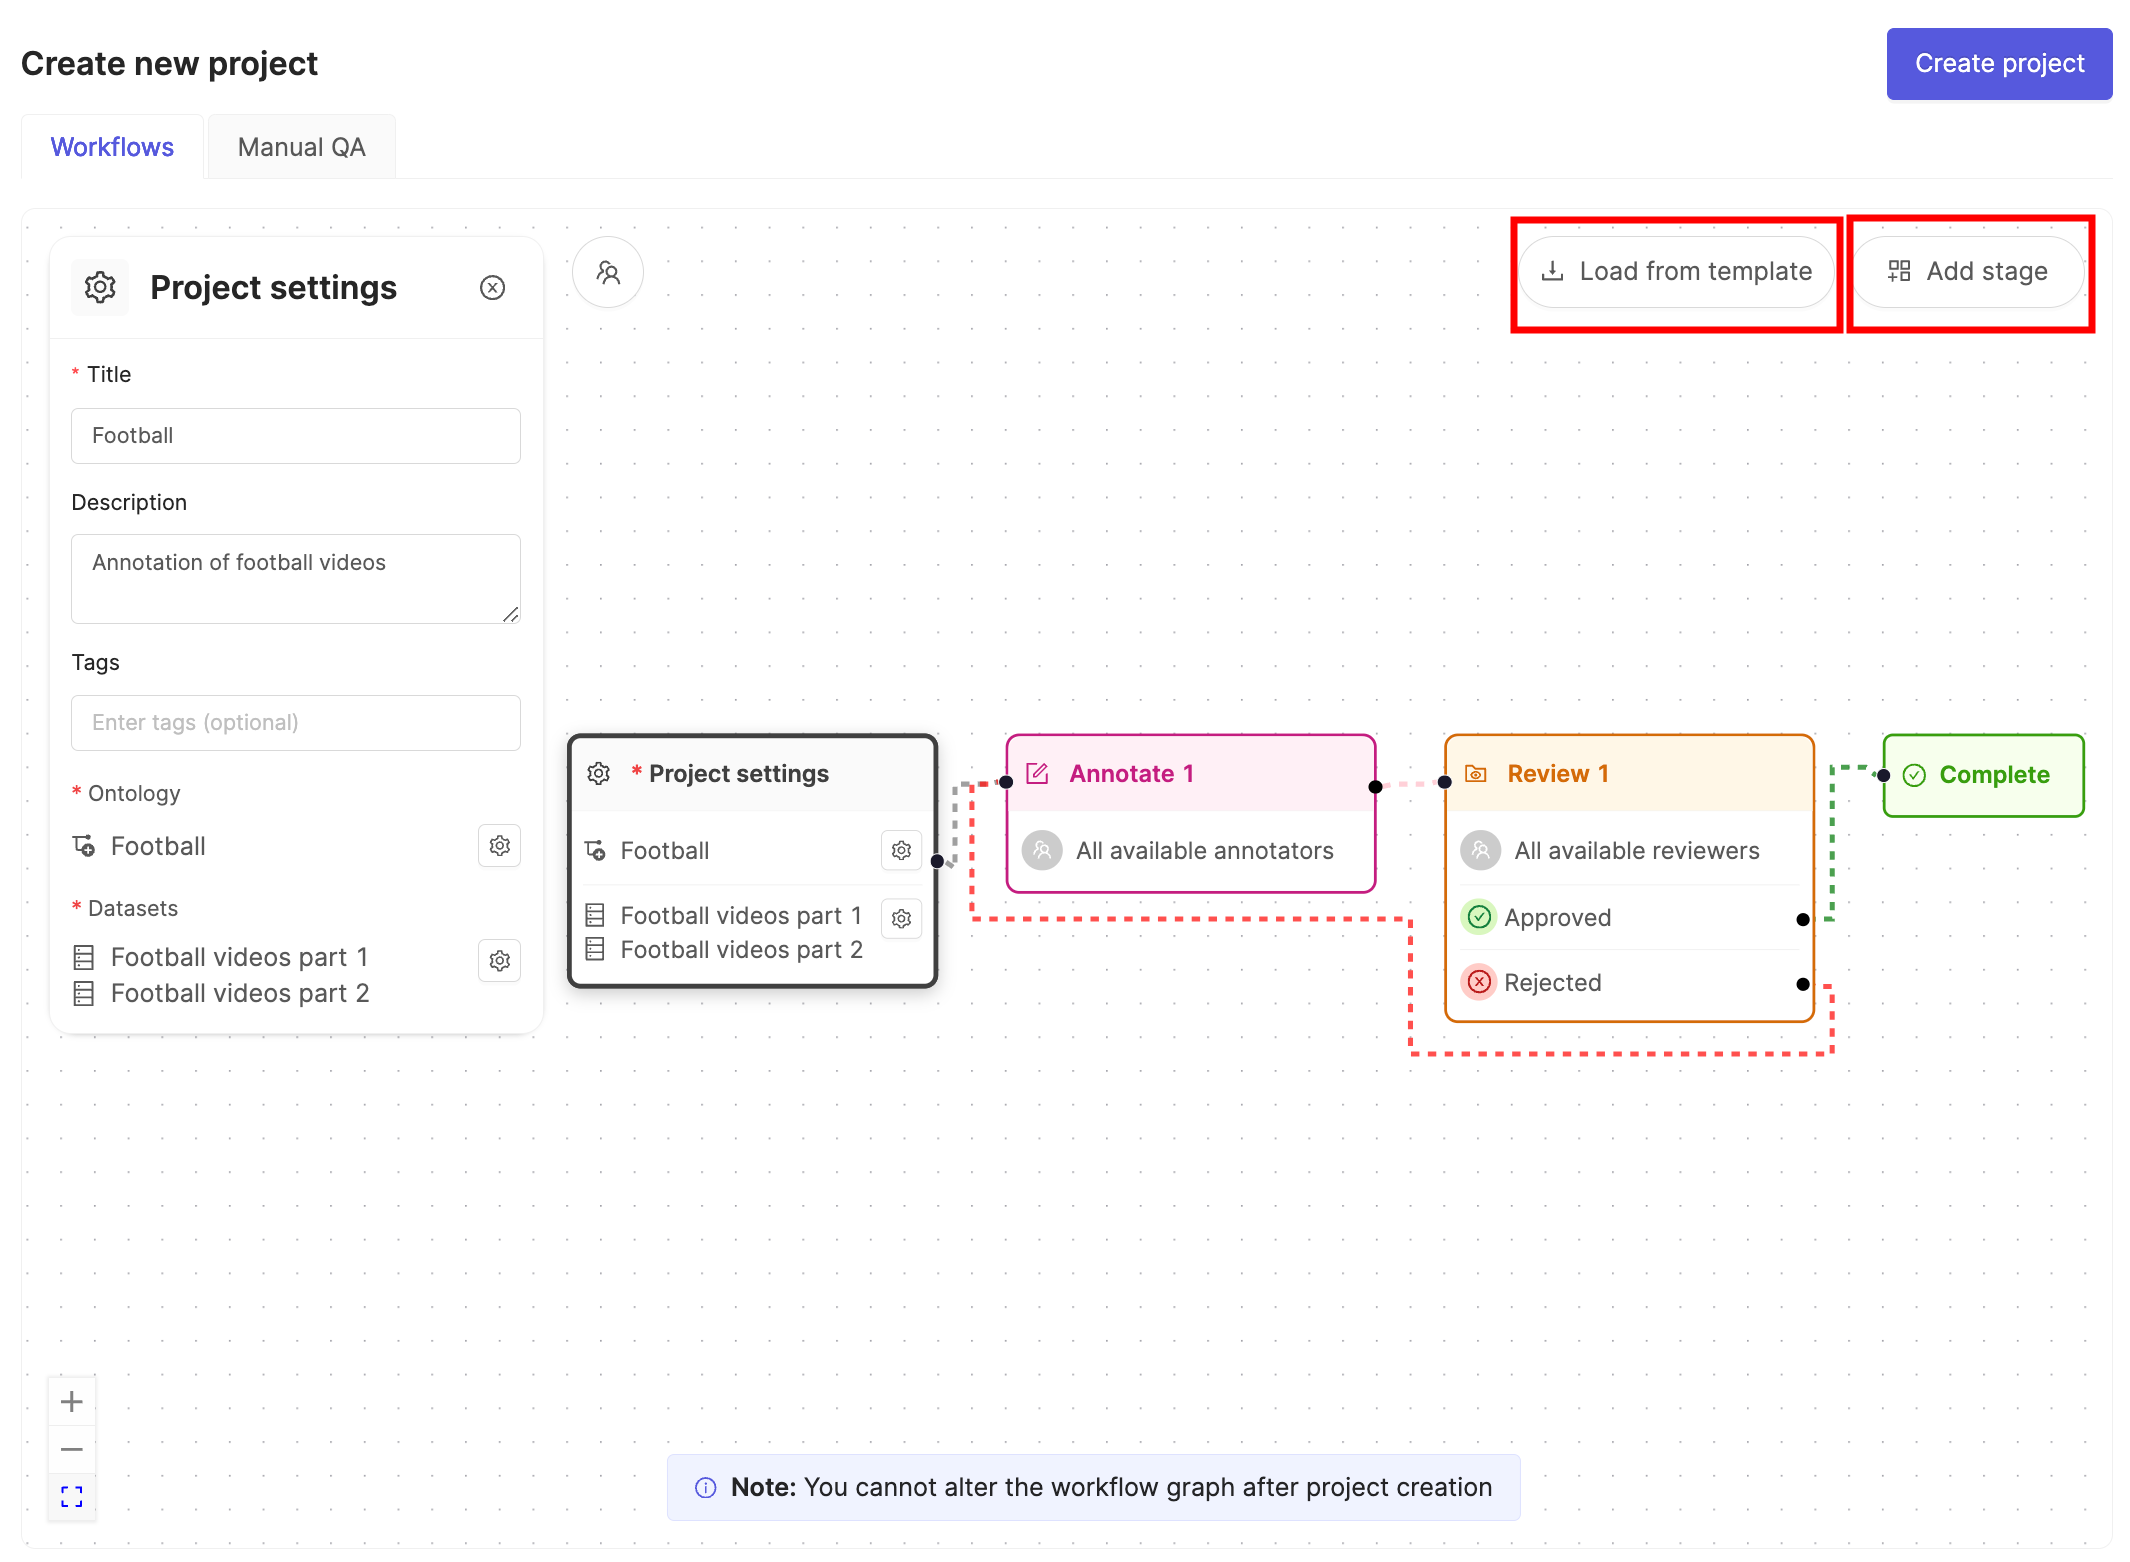
## STEP 6: Create a Project
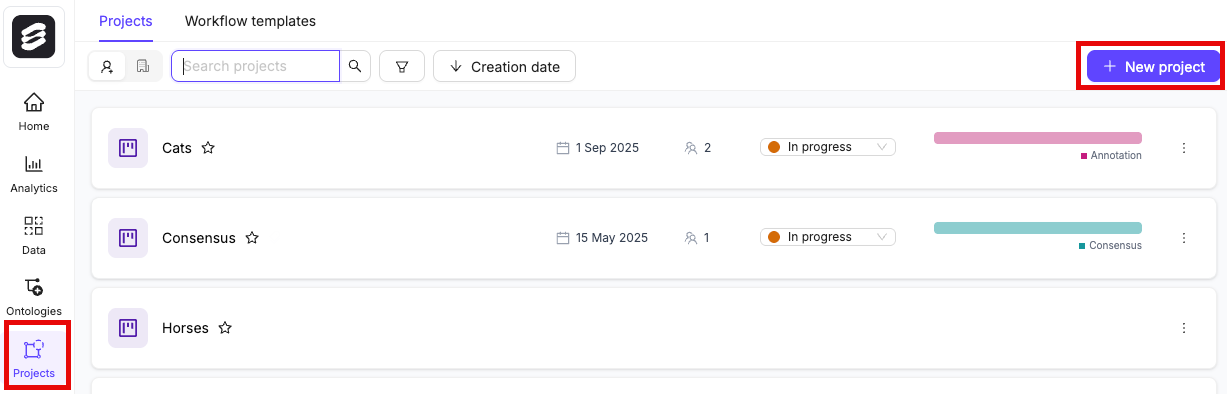
1. In the Encord platform, navigate to **Projects**.
2. Click the **+ New annotation project** button to create a new Project.
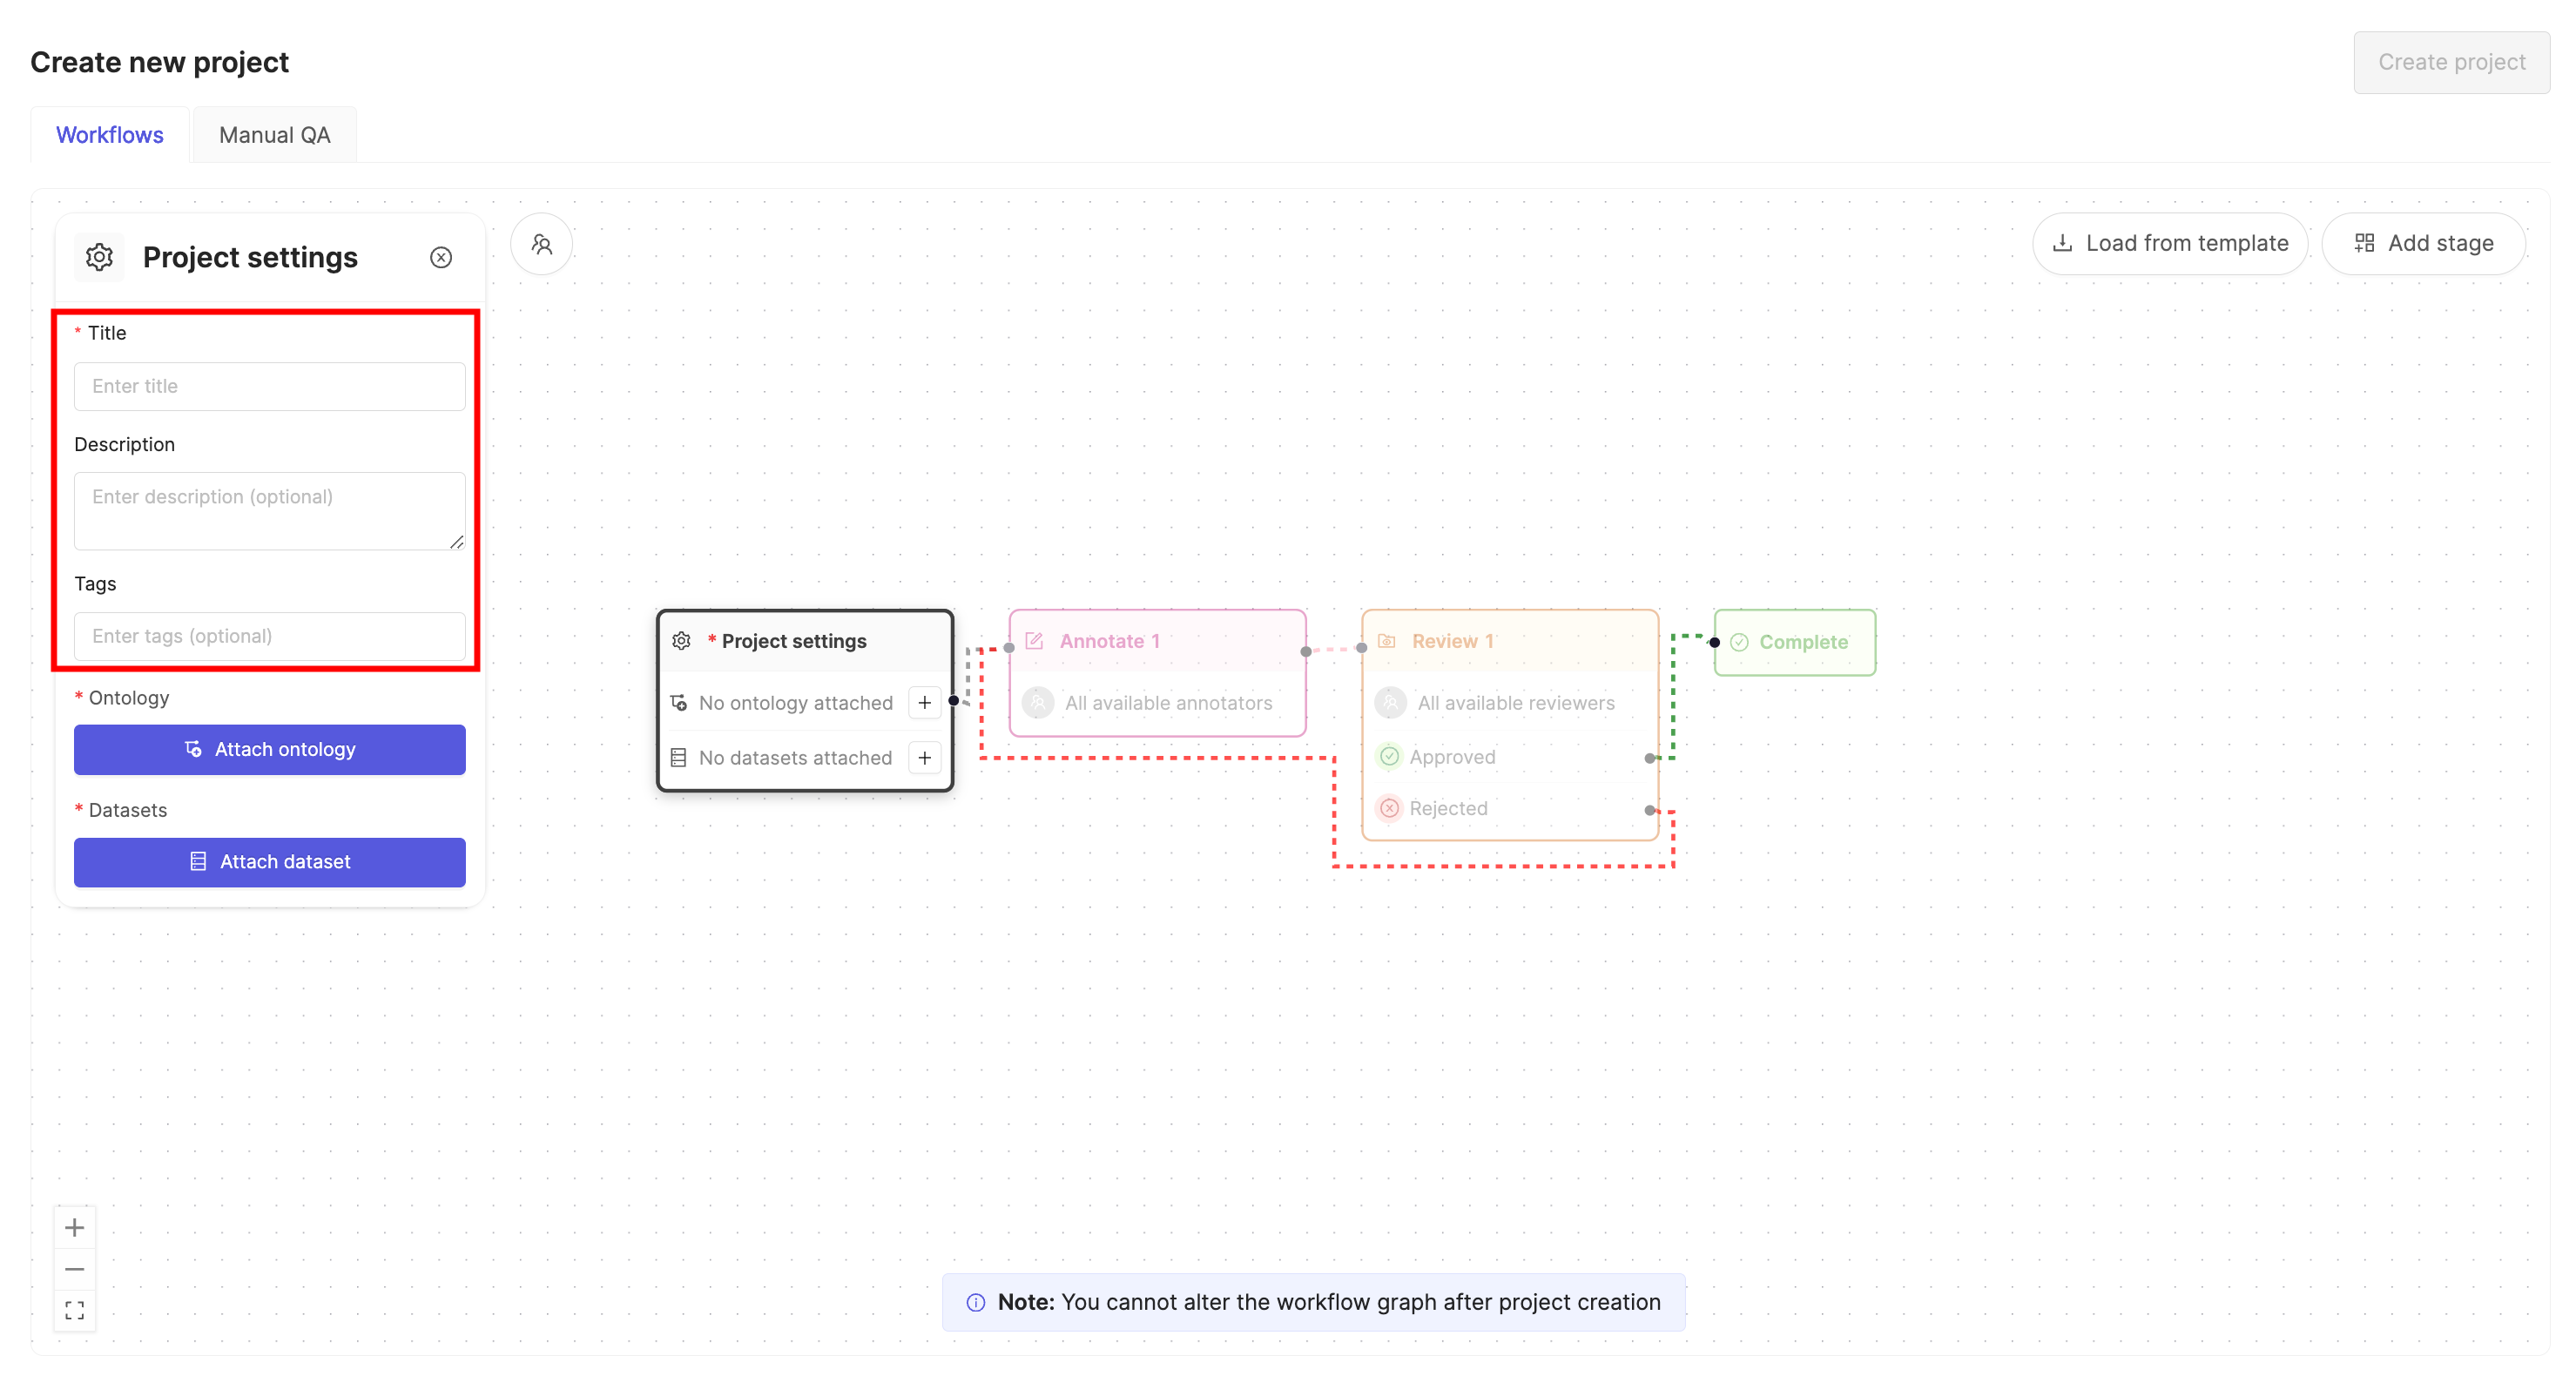
3. Give the Project a meaningful title and description.
An optional [Project tags](/platform-documentation/Annotate/annotate-projects/annotate-project-settings#project-tags) drop-down is visible. Project tags are useful for categorizing and finding your Projects. Select as many tags as are relevant for your Project.
4. Click the **Attach ontology** button.
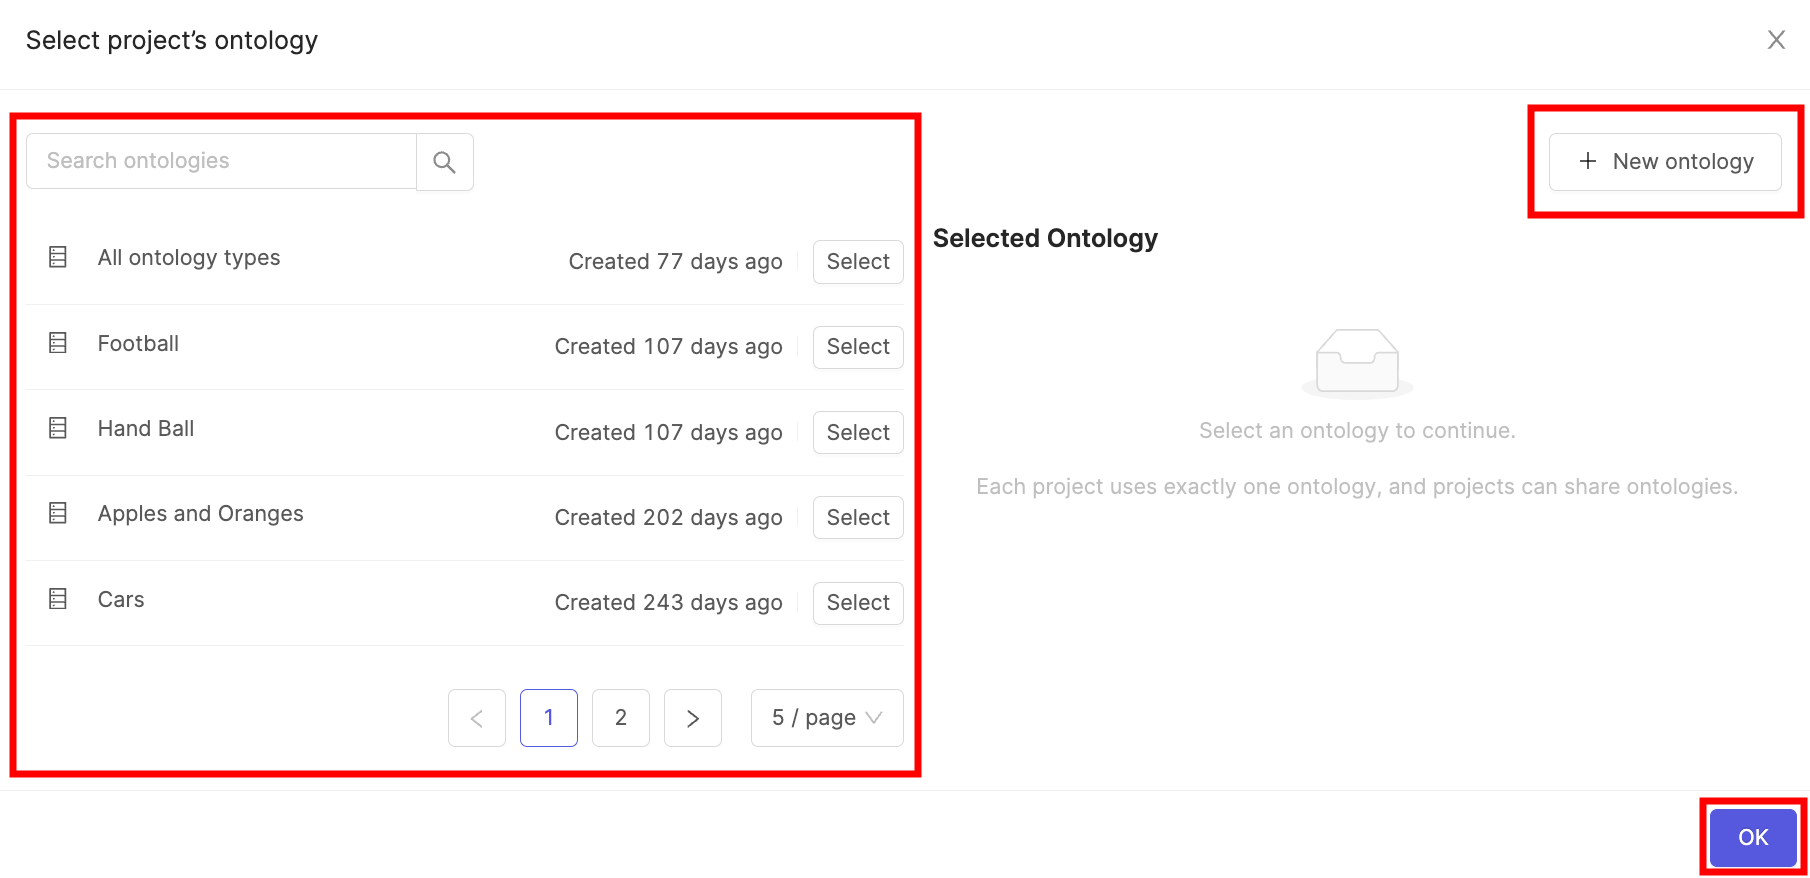
5. Select the Ontology you created in STEP 5 and click the **Attach** button.
6. Click **OK** to attach the Ontology to the Project.
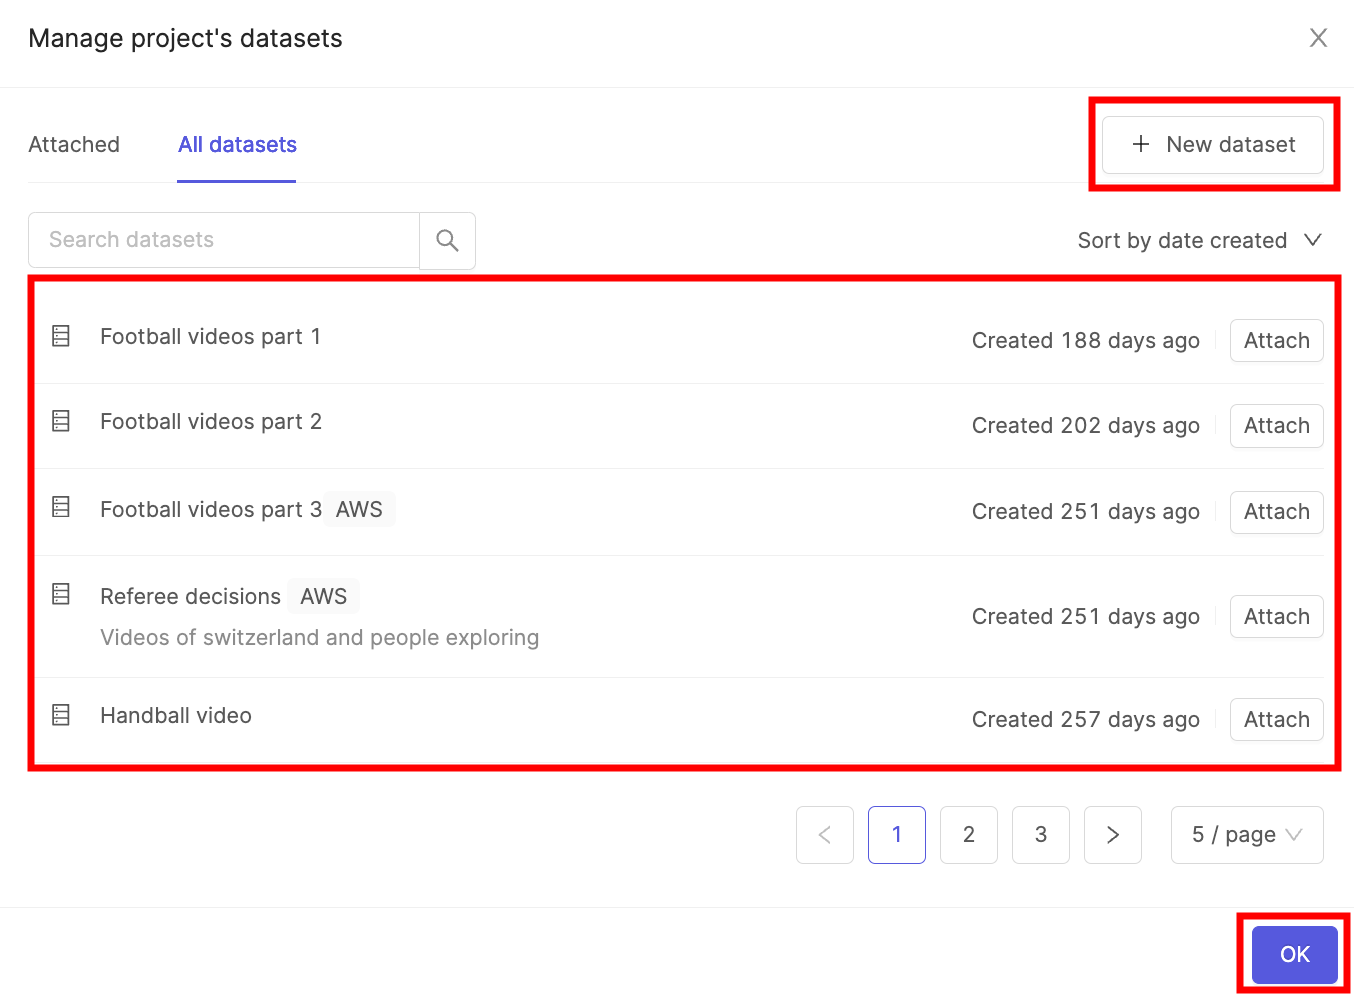
7. Click the **Attach datasets** button.
8. Select the Dataset you created in STEP 4 and click the **Attach** button.
9. Click **OK** to attach the Dataset(s) to the Project.
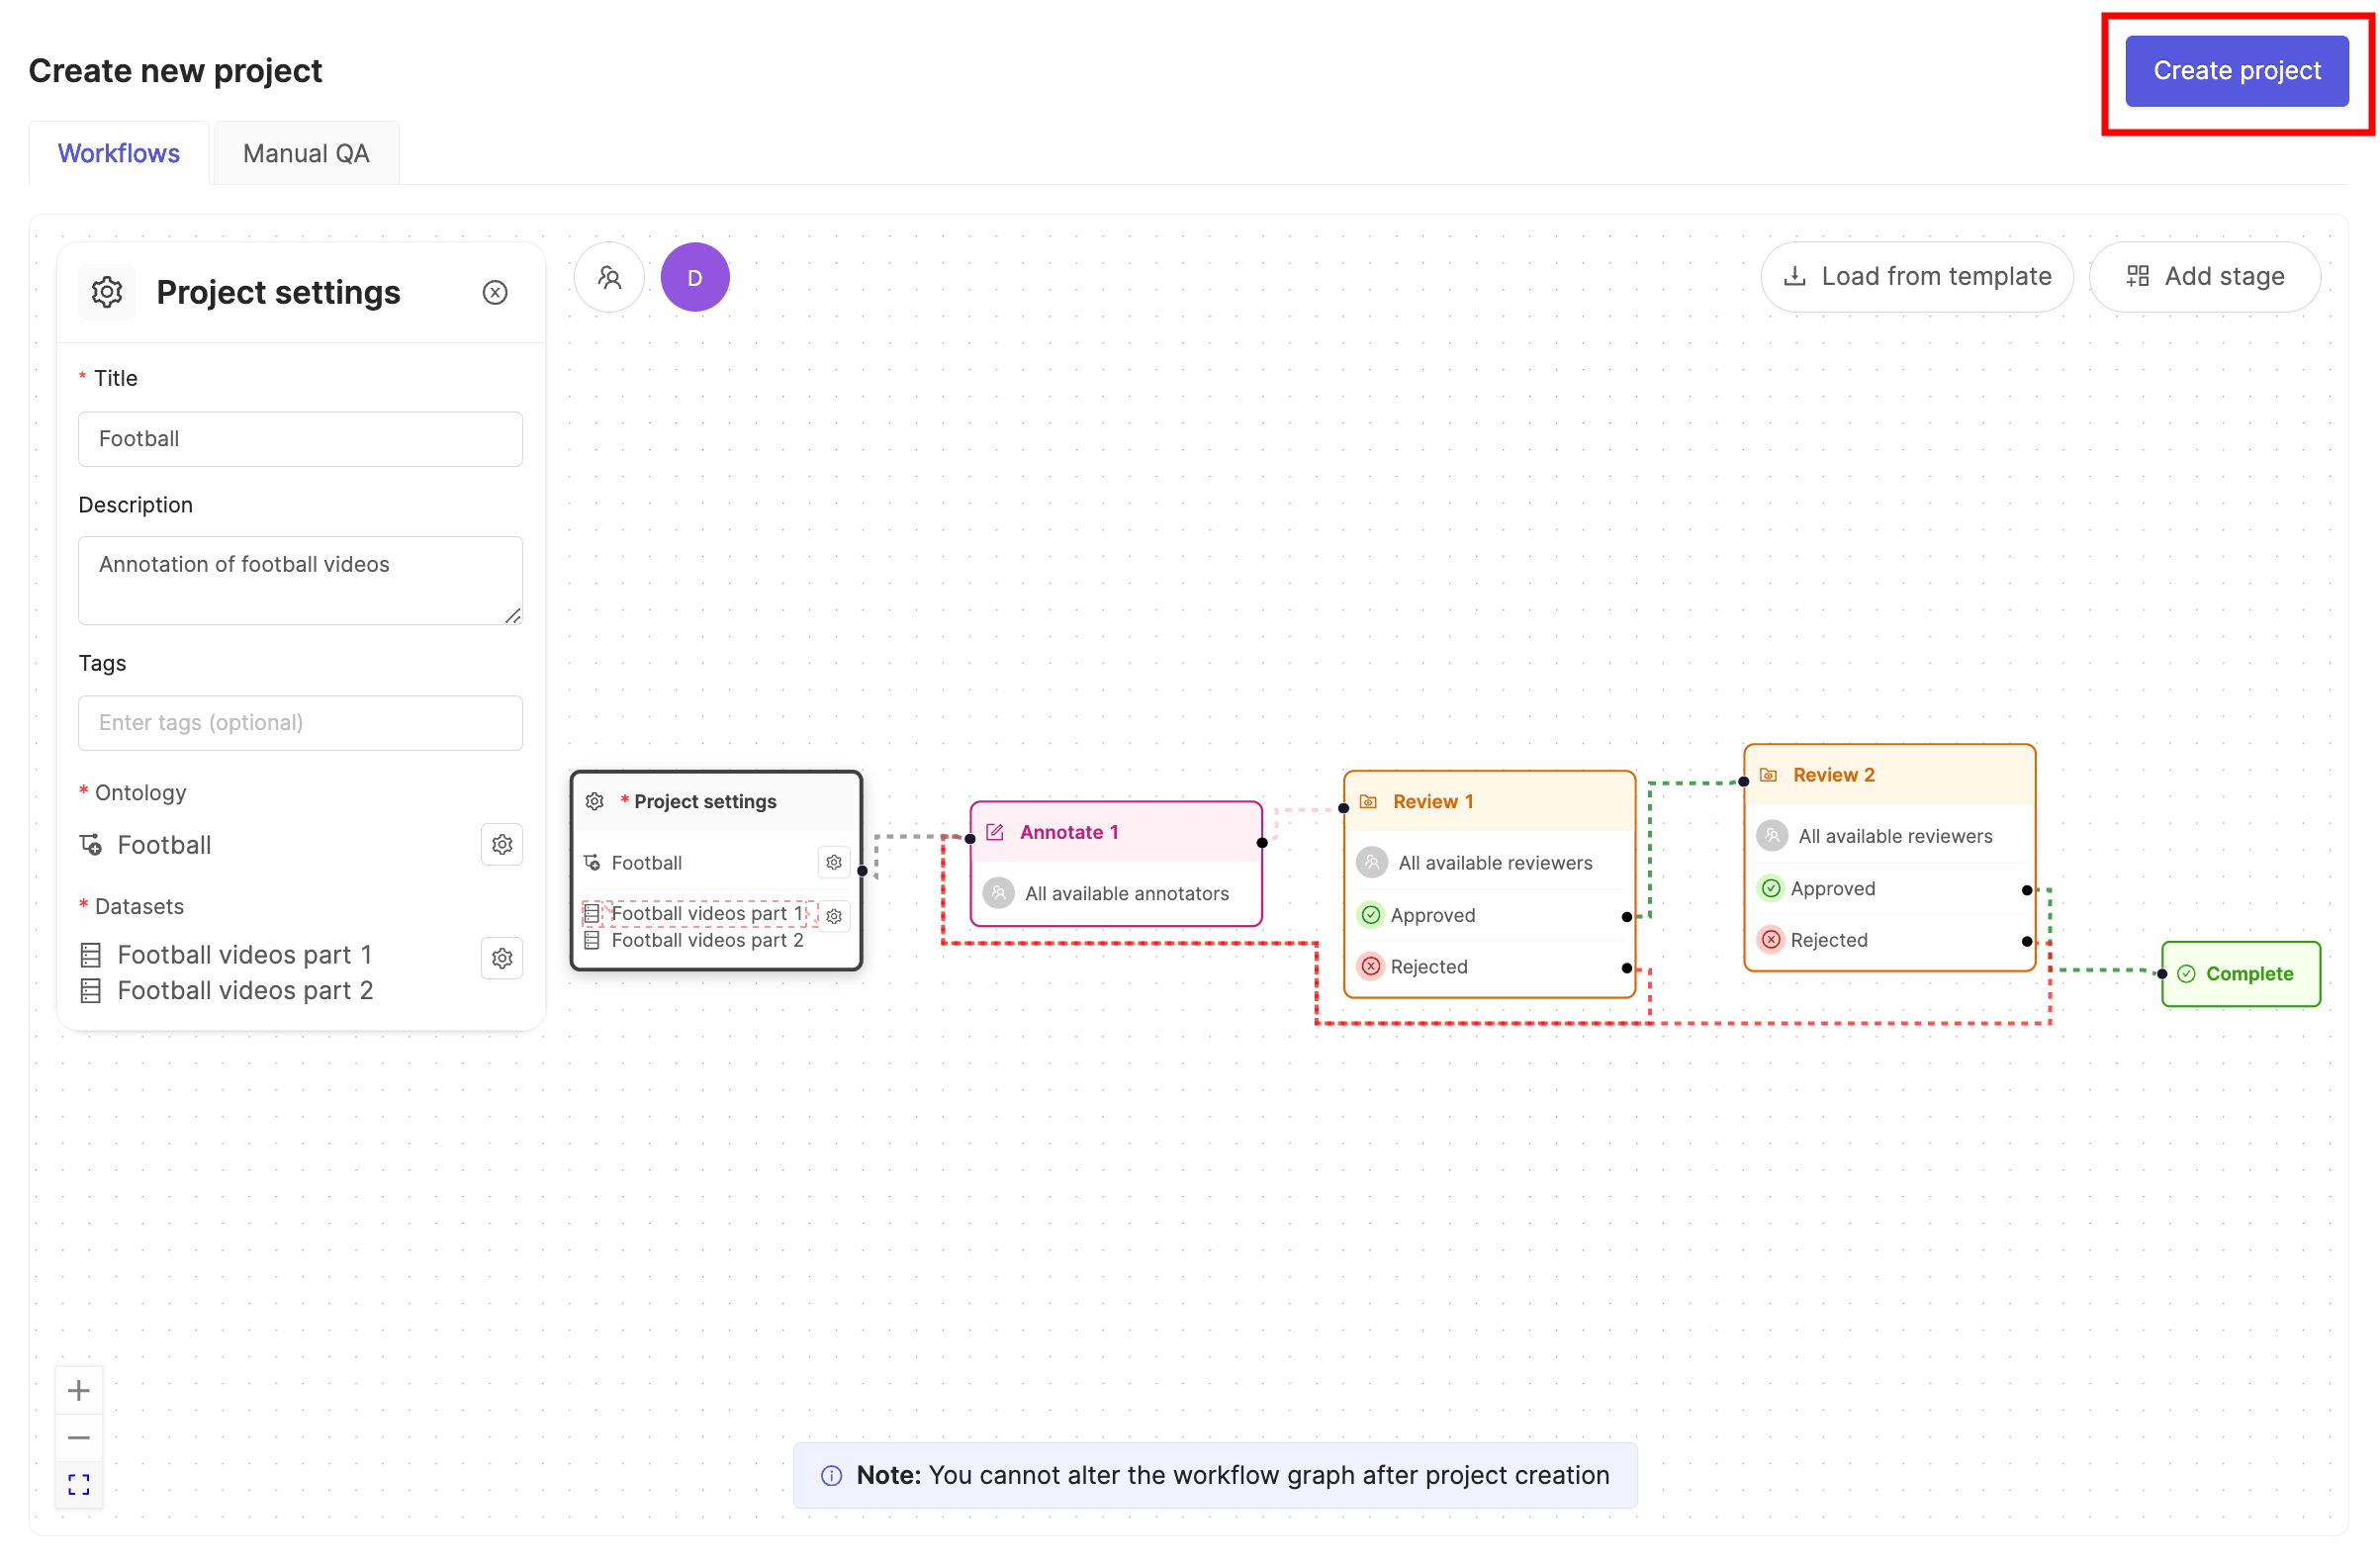
10. Ensure the default Workflow shown suits your needs.
11. Click **Create project** to finish creating the Project.
***
## STEP 7: Import Custom Layout
After creating your Project, import a custom layout for the Label Editor. Start by creating a JSON file that determines the layout.
### Create a JSON for the Layout
```json Side by Side Layout theme={"dark"}
{
"grid": [
[0], [1]
],
"gridContent": {
"0": {
"client_metadata_query": {
"or_conditions": [
{
"key": "encord-editor-grid-position",
"operator": "=",
"value": "A"
},
{
"key": "encord-editor-grid-position",
"operator": "=",
"value": "B"
}
]
}
},
"1": {
"client_metadata_query": {
"or_conditions": [
{
"key": "encord-editor-grid-position",
"operator": "=",
"value": "A"
},
{
"key": "encord-editor-grid-position",
"operator": "=",
"value": "B"
}
]
}
}
},
"topLevelGridFilter": {
"client_metadata": {
"key": "encord-layout-group",
"operator": "="
}
},
"$schema": "https://raw.githubusercontent.com/encord-team/Annotate/main/editor-layouts/editor_layout_schema.json"
}
```
```json Stacked Layout theme={"dark"}
{
"grid": [
[0, 1]
],
"gridContent": {
"0": {
"client_metadata_query": {
"or_conditions": [
{
"key": "encord-editor-grid-position",
"operator": "=",
"value": "A"
},
{
"key": "encord-editor-grid-position",
"operator": "=",
"value": "B"
}
]
}
},
"1": {
"client_metadata_query": {
"or_conditions": [
{
"key": "encord-editor-grid-position",
"operator": "=",
"value": "A"
},
{
"key": "encord-editor-grid-position",
"operator": "=",
"value": "B"
}
]
}
}
},
"topLevelGridFilter": {
"client_metadata": {
"key": "encord-layout-group",
"operator": "="
}
},
"$schema": "https://raw.githubusercontent.com/encord-team/Annotate/main/editor-layouts/editor_layout_schema.json"
}
```
### Import the JSON
1. Navigate to the Project settings.
2. Click on **Editor Layouts**.
3. Click **Upload JSON**.
4. Select the JSON file containing the layout you want the Label Editor to have.
***
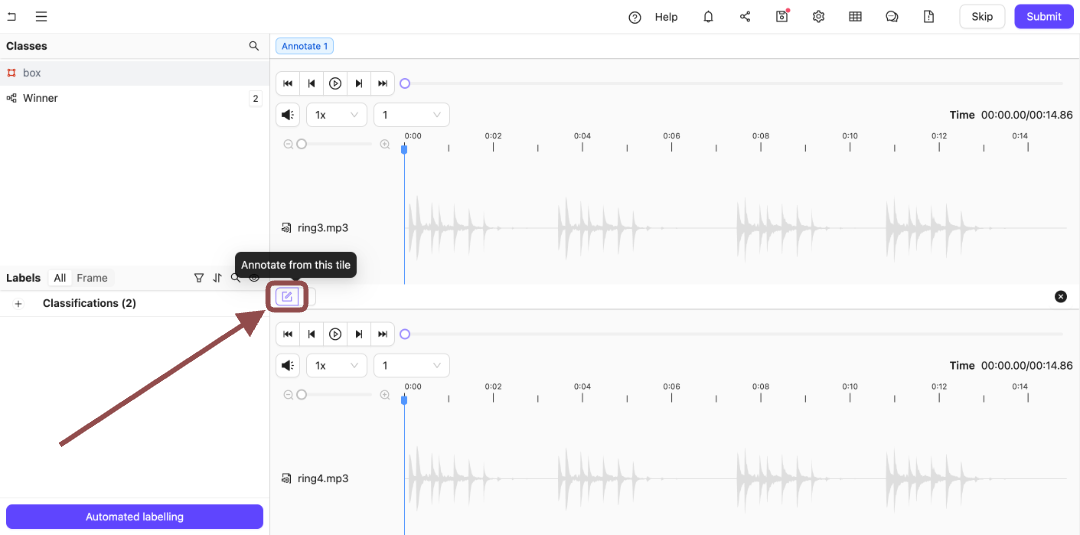
## STEP 8: Label and Submit Audio Data
More than a single file appears in the Label Editor. Switch back and forth between the files you are labeling or reviewing using the **Annotate from this tile** icon.
### Label Audio Files
Label audio files using the Classification specified from your Ontology.
**To label audio files:**
We recommend using hotkeys to speed up and streamline your labeling process. For this example, the Classification hot keys are `2` and `Q`, but for you they might be different.
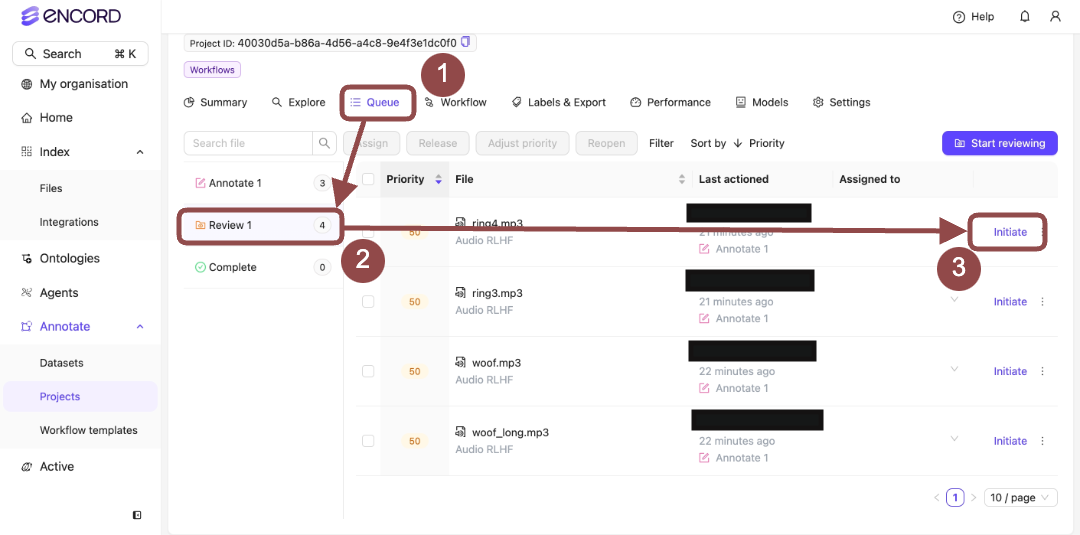
1. Go to **Project > \[Your Project Title] > Queue > Annotate**.
The *Project Annotate Queue* appears with a list of audio files for labeling.

2. Click **Initiate** next to a file from the Project Queue.
Two audio files appear in the Label Editor.
3. Press `2` to select the *Winner* Classification.
The options for the Classification appear.
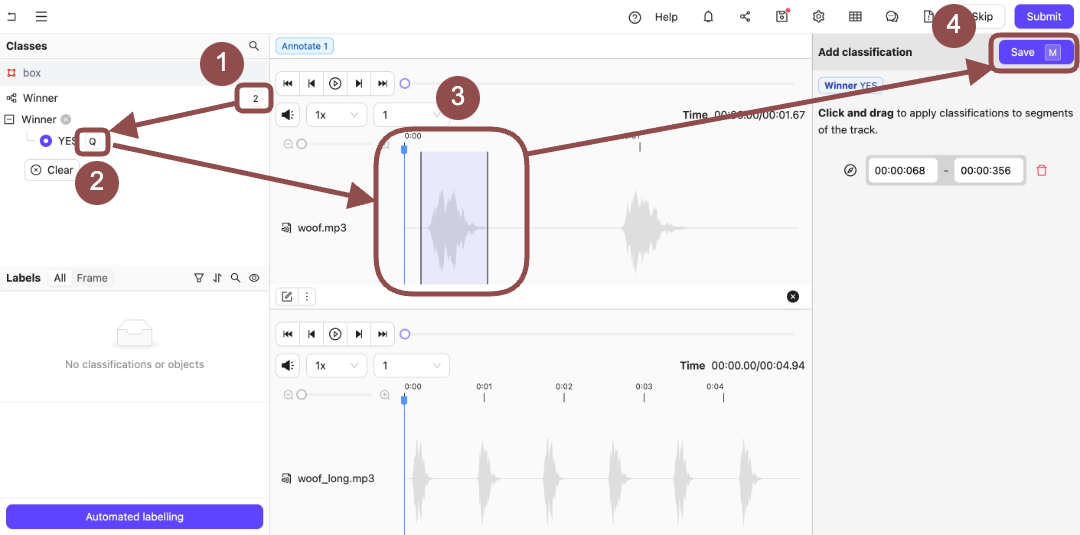
4. Press `Q` to select *Yes*.
5. Click and then drag the sections of the audio file that appears at the top of the Label Editor.
6. Press `N` to save the Classifications on the audio file.
7. Click the **Annotate from this tile** icon to switch to annotating the bottom audio file.
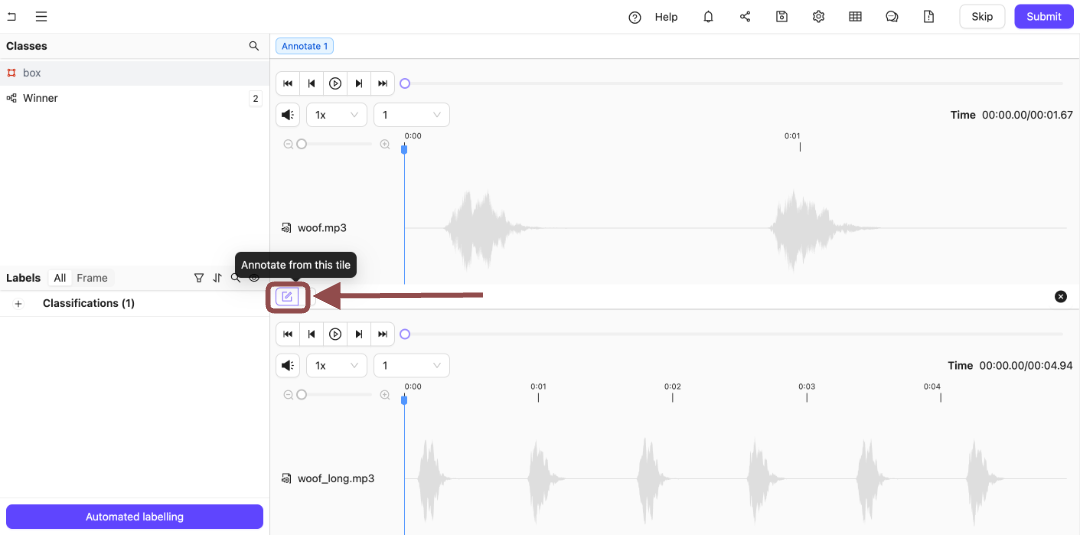
8. Press `Q` to select *Yes*.
9. Click and then drag the sections of the audio file that appears at the top of the Label Editor.
10. Press `N` to save the Classifications on the audio file.
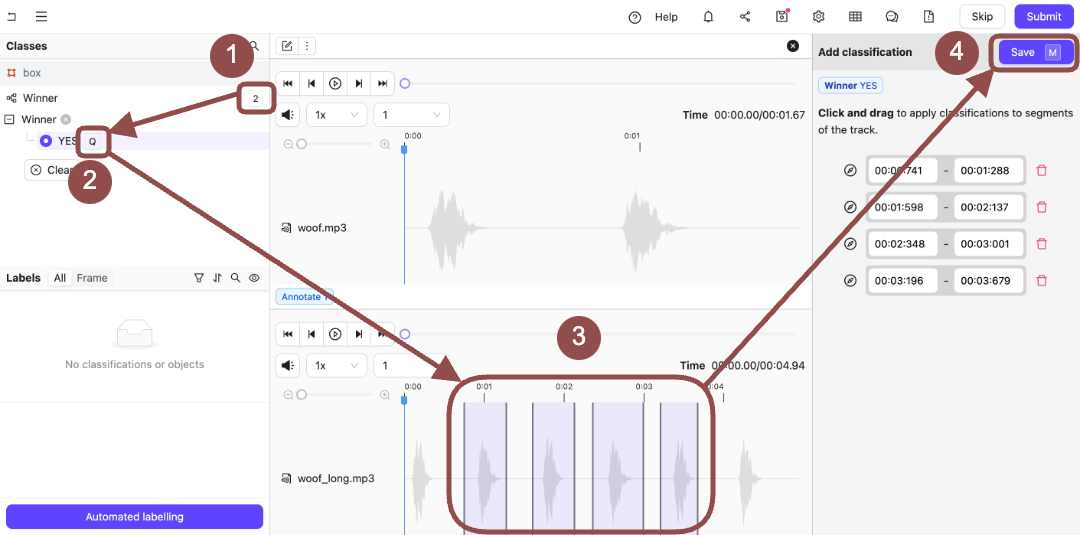
10. Click **Submit**.
The next set of audio files for annotation appears.
***
## STEP 9: Review Audio Data
Approving tasks moves the tasks to the next stage in a workflow. In this example, that is *Complete*.
Rejecting tasks sends the tasks back to the first stage in a workflow. In this example, that is *Annotate*.
### Approve
**To approve labels on audio files:**
1. Go to **Project > \[Your Project Title] > Queue > Review**.
The *Project Review Queue* appears with a list of audio files for labeling.
2. Click **Initiate** next to a file from the Project Queue.
Two audio files appear in the Label Editor.
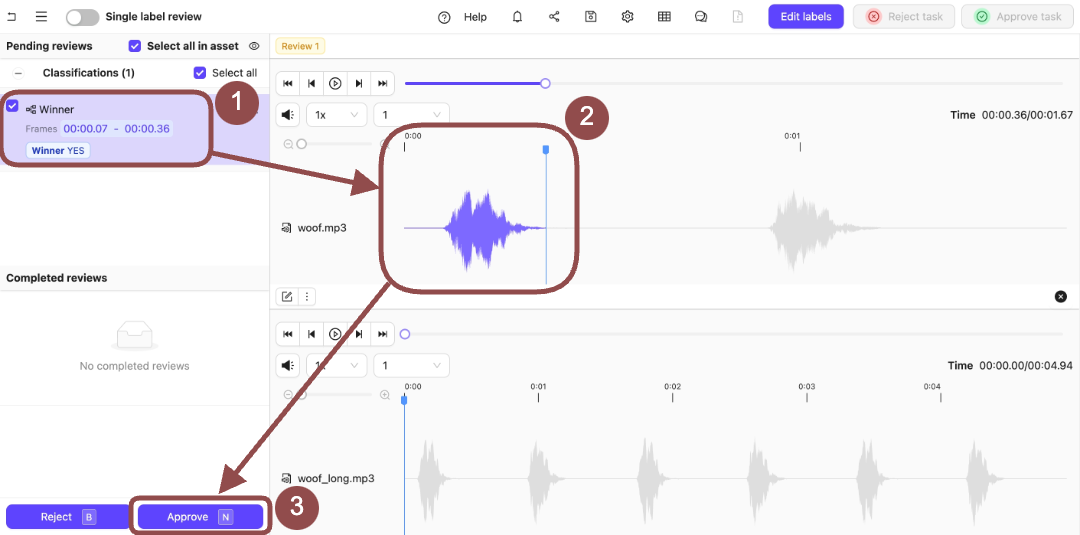
3. Expand the *Winner* Classification.
The options for the Classification appear.
4. Select the Classifications applied to the audio file.
5. Press `N` to approve the Classifications on the audio file.
6. Press the **Review from this file** icon.
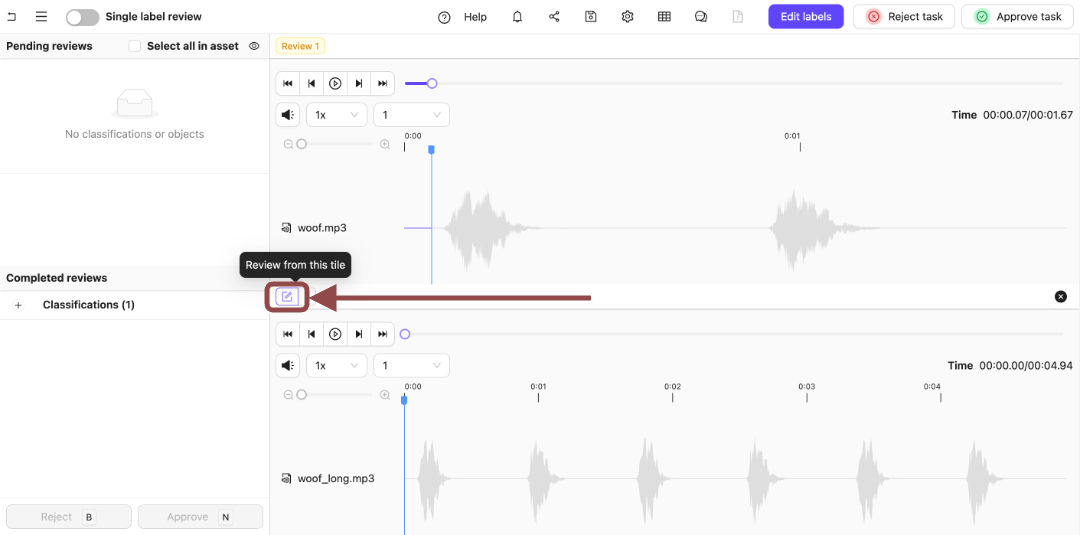.
7. Expand the *Winner* Classification.
The options for the Classification appear.
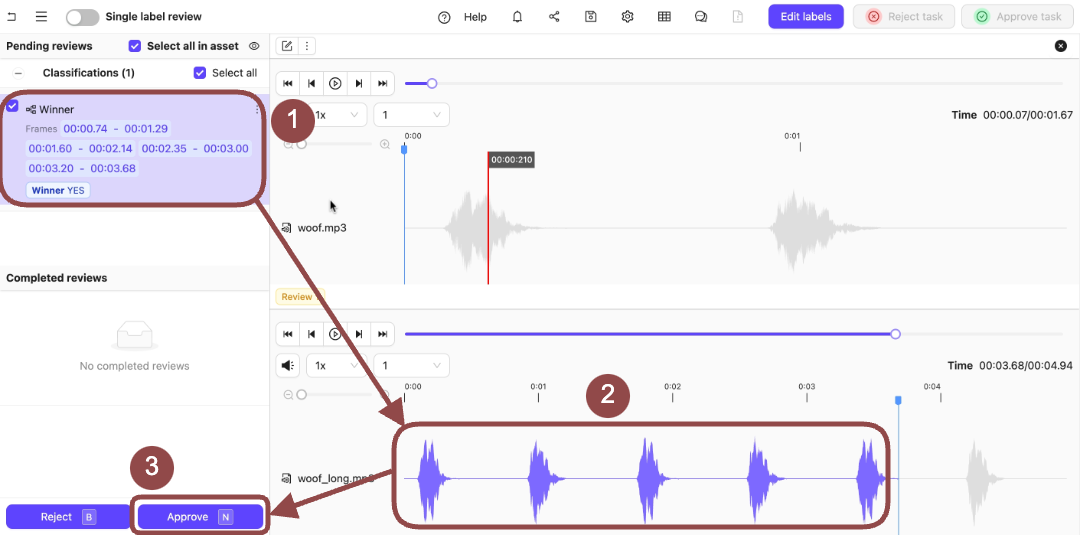.
8. Select the Classifications applied to the audio file.
9. Press `N` to approve the Classifications on the audio file.
10. Click **Approve task** to move the task to the next stage.
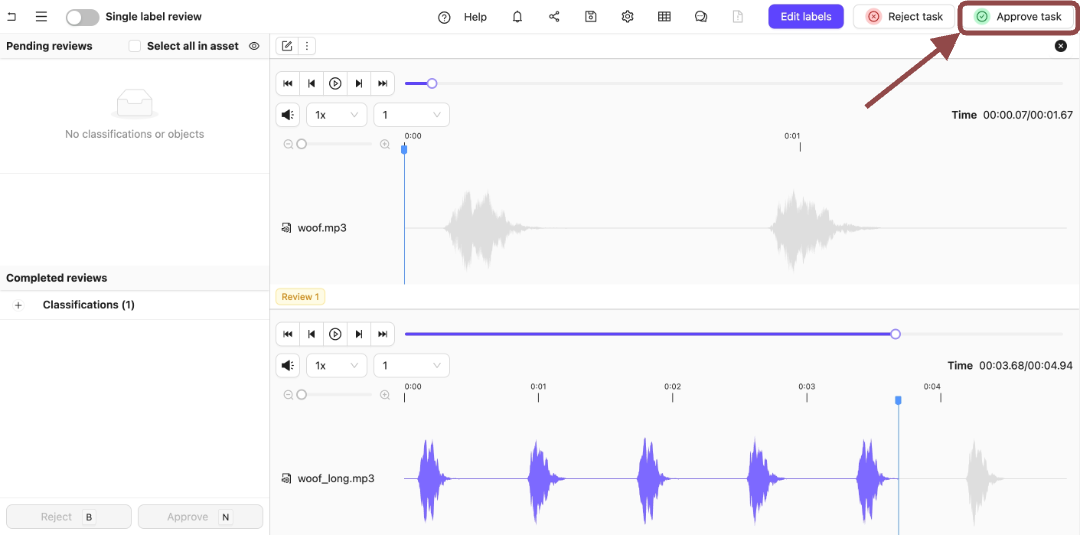.
In this example, that is the **Complete** stage.
.
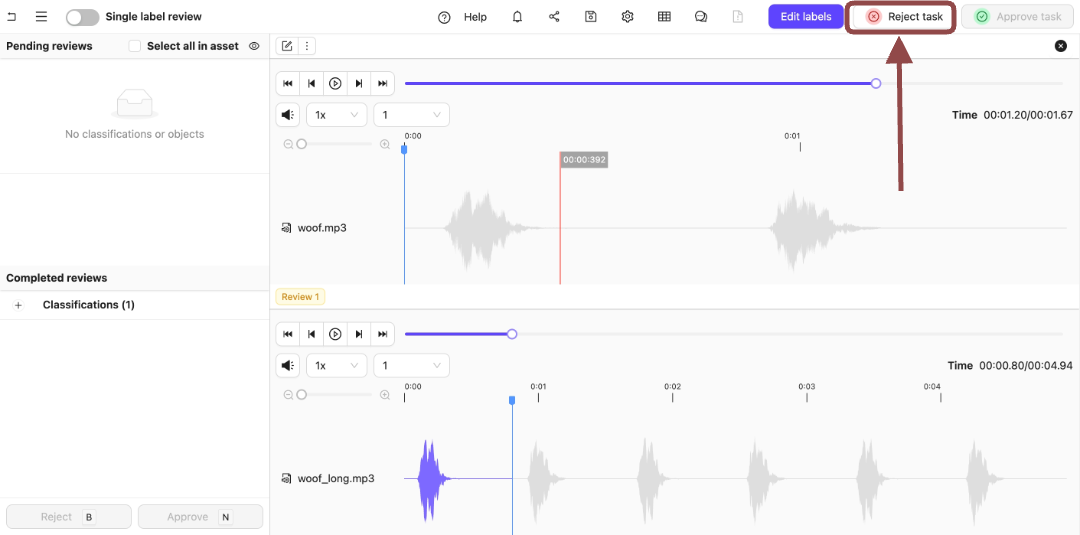
### Reject
**To reject labels on audio files:**
1. Go to **Project > \[Your Project Title] > Queue > Review**.
The *Project Review Queue* appears with a list of audio files for labeling.

2. Click **Initiate** next to a file from the Project Queue.
Two audio files appear in the Label Editor.
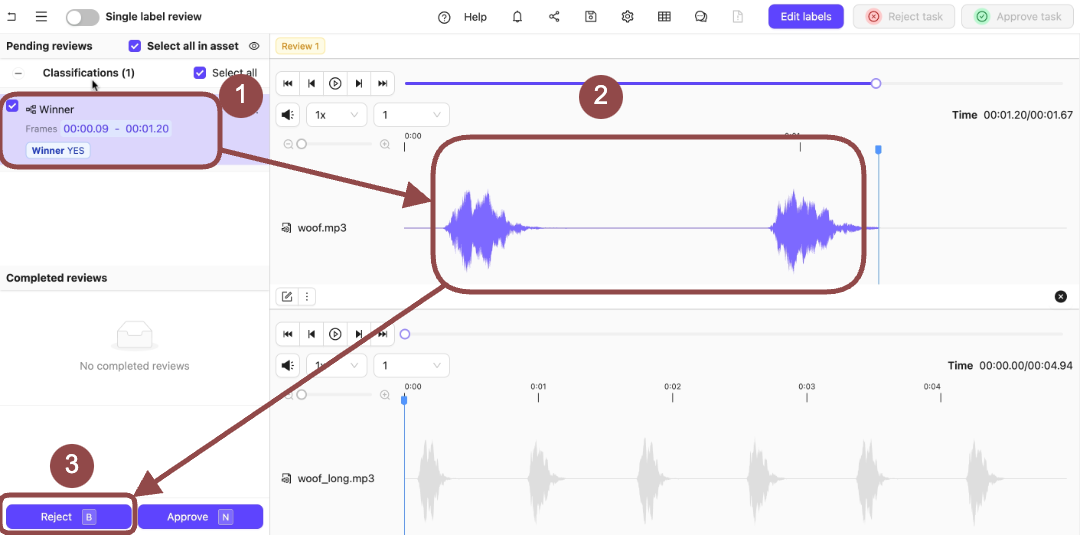
3. Expand the *Winner* Classification.
The options for the Classification appear.
4. Select the Classifications applied to the audio file.
5. Press `B` to reject the Classifications on the audio file.
A dialog appears.
6. Provide a reason for rejecting the Classification.
7. Press the **Review from this file** icon.
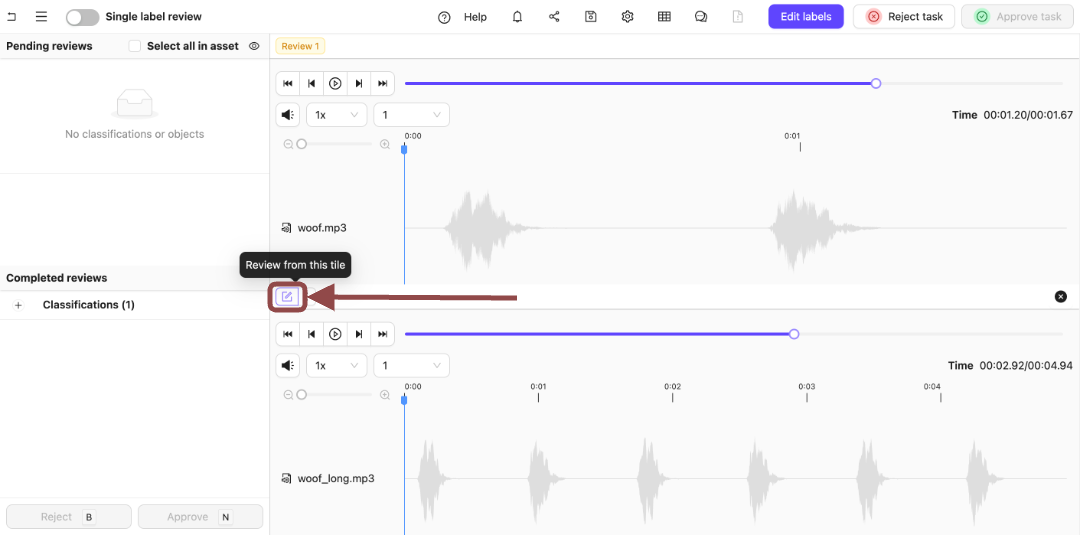.
8. Expand the *Winner* Classification.
The options for the Classification appear.
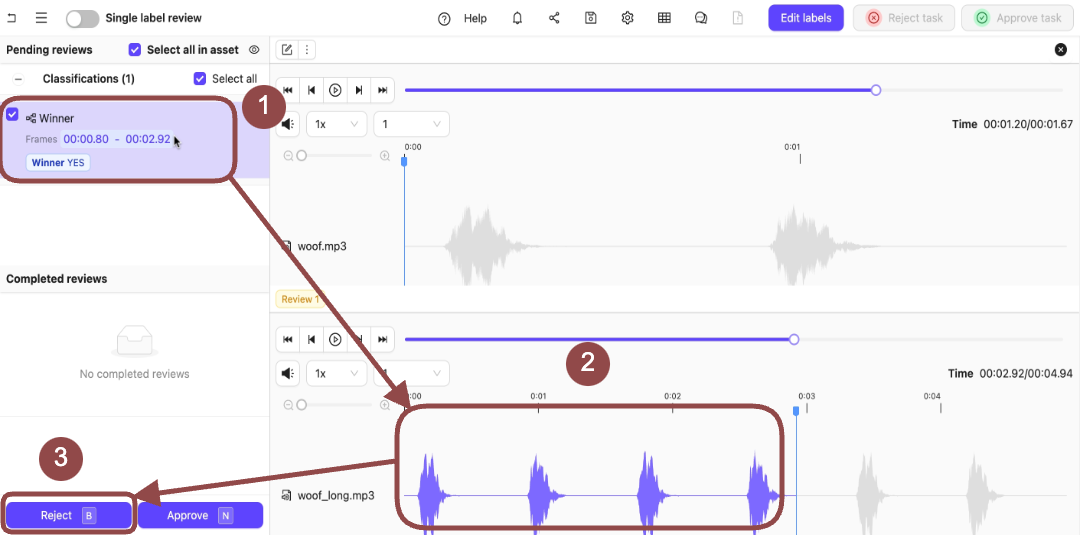.
9. Select the Classifications applied to the audio file.
10. Press `B` to reject the Classifications on the audio file.
11. Click **Reject task** to reject the tasks.
.
Both tasks then appear in the **Annotate** stage.
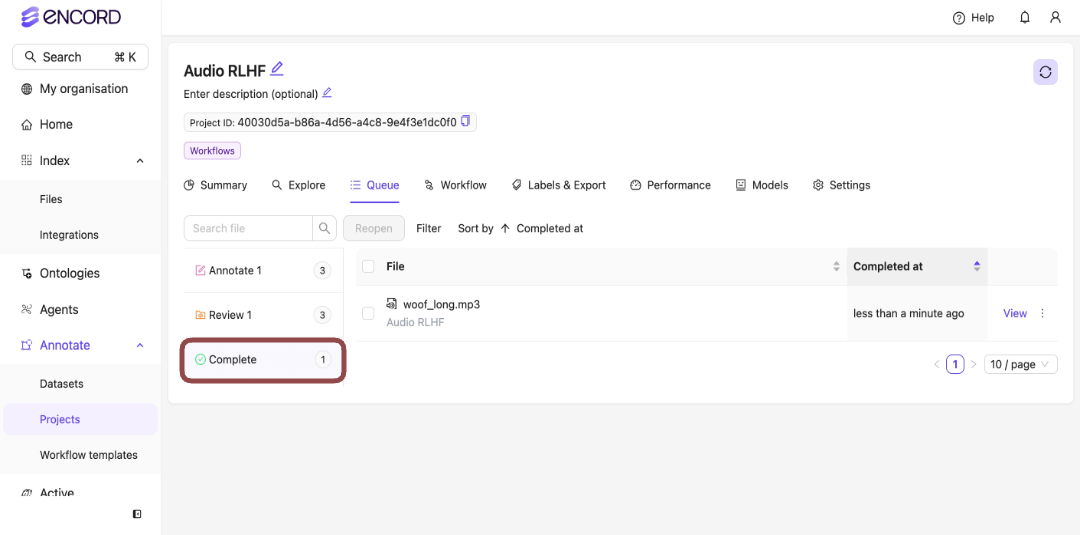
### Complete
Files in the *Complete* stage can be reopened.
.