> ## Documentation Index
> Fetch the complete documentation index at: https://docs.encord.com/llms.txt
> Use this file to discover all available pages before exploring further.
# User and Resource Management
All steps in this guide must be performed by Workspace Admins.
## Part 1: User Management
### Invite Users to your Workspace
1. Click **Settings** in the **My workspace** section.
The Workspace settings page appears with the *Users* tab selected.
2. Click the **+ Invite users** button.
A dialog appears
3. Type the email addresses of the users you want to invite.
4. Press ENTER.
5. Select the role you want the users to have.
6. Click **Add** to invite the users to your Workspace.
Users accept invitations by clicking the email link. The link redirects users to the Encord login page, regardless of whether the user has an existing Encord account.
### Remove Users and Revoke Invitations
1. Click **Settings** in the **My workspace** section.
The Workspace settings page appears with the *Users* tab selected.
2. Search for the user you want to remove from your Workspace.
3. Click **User details**
4. Click **Remove user**.
If the user being removed is the sole Admin for any Projects or Datasets within the Workspace, you are prompted to select a replacement user from within your Workspace.
Admins cannot be removed from a Workspace. To remove an Admin from your Workspace, contact [support@encord.com](mailto:support@encord.com).
### Invite Status
The user's status shows the status of the invitation to your Workspace. Users can have the following status:
* **Invited**: Shows the date the user was invited to your Workspace. The invitation is pending.
* **Declined**: Shows the date the user declined the invitation to join your Workspace.
* **Joined**: Shows the date the user joined your Workspace.
### Change User roles
1. Click **Settings** in the **My workspace** section.
The Workspace settings page appears with the *Users* tab selected.
2. Search for the user you want to change the user role for.
3. Click the user role dropdown of the user.
4. Select the role you want the user to have.
**To change a user's role for a resource**:
1. Click **Settings** in the **My workspace** section.
The Workspace settings page appears with the *Users* tab selected.
2. Click **User details** in the **Action** column for the user.
3. Click the user's current role in the Role column, then select the new role you want to assign for the resource.
Click **Change role** from the **Bulk actions** dropdown to change a user's role in multiple Projects at once.
## Part 2: User Assignment
The ability to add users to the following resources is coming soon.
* Datasets
* Ontologies
* Cloud Integrations
* Workflow templates
* Folders
### Assign One User to Multiple Projects
Users can be assigned to various resources even before the users accepts their invitation to join your Workspace.
1. Click **Settings** in the **My workspace** section.
The Workspace settings page appears with the *Users* tab selected.
2. Click **User details** in the **Action** column for the user you want to assign.
3. Select the resource you want to assign a user to by clicking the relevant tab.
4. Click the **Assign to** button. Different resources have different resource names on the button.
5. Select all the resources you want to assign the user to from the list. Use the search bar to search for a specific resource if necessary.
6. Click **Select a role**.
7. Select a role for the user. The role is assigned for all selected resources.
8. Click **Assign to annotation projects** to assign the user to your selected Projects.
**To remove users from resources**:
1. Click **Settings** in the **My workspace** section.
The Workspace settings page appears with the *Users* tab selected.
2. Click **User details** in the **Action** column for the user you want to remove.
3. Select the resource you want to remove the user from by clicking the relevant tab.
4. Click the red icon in the **Remove** column of the resource you want to remove the user from.
Select **Remove user** from the **Bulk actions** dropdown to remove users from multiple Projects at once.
### Assign Multiple Users to One Project
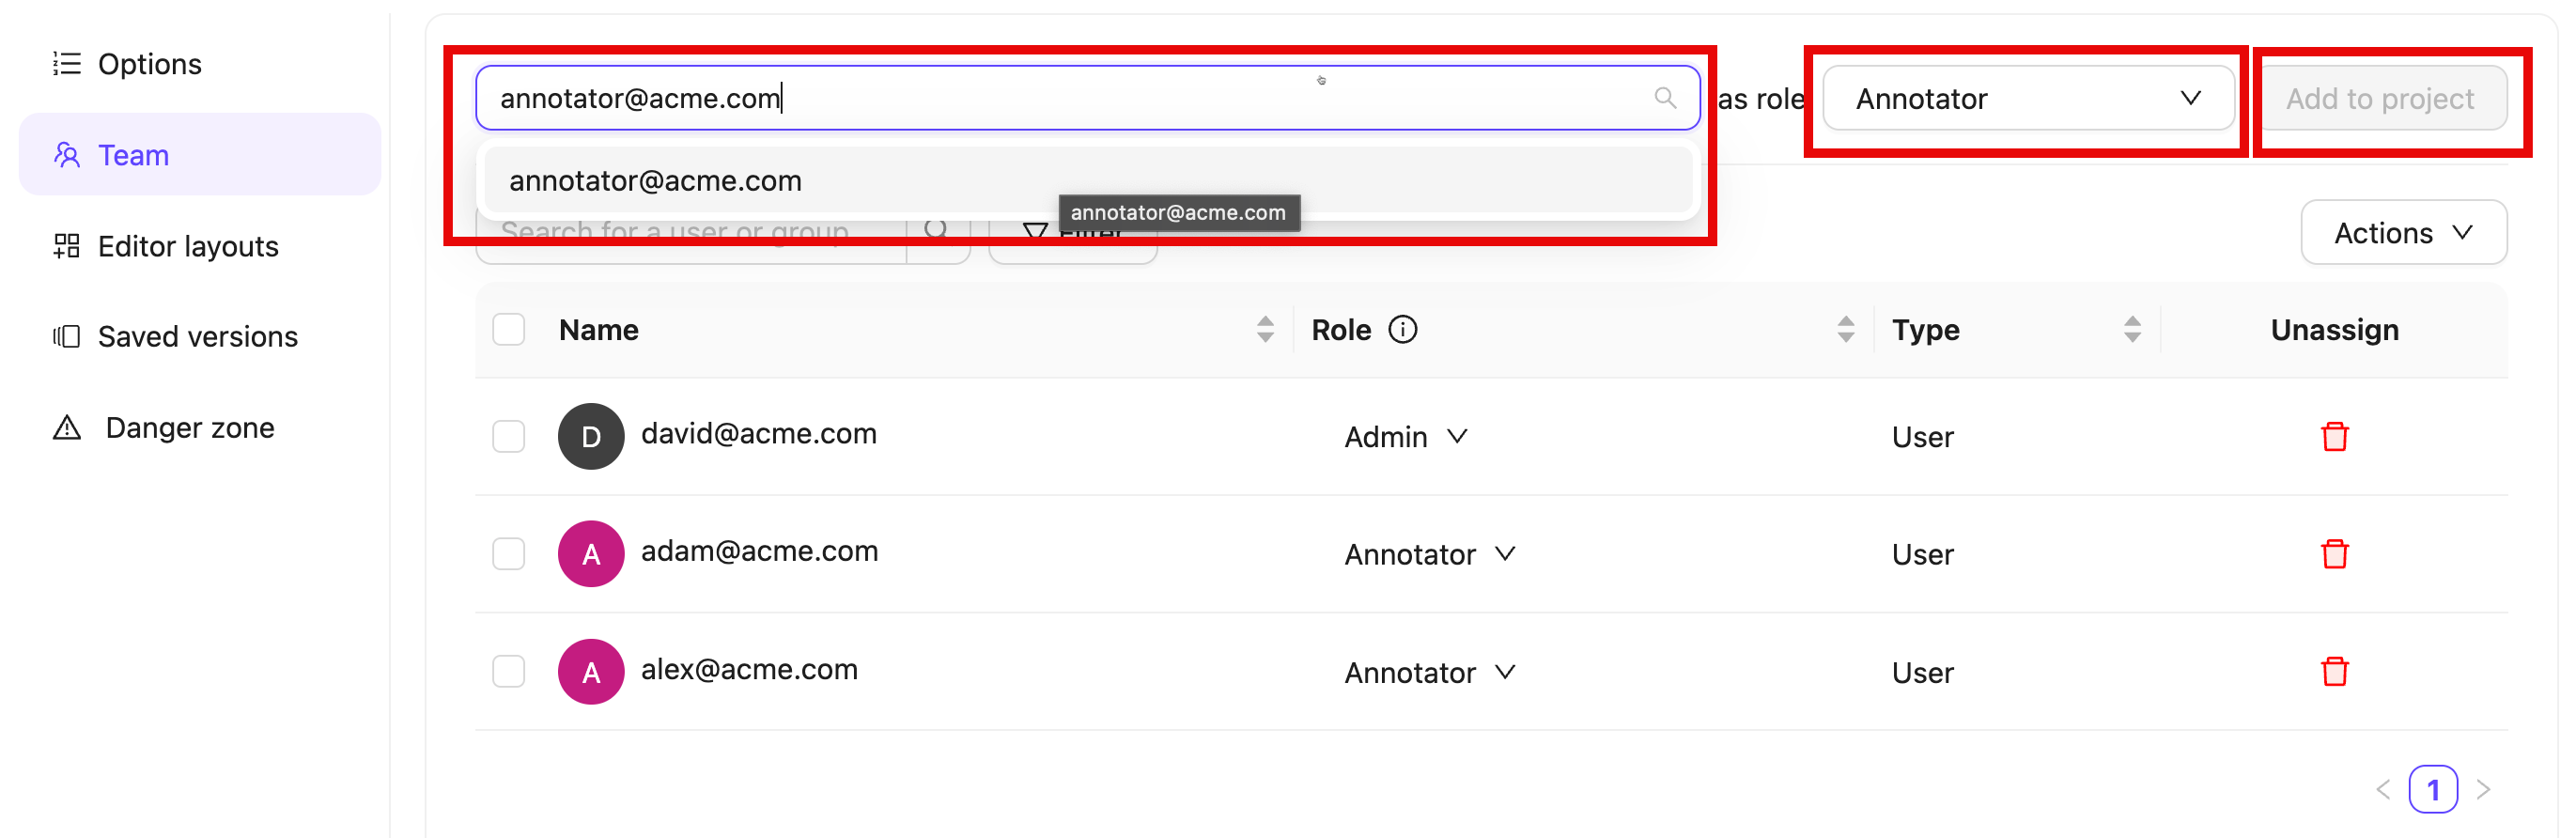
To manage Project collaborators, select the *Team* pane in your project *Settings*. Collaborators can be added individually or as [groups of users](/platform-documentation/General/general-workspace-settings#user-groups).
**To add collaborators to a Project**:
1. Search for the collaborator or the [group](/platform-documentation/General/general-workspace-settings#user-groups) you want to add. Multiple collaborators and groups can be added at once.
You can invite users who are not part of your Workspace. Invitations to join the Workspace are sent to them, and once accepted, they become Project collaborators. See instructions on how to do this [here](/platform-documentation/General/general-workspace-settings#accepting-invites).
Only group members are added when a group is assigned to a Project. Group managers are not included.
2. Select a user role.
* **Annotator**: Can access and label tasks in all or selected Annotate stages in the Project.
* **Reviewer**: Can access and review tasks in all or selected Review stages in the Project.
* **Annotator & Reviewer**: Performs both annotation and review tasks.
* **Team Manager**: Can access and label tasks in all stages in the Project. Can move, assigns, prioritize tasks to users. Can manage Project collaborators.
* **Admin**: Grants full administrative control over the Project.
3. Click **Add to project**.
To remove a user or group from the Project click the *Delete* icon in the *Unassign* column.
**Import collaborators using a CSV**:
1. Click **Actions**.
2. Select **Import collaborators**.
3. Add the CSV file containing users and their roles.
4. Click **Submit**.
CSV files must be formatted in the following manner:
```csv theme={"dark"}
Email,Role,Group
david@acme.com,Admin,
adam@acme.com,Annotator,
joe@acme.com,Annotator,
```
### Change User Access
A user's access to various resources can easily be modified.
1. Click **Settings** in the **My workspace** section.
The Workspace settings page appears with the *Users* tab selected.
2. Click **User details** in the **Action** column for the user.
3. Click the user's current role in the Role column, then select the new role you want to assign for the resource.
Click **Change role** from the **Bulk actions** dropdown to change a user's role in multiple Projects at once.